Deponia: The Complete Journey

Deponia: The Complete Journey

54 ratings
Collecting Agent / Pin-Up Goal SPEED guide
By mishalunchbox
On your first play-through, you missed one or both of those long collecting achievements; now you want to go back for them, but don't want to have to work through all the puzzles again... This guide leads you quickly to all the items you missed, circumventing all that time-consuming "entertainment."
2
   
Award
Favorite
Favorited
Unfavorite
Introduction
This guide was written specifically for people who have already played through the 2nd game of "The Complete Journey" and now need to go back for the Collecting Agent and/or Pin-up Goal achievement(s). Players of the standalone "Chaos on Deponia" should be able to use this guide as well, as long as they can get past the fact that i won't be explaining why the Chapters start at IV (it's a "Complete Journey" thing... i think).

The steps here are presented in short and sweet form so you can zip straight through without having to try to remember everything you need to do to reach the items; it's less a "walkthrough" than a "sprint-through" (all rights reserved on that word i just made up*). It's designed to be followed from start to finish, so if any step doesn't make sense or doesn't work for you, that probably means you missed something, and you'll have to figure out for yourself what that something was.

* (in 2017)

If you're ONLY after Collecting Agent, you can start at the beginning of Chapter V; if you want Pin-Up Goal (and/or if you intend to try for Animal Lover on this run), you need to start a new game at Chapter IV.

If you're looking for help with anything other than Collecting Agent or Pin-Up Goal, you're better off consulting another guide. Might i suggest this one?
http://steamoss.com/sharedfiles/filedetails/?id=885382370
what's a "sprint-through"?
I am SO glad you asked. When i write a walkthrough, i include hints and context, i group my instructions by quest, and i try to only put one instruction per step.

Conversely, in a sprint-through:
  • instructions are VERY terse and assume you already know your way around
  • multiple instructions may be included within one step
  • there are NO HINTS given
  • there is practically NO CONTEXT given
  • there are NO spoiler tags
  • steps MUST be done IN THE ORDER LISTED to avoid confusion
  • if you miss an instruction, i do NOT help you try to figure out which one
  • instructions are grouped by LOCATION (rather than by quest) to minimize walking around
  • emphasis is on SPEED rather than enjoyment or puzzle solving!!!
...i just realized that sounds A LOT like some of the guides out there that were so dismally unhelpful that i felt compelled to spend hundreds of hours of my life writing three full walkthroughs (one of which is linked below). Ah well. Hopefully my unhelpful mini-guide is less unhelpful than theirs. Fingers crossed!

This sprint-through was designed for people who...
  • ...have already played through the game
  • ...need to go back to earn one or both of the long, drawn-out missable achievements
  • ...are in a hurry
If any of this sounds unappealing to you, please take a look at my full walkthrough:
http://steamoss.com/sharedfiles/filedetails/?id=885382370
what's "Collecting Agent"?
To earn this achievement, you must amass 26 items in your inventory (easier summarized than done).

If you haven't yet completed at least one playthrough of the game, i recommend you only use this guide for the list of items provided in the next section; the "sprint-through" instructions here are designed specifically to suck all the fun out of the game so you can get through it more quickly.

My full walkthrough has notes about what you should and should not do if you hope to earn this achievement; so if you have your heart set on get Collecting Agent on your first playthrough and you find the list too hard to use, that other guide may better suit your needs.

If i were you, though, i would just enjoy the game your first time through, then come back for this achievement later. The guide'll still be here.
Collecting Agent item summary
All 26 items, as described in this guide:


  • #1: Bait
  • #2: Crank
  • #3: Screwdriver
  • #5: Antenna
  • #6: Sugar Dispenser
  • #4: Remote including Cartridges
  • #7: Razorfish
  • #8: "Dead Pigeon Tango" (or other sheet music)
  • #9: Expired Pills
  • #10: The Golden Dragon of Invisibility
  • #11: Left Frame
  • #12: Sunglasses Lens
  • #13: Right Frame
  • #14: Hand-Held Vacuum Cleaner
  • #15: Candle
  • #16: Water
  • #17: Urn
  • #18: Coal
  • #19: Thread
  • #20: Bread
  • #21: Hook
  • #22: Bucket
  • #23: Field Guide
  • #24: Spade
  • #25: Earth Platypus Egg
  • #26: Water Platypus Egg

Alternate items:
  • Flying Platypus Egg instead of Crank (#2)
  • Bucket with Soil instead of Bucket (#22)
  • Lit Candle instead of Candle (#15)
  • Lint instead of Urn (#17)


If you're playing the standalone "Chaos on Deponia"...
...you might not be able to pick up the 26th item. In that case you may need to first clear space in your inventory, pick up the item, then refill that cleared space in a backhanded manner. I know of two techniques for doing this:
  1. the Sunglasses method:
    • combine Sunglasses Lens with Left or Right Frame
    • pick up 26th item
    • use Screwdriver to dismantle Frame with Lens back into 2 pieces (thereby forcing one piece into the 26th slot)
  2. the Golden Dragon method:
    • remove Golden Dragon of Invisibility from inventory by clicking or right-clicking it
    • pick up 26th item
    • enter Gadget Shop; Golden Dragon is automatically recovered, forcing it into 26th inventory slot
If you're still having trouble, please refer to this other guide written 'specially for players of the standalone version.
what's "Pin-Up Goal"?
To earn this achievement, you must collect the pieces of this jigsaw puzzle:

Your puzzle -- in whatever state of completion it may be -- can be viewed by going to the Main Menu, then clicking "Bonus" > "Puzzle." By the way, the Puzzle is completed in random order, so unfortunately you can only learn from it how many pieces you already have, not which ones.

You must collect all 12 puzzle pieces in one continuous timeline (starting at Chapter IV), without ever clicking any piece more than once. The latter means both that you can't double-click any of them, AND that you musn't create any "overlaps" when loading up save files. That is to say that if loading a save file requires you to re-collect a puzzle piece you've already clicked -- like because you picked it up it after saving your game, and it reappeared when you loaded the file -- then you've failed (see flow chart).

As an example of what a "continuous timeline" is NOT, let's say you made it to the beginning of Chapter VI before deciding to work on this achievement; if you were to collect all the pieces in VI and then go back to a save file from Chapter V to pick up the rest, it would NOT work.

If you're doing well in your pursuit of this achievement, you'll hear a musical sound each time you collect a piece. If you don't hear the musical sound when you click an item, you've probably already failed. Check your Bonus Puzzle screen for an obvious sign you're in trouble:


"Oh noes, I failed :'-( Now what?"
The first thing you should do is consider putting the work you've done so far towards Pin-Up Goal's sister achievement, Cheater (i hid that so search engines wouldn't bring people here thinking this guide was going to help them with it). If you want to learn about "that other achievement," please visit "my other walkthrough." :)

Before having another go at Pin-Up Goal, you need to start a new game from the beginning of the installment (Chapter IV). The first time i went after this achievement, i tried jumping directly to Chapter V from the world map after starting a new game. The chimes were going off with each click as if everything were okay, but then the final two items didn't make sounds and didn't register. I ended up having to start over AGAIN from Chapter IV.

If you fail Pin-Up Goal and are NOT playing "The Complete Journey," you may need to refer to a guide specifically written for the standalone "Chaos on Deponia" about these achievements; apparently there's some kind of bug in that game that makes failure permanent or some crazy thing.

"So... where are the pieces?"
To encourage the use of caution, i put the puzzle piece locations & screenshots down near the end of the guide, at the points at which i recommend you collect them (the end of Chapter V and the beginning of Chapter VI).

It's in your best interest to wait until you're almost done with Chapter V before clicking any puzzle pieces, especially if you're working on Collecting Agent. It's really easy to mess up and fail Pin-Up Goal by making a tiny mistake with your save files, so waiting until most of the legwork is done before you start clicking the pieces is a good way to avoid having to worry about that.

If you were to -- for example -- accidentally use a Collecting Agent item, then click a puzzle piece after that, your ONLY recourse to earn both achievements at that point would be to start over (because loading up the save file from before you clicked the puzzle piece would negate Pin-Up, but continuing without the lost inventory item would negate Collecting Agent).
what's "optional (missable achievement)"?
I threw in a handful of missable achievements beyond the two big ones... mostly just the ones that could be described in one sentence fragment or less. If you need additional info about any of these mini-missables, please search for its name in my full walkthrough.

Mentioned* in this guide:
  • Animal Lover (you must play Chapter VI beyond the end of this guide to earn this one)
  • Supercool
  • Blow job
  • Endurance Test
  • Bloody Nose
  • With Love from Porta Fisco
  • T-415411293
  • Animal Husbandry
  • Pre-Paradox
* I say "mentioned" not only because my instructions are so brief, but also because the first two on the list require multiple steps, and some of those steps -- the non-missable ones and the ones that happen after the guide ends -- are not specified here.
what's "optional (Endurance Test)"?
In the instructions below, i have you kick the Gondolier's Bumper every time you pass through the Harbor; this is just to save you having to exit the Harbor and then come back 10 times in a row (which is what's required for this achievement).

Save your game after the 9th kick (in the section called "9. win Baby Goal"), just in case you counted wrong -- the instruction that immediately follows it (in the section called "10. win Lady Goal") makes your next kick your last.
****** ON WITH THE SPRINT-THROUGH
Estimated completion times: Collecting Agent ~ 15-30 minutes, Pin-up Goal ~ 40-60 minutes
(depending on participation in other missables, use of skip buttons/esc key, attention span, etc.)
CHAPTER IV
If you're working on Pin-Up Goal (and/or Animal Lover), you need to start your game here.

terrorize Grandma Utz
  1. click Toolbox on floor, take Power Inverter and Hammer
  2. click Hammer on Canary, click Hammer under Tablecloth
  3. open Bathroom Door, click Box, put Power Inverter into Box
  4. click Flush Handle in Bathroom, click Flush Button on sink
  5. use Tablecloth on sink, click Button next to sink
  6. take Soaked Tablecloth and use it on Fire

destroy Goal's Escape Pod
  1. click Bellows, then Pan Handle
  2. use Knife on Fireworks
  3. click Pan Handle, then Bellows
  4. optional (missable achievement "Blow Job"): click Badge 5 times
  5. click Eject-button
CHAPTER V
If you're only working on Collecting Agent, you can start your game here. If you want to also do Pin-Up Goal, you need to start at Chapter IV.
1. Bozo's Cutter, Doc's Workshop, Little Venice
items
  • #1: Bait
  • #2: Crank
  • #3: Screwdriver
  • #4: Remote including Cartridges
  • #5: Antenna
steps
  1. aboard Bozo's Cutter, click Trash Can to get Bait
  2. exit Cutter; when Town Map appears, click "Industrial Park"
  3. from Outside Doc's Workshop, click door on right to enter Doc's Replacement Parts Store
  4. get past Clever-Byte:
    • pick up Crank, Electrical Tape, and Stick
    • use Stick on Clever-Byte; pick Stick back up
    • optional (missable achievement "Supercool"): fetch Stick 2 more times
    • use Stick on Lamp
    • use Electrical Tape on Stick
    • use Insulated and Highly Charged Stick on Clever-Byte
  5. go to Doc's Office
  6. after auto conversation with Doc, pick up Screwdriver
  7. go Outside Doc's Workshop; after auto conversation with Liebold & Garlef, right-click Town Map
  8. go to Dock, esc through cutscene
  9. enter Gadget Shop, choose any dialogue option, esc through another cutscene
  10. back at Doc's office, combine Cartridges with Remote to create Remote including Cartridges
  11. go Outside Doc's Workshop and exit on far left to Weapons Shop
  12. exit on lower left to Little Venice
  13. pick up Antenna

THIS IS A "SPRINT-THROUGH" for Collecting Agent & Pin-Up Goal!
If it doesn't meet your needs, please try my full walkthrough.
2. Tavern
items
  • #6: Sugar Dispenser
  • #7: Razorfish
  • #8: "The Dead Pigeon Tango" (or other sheet music)
steps
  1. go to Harbor
  2. optional (Endurance Test): kick Gondolier's Bumper (that's once)
  3. enter Tavern, click Goal; pick any facial expression and any opening line
  4. when talking to Lady Goal, say "You have to come with me to see Doc" to get Peanut Bowl
  5. switch to Baby Goal (blue cartridge), say all of the following:
    • "You have to come with me and see Doc"
    • "Can't you remember anything?"
    • "Janosch, Janosch. What's up with that Janosch?"
  6. say all of the following to Garlef to get Bathroom Key:
    • "You're part of a resistance movement, or so i've heard?"
    • "May I join you?"
    • "Please, let me join you! I want to impress a woman!"

    Pin-Up Goal bonus tasks
    These steps are only necessary if you're working on Pin-Up Goal:

    • click Jukebox and press top button to select "The Mating Song of the Junk Crabs"
    • switch to Spunky Goal (green cartridge), say "You have to come with me and see Doc."
    • say all of the following to Bozo:
      • "What were you going to say earlier? Something about a very special 'boarding maneuver?"
      • "I do believe Spunky Goal likes me."
      • "Tell me more about your Bambina."
      • "I think you should pay a visit to your Bambina."
    • say all of the following to Nod:
      • "I think an apology would be in order."
      • "Unorganized Crime...what is that, exactly?"
      • "May I join you?"
      • (pick any of the first 4 options on the next menu, the ones in which Rufus is describing what he has to offer)
      • "How can I prove to you that I'm reckless enough?"

  7. optional (missable achievements):
    • "Animal Lover:" tell Baby Goal, "Hey, Baby!" > "What's a nice girl like you doing in a place like this?"
    • "Supercool:" tell Spunky Goal, "You have to come with me to see Doc." > "You must come with me! Something went wrong with the surgery." > "What do I have to do to make you come along?"
  8. use Bathroom Key on Bathroom Door to get Shred of Toilet Paper
  9. take Sugar Dispenser
  10. exit to Harbor and use Sugar Dispenser on Generator
  11. optional (Endurance Test): kick Gondolier's Bumper (that's twice)
  12. enter Tavern, take Razorfish
  13. use Screwdriver on Jukebox Flap
  14. take sheet music ("The Dead Pigeon Tango" or "The Mating Song of the Junk Crabs")
  15. exit to Harbor
  16. optional (Endurance Test): kick Gondolier's Bumper (that's 3x)

THIS IS A "SPRINT-THROUGH" for Collecting Agent & Pin-Up Goal!
If it doesn't meet your needs, please try my full walkthrough.
3. Marketplace, Gadget Shop
items
  • #9: Expired Pills
  • #10: The Golden Dragon of Invisibility
  • #11: Left Frame
  • #12: Sunglasses Lens
  • #13: Right Frame
steps
  1. exit upper left to Marketplace, give Shred of Toilet Paper to Pharmacist
  2. take Expired Pills from Dumpster
  3. optional (Endurance Test): go to Harbor, kick Gondolier's Bumper (that's 4x)
  4. go to Dock, enter Gadget Shop
  5. use Cucumber of Revelation on Juicer Hat
  6. click Anti-Gravity Socks, take Indestructable [sic] Sunglasses of Eternal Darkness
  7. use Indestructable Sunglasses of Eternal Darkness on Shredder, then give them to Shop-O-Mat
  8. take The Golden Dragon of Invisibility, then right-click it in inventory
  9. click Indestructable Sunglasses of Eternal Darkness on counter to get Left Frame, Sunglasses Lens, and Right Frame
  10. exit to Dock

THIS IS A "SPRINT-THROUGH" for Collecting Agent & Pin-Up Goal!
If it doesn't meet your needs, please try my full walkthrough.
4. Seagull, Crane
items
  • #14: Hand-Held Vacuum Cleaner
  • #15: Candle
  • #16: Water
  • #17: Urn
  • #18: Coal
  • #19: Thread
  • #20: Bread
steps
  1. go to Marketplace, go up to Bellevue, use Peanut Bowl on Fine Nose sensor
  2. optional (missable achievement "Bloody Nose"): step on Rake 10 times
  3. enter Seagull's House. You don't need to talk to him.
  4. right-click everything in the room (Flowers, Books, Goldfish Bowl, Window) to get 5 Memos
  5. click Books, then click "Pull here for secret door" on upper right part of bookshelf
  6. take Hand-Held Vacuum Cleaner
  7. return to Bellevue, enter Crane's hovel
  8. hand 5 Memos to Crane
  9. take Candle, Water, Coal, Thread, Bread, Urn
  10. exit to Bellevue, kick Tree

THIS IS A "SPRINT-THROUGH" for Collecting Agent & Pin-Up Goal!
If it doesn't meet your needs, please try my full walkthrough.
5. Bellevue, Dock, Harbor
items
  • #21: Hook
  • #22: Bucket
  • #23: Field Guide
  • #24: Spade
  • #25: Earth Platypus Egg
  • #26: Water Platypus Egg
steps
  1. return to Bellevue, go to Old Town
  2. optional (missable achievement "With love from Porta Fisco"): read all Greeting Cards
  3. right-click Take-Out Menu; pass (or skip) minigame
  4. go to Dock, give Fortune Cookie to Fisherman
  5. take Hook (from Jar of Hooks) and Bucket
  6. return to Old Town
  7. give ID Card to Platypus Trapper to get Field Guide; examine it in inventory!
    Pin-Up Goal bonus tasks
    These steps are only necessary if you're working on Pin-Up Goal:

    • click arrow marked "Up"
    • use Crank on Crank Handle to install it
    • click Crank to reel in Flying Platypus Egg (#2 alternate)
    • when you get to Bellevue, use Bucket on Tub full of Dirt to create Bucket with Soil (#22 alternate)
  8. go to Bellevue, take Spade
  9. click Egg; pass (or skip) minigame to get Earth Platypus Egg
  10. go to Harbor, pick up Water Platypus Egg
    you should receive Collecting Agent here!
    If not, check the "Collecting Agent item summary" above to see what you're missing.

    The following steps are only necessary if you're working on Pin-Up Goal; they're all safe to do before completing Collecting Agent, HOWEVER, you would need to get another sheet music out of the Jukebox:

  11. optional (Endurance Test): kick Gondolier's Bumper (that's 5x)
  12. enter Tavern, light your Candle with their Candle to create Lit Candle (#15 alternate)
  13. exit Tavern, give "The Mating Song of the Junk Crabs" sheet music to Gondolier
  14. optional (Endurance Test): kick Gondolier's Bumper (that's 6x)

THIS IS A "SPRINT-THROUGH" for Collecting Agent & Pin-Up Goal!
If it doesn't meet your needs, please try my full walkthrough.
onward to PIN-UP GOAL
The instructions below rely on your having completed all of those above. This gets a little hard to follow in this format, so stay focused. Maybe draw little checkmarks on your monitor as you complete tasks.
6. Dock, Little Venice
steps
  1. go to Dock
    • show Razorfish to Fisherman; tell him your secret is "bait"
    • use Expired Pills on Bucket with Bait
    • give Bait to Fisherman
  2. click Town Map, go to Little Venice
    • combine Left Frame with Sunglasses Lens to create Left Frame with Lens
    • combine Left Frame with Lens and Right Frame to create Repaired Sunglasses [Left Lens]
    • optional (missable achievement "T-415411293"): use Sunglasses on Junk Crab colony
    • use Repaired Sunglasses [Left Lens] on Periscope
  3. enter Submersible
    • open Door to Radio Room, talk to Cletus (choose any one of the last 3 options)
    • press red Button, use Razorfish on Kitty
    • say (to Wink and Donna) "What did she say?" > "That I'll be made into shark food?" > "Go ahead"
    • enter Bridge, take Tournament Hand, exit Bridge, exit Submersible
  4. go to Weapons Shop
    • talk to Bozo, tell him "it's going to be great;" watch (or esc through) the scene
    • turn Pipe Valve to trap Crabs
  5. go to Marketplace, go up to Pharmacist, switch Pipe Diverter so that red is connected to green

THIS IS A "SPRINT-THROUGH" for Collecting Agent & Pin-Up Goal!
If it doesn't meet your needs, please try my full walkthrough.
7. Doc's Workshop
steps
  1. go to Outside Doc's Workshop
    • use Coal and then Lit Candle on Furnace
    • click "Egg in the funnel;" pass (or skip) minigame
    • collect Fire Platypus from Furnace.
      optional (missable achievement "Animal Husbandry"): don't put Fire Platypus on nest here; wait until the next section
    • place Fire Platypus on nest
  2. enter Doc's Workshop
  3. use Tigerfish on Paint Bucket
  4. go to Doc's Office
    • combine Earth Platypus Egg and Bucket with Soil
    • use Bucket with Soil and Egg on Freezer
    • click red Switch twice
    • use Spade on Frozen Earth Platypus
  5. go to Lock
    • combine Zebrafish with Water Platypus Egg
    • use Frankenfish with Egg on Electrodes
  6. go Outside Doc's Workshop
  7. optional (missable achievement "Animal Lover"): let Zebrafish with Egg die
  8. use Water on Zebrafish with Egg

THIS IS A "SPRINT-THROUGH" for Collecting Agent & Pin-Up Goal!
If it doesn't meet your needs, please try my full walkthrough.
8. Bellevue
steps
  1. right-click Town Map, go to Bellevue
  2. enter Seagull's house
    • put Zebrafish with Egg in Goldfish Bowl, click Goldfish Bowl to collect Water Platypus
    • climb ladder to Crow's Nest, use Urn (or Lint) on Pipe
    • combine Hook with Thread
    • use Hook on a Thread on "Windsock, half-mast," then attach other end to Grommet
    • put Flying Platypus Egg into Windsock
    • go down ladder, open Hatch, use Hand-Held Vacuum Cleaner on Lint Trap
    • climb ladder, use Razorfish on Windsock
    • take Windsock
  3. go out to Bellevue
  4. put Bread inside Birdhouse
  5. combine Windsock with Antenna
  6. use Landing Net to collect Flying Platypus.
    optional (missable achievement "Animal Husbandry"): you should earn achievement here, making it safe to put Fire Platypus on its nest
  7. put Earth Platypus on its nest
  8. go to Old Town, put Flying Platypus on its nest
  9. right-click Greeting Cards next to Platypus Trapper
  10. talk to Platypus Trapper and say "Tell me more about these greeting cards?" then "So, when you've got the time…" to get the "Platy-Poo" poem

THIS IS A "SPRINT-THROUGH" for Collecting Agent & Pin-Up Goal!
If it doesn't meet your needs, please try my full walkthrough.
9. win Baby Goal
steps
  1. go to Harbor
  2. put Water Platypus on its nest
  3. optional (Endurance Test): kick Gondolier's Bumper (that's 7x)
  4. enter Tavern
    • say to Garlef "Why are you sitting here by your lonesome?" > "I want to play!" > "I'm ready!"
    • pass (or skip) minigame
    • tell Baby Goal "It is done. We are resistance fighters!"
  5. exit to Harbor
  6. optional (Endurance Test): kick Gondolier's Bumper (that's 8x)
  7. go to Marketplace, enter Dark Alley
  8. turn music volume all the way down (via "Settings" menu)
  9. knock on Door, hide in Crate, wait for Liebold to come out
  10. knock on Door again
  11. enter Rebel Hideout
  12. use Slides on Slide Projector, then say:
    • "A symbol"
    • "An Organon bombing fort"
    • "Our enemy will try to eradicate Deponia"
    • "Our team will dare to attack"
    • "I obtained topographical data locating one particular Organon fort"
    • "...detonate a bomb here and put an end to all life, marine and on land"
    • "Goal and her brain implant might mean an important trump in our hand"
  13. after cutscene (Baby Goal victory), exit Tavern
  14. optional (Endurance Test): kick Gondolier's Bumper (that's 9x) and save your game

THIS IS A "SPRINT-THROUGH" for Collecting Agent & Pin-Up Goal!
If it doesn't meet your needs, please try my full walkthrough.
10. win Lady Goal
steps
  1. go to Little Venice, go to Weapons Shop, turn Pipe Valve to free Crabs
  2. go to Bellevue
    • enter Seagull's House, tell him "I did it."
    • go to Poet's house; say "You know quite a bit about Poetry, don't you?"
    • optional (missable achievement "Supercool"): recite any poem OTHER THAN "Platy-poo"
    • recite "Platy-poo" poem
    • go to Seagull's House, say "I know which words i'll use to impress Goal" then "I may not be good at waxing eloquent. But I've got this."
  3. after you land in Harbor, enter Tavern, give Invitation for Lady Goal to Lady Goal
  4. after you land in Seagull's house, take Radio Equpiment Memo from Seagull's desk
  5. give Radio Equpiment Memo to Crane
  6. go to Old Town; after the scene, give Radio Equipment to Platypus Trapper
  7. after cutscene (Lady Goal victory), exit Tavern, kick Gondolier's Bumper
    (this one is NOT optional. If you've been following "Endurance Test" instructions, that should be 10x)

THIS IS A "SPRINT-THROUGH" for Collecting Agent & Pin-Up Goal!
If it doesn't meet your needs, please try my full walkthrough.
collect puzzle pieces
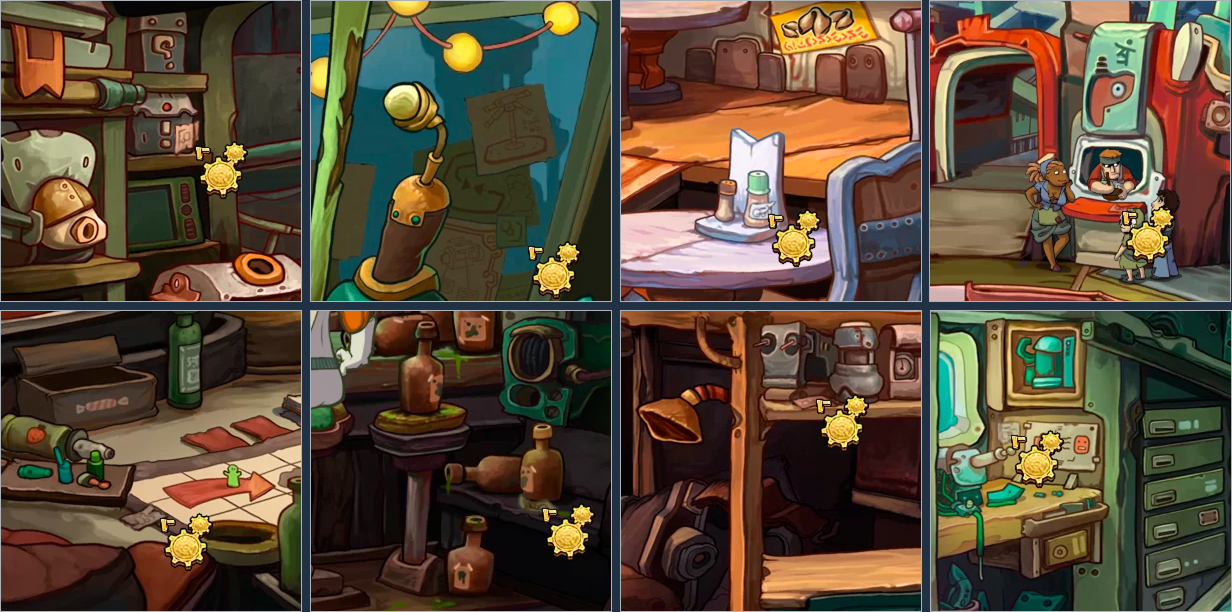
If you were holding off 'til the end of the Chapter before collecting the Pin-Up pieces as i recommended, now would be a good time to go get them. I've listed them below in the "speediest" order. Once you're done at the Dock (following collection of piece #2), use Town Map to jump to Bellevue.

Chapter V Puzzle Pieces:
  1. Dock > Gadget Shop (on "!" box on left side)
  2. Dock > Bozo's Cutter (stuck to window on right side)
  3. Bellevue > Old Town (condiment label on table)
  4. Marketplace (on orange counter between Bellevue and Dark Alley)
  5. Dark Alley > Rebel Hideout (near game board on lower left)

    The next three are at the end of the list because they can be picked up during the chapter "finale" described in the next section (they can also be picked up now, if you prefer extra walking to risk-taking -- i know i do). Make sure you save your game after you pick up the first five puzzle pieces just in case you space out and miss your chance(s) at any of these:

  6. Harbor > Tavern (on shelf by bottle closest to bathroom)
  7. Doc's Replacement Parts Store (on shelf near Lamp)
  8. Doc's Office (near window under entrance)

The pieces associated with the Dock -- the ones aboard Bozo's Cutter and inside the Gadget Shop -- CANNOT be collected in chapter VI.
finish Chapter V
Remember that the way to avoid messing up Pin-Up Goal is to avoid clicking any piece more than once. So if you reach Doc's Replacement Parts Store and realize you forgot to collect piece #6 when you were at step 2 -- and therefore have to go back to a save file -- DO NOT click piece #7 before loading the save!

steps
  1. go to Weapons Shop, say "You're not going to give up just like that are you?" to Bozo
  2. after Gondolier death scene, go to Tavern.

    This is where puzzle piece #6 is; once you win Platypus Bataka, it can no longer be collected.

  3. use line on Spunky Goal; pass (or skip) minigame.

    After cutscene (Spunky Goal victory), you're in Doc's Replacement Parts Store, where puzzle piece #7 is. You can't return to this room once you leave it in step 5.

  4. click Door behind Janosch
  5. use Liebold's Remote on Liebold, enter Mysterious Anomaly.
  6. say "I want proof" to Future Rufus, then pick any option from the next menu, then say "Oh well. I'll go rescue Goal, then."

    This puts you in Doc's Office, where puzzle piece #8 is; be sure to collect it before entering Lock in step 12.

  7. open Drawer and take Remotes
  8. mention "remote" to Goal, then mention "champagne"
  9. combine Cartridge with Donna's Remote (the blue one), then use it on Donna
  10. collect Crowbar and Weapon
  11. optional (missable achievement "Pre-Paradox"): enter Mysterious Anomaly
  12. go to Lock, use Crowbar on Electrodes
  13. tell Past Rufus "Zeeblezooble"
  14. click Clock
  15. in the conversation with Donna-Goal, just keep picking the last option on every menu until the next chapter starts

THIS IS A "SPRINT-THROUGH" for Collecting Agent & Pin-Up Goal!
If it doesn't meet your needs, please try my full walkthrough.
CHAPTER VI
steps
  1. click Porta Fisco on Radar map
  2. collect puzzle piece #9 from trash
  3. enter Seer's tent, choose "I don't want to bother you any longer" from dialogue menu
  4. collect puzzle piece #10 on rug hanging by door
  5. board Cutter, go to Isla Watchit
  6. collect puzzle piece #11 from right side
  7. go through passage to Radio Tower, collect puzzle piece #12 from left side


If you're hoping to earn "Animal Lover" and need help figuring out what to do next, check out my full walkthrough.

7 Comments
mishalunchbox  [author] 10 Mar, 2023 @ 5:20pm 
Thanks for the feedback! Praise is always nice, too :bunnyinablanket:
Deej Tiuz 13 May, 2022 @ 8:03am 
You're a legend man, thanks to you i completed both of them, everything worked fine!
mishalunchbox  [author] 29 Mar, 2022 @ 11:20am 
@everyone: to preserve what's left of my sanity, i'm now only attending to these guides once per year. Expect potentially loooong delays in response times <3

@drogerson, thank you for the feedback!! Sorry for the late reply; for my excuse, see previous paragraph :)
drogerson 28 May, 2021 @ 2:36pm 
Worked perfectly! Much Thanks!
mishalunchbox  [author] 15 Mar, 2021 @ 8:31am 
Thank you both so much for the positive feedback!!! @Natrea, i'm sorry it took me so long to respond... i'm not sure what happened there.

I've just made huge changes to this guide, adding Pin-Up Goal and a few other missables to it. I know you don't care about that, because you're done with this stuff... i just wanna mark when the big change happened, and be honest about the fact that your kind words were in reference to the old version of the guide (in which only Collecting Agent was covered).
NoctuaNympha 5 Feb, 2021 @ 7:15pm 
Thank you sooooo much!! MASTER of these guides, truly :redflowers:
Natrea 19 May, 2019 @ 6:01pm 
Thank you! All the tips worked excellently! Also, managed to get a bit of other achievements while doing this one.