Total War: ATTILA

Total War: ATTILA

588 ratings
Campaign Battles
By Voth and 1 collaborators
A treatise on army make up, formations, and tactics.
7
3
11
5
4
2
2
   
Award
Favorite
Favorited
Unfavorite
Introduction
This guide is to help players who are having trouble with battles in their campaign. It deals with player vs AI and how the AI reacts to situations, not necessarily for the current multi-player meta.

This guide will specifically cover:
  • Army make up: what units to bring to the battle.
  • Formations: how to arrange the units you bring to the battle.
  • Tactics: how to engage the enemy with your units.
Army make up
Army make up depends highly on what units you have available and what type of enemies you will be fighting. There is no single "best" army build and a lot depends on personal preference. However I will go over some basics.

General campaign build:
This build is used for sieges and battles against the standard armies of most factions. It consists of a General and:
  • Spears or Pikes x2: you need at least 2 spears or pikes to properly screen your main battle line from cavalry charges or to soak up missiles. These units will take the brunt of causalities and will often be replaces with cheap mercenaries on extended campaign.
  • Line Infantry x4: these units will make up your main battle line and should consist of sword and shield style infantry with good melee defense and armor. Units that can enter shield wall excel at this position and will help you hold a solid line for a very long time while you set up the hammer and anvil.
  • Shock Infantry x2: units wielding 2 handed axes, falx, or otherwise having high charge, attack, and weapon damage. These units are multi purpose utility helping break an enemy line or support cavalry on the flanks.
  • Skirmishers x4: these units fill a multitude of rolls such as: softening up main lines, killing other skirmishers, starting fires, or shattering broken units.
  • Cavalry x2: bring these to secure your flanks, kill artillery, kill skirmishers, and break lines with hammer and anvil.
  • Artillery x1 you need at least one artillery piece in an army to carry out sieges and to force the enemy to come to you in open field battles.
  • Preference x4: add the flavor to your army that you like or your chosen faction suggests.

Anti Huns build:
This build excels at dealing with cavalry heavy factions that use a lot of mounted skirmishers such as the Huns. It consists of a General and:
  • Spears or Pikes x4: having more infantry that is strong against cavalry, to screen you, is a good thing.
  • Line Infantry x2: two of these are usually enough to hold any line against the few infantry this faction will bring. They are also good for blobbing up enemy cavalry to lock it down.
  • Skirmishers x4: these units are key to killing mounted archers that will otherwise run away from your cavalry or spears.
  • Cavalry x8: fighting fire with fire, you will want to bring mostly strong melee cavalry to counter all the shock cavalry this faction brings. Melee cavalry in a diamond or wedge will kill shock cavalry.
  • Artillery x1: I find it is always good to bring a unit of artillery to force the enemy to come to you.

Hun Cheese:
Your general and 19 cavalry to out Hun the Huns. This is very expensive in a campaign setting, but if you can afford it, it makes Hun killing a cake walk.
Formations
Standard Formation

Screen your skirmish units from cavalry charge with your spear/pike units. Choose priority targets for your skirmishers; cavalry, crossbows, and javelin units should be your first targets. Line infantry and spears, especially in a stance, block most missiles, don't waste ammo.

Set your artillery to general snipe or skirmisher snipe in field battles, kill towers in sieges.

Try to win the flanks with your cavalry and set up the hammer and anvil.

Use your main line to engage the enemy and fix them in place, becoming the anvil.

Try not to friendly fire after you drop your skirmishers behind your main line. Use fire and whistling arrows to shatter routing units so your main line can keep formation.
  • Spear/Pike Screen: these units function as a vanguard and present a strong front against enemy cavalry that would otherwise charge your skirmishers freely. This gives gives your skirmishers more time to spend some ammo before they have to retreat behind the main battle line.
  • Skirmishers: keeping these units in a forward position allows them to make use of their range, kill off enemy skirmishers that would otherwise soften your line, and to soften the enemy up before you main battle line engages.
  • Main Battle Line: consists of line infantry and your general. After the initial engagement, the main battle line is advanced to begin pushing back enemy skirmishers and begin fixing enemy infantry in place.
  • Flanks: consist of your cavalry and your shock infantry. They will wrap around the enemy line to kill skirmishers, artillery, perform flanking maneuvers, and the hammer and anvil.
  • Artillery: is kept in the back because it has plenty of range and dies to everything quickly.

Hun Hunter Formation:

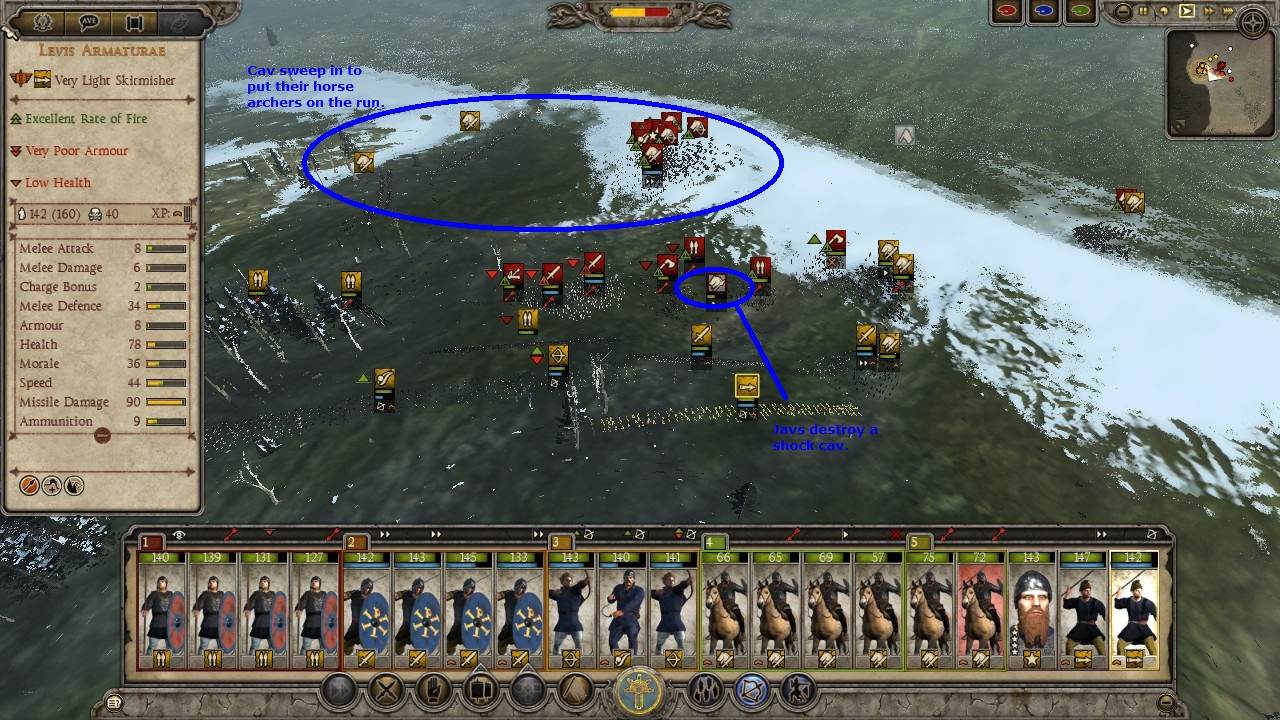
The idea with the hun hunter formation is to draw their horse archers toward you main battle line, where your general is. Your screens can be moved around to create a safe zone for your skirmishers to address the horse archers. With your skirmishers you will be able to kill their horse archers long before they kill your general or your screens. Crossbows excel at this, but long range archers and slingers can also kill off lightly armor horse archers quickly.

The second tier of screening that is dropped back creates a long flank, this means their cavalry will have to ride a very long way around to get to your backs.

Lastly the flanks swell to a much larger size with a lot of melee cavalry. The huns use many shock cavalry which is weak to melee cavalry. Send your flanks out to deal with their cavalry before swinging back around to finish the enemy main battle line.
Tactics: Screening
Vs Cavalry:

When screening against AI cavalry move your spear or pike unit to follow if the cavalry attempts to round your flank. The AI will get frustrated by this and charge your screen at which point you will want to enter spear wall or phalanx for maximun effect.

Vs Skirmishers:

Screening is also the act of soaking up missiles from skirmishers. Having a spear unit with good armor in the spear wall stance will give it an extremely long life against arrows and slingers. Crossbows and javelins however, will hurt very bad. As your screen absorbs the missiles, you can advance your skirmishers into range to counter theirs.

The Dog Screen:

The dog screen variant is great for early game or sieges against unwalled cities where you have superior numbers. The enemy will be drawn to your exposed skirmishers. Release the dogs as soon as the option is available. The dogs will blob up the enemy, effectively holding them in place while your skirmishers kill them off. Friendly fire on dogs does not matter as the dogs are immune to morale effects and respawn after every battle. Using the dog screen will allow you to sack city after city without needing to rest from casualties. This is kind of a cheese move, but effective.

It should also be noted that dogs absolutely slaughter most skirmishers.

While the pic says "X-bows" any skirmishers will work. However, javelins and crossbows will melt enemy cavalry.
Tactics: the Charge
Cavalry vs Cavalry:
A strong flanking force is usually made up of mostly cavalry for speed. Therefore flank battles often consist of cavalry vs cavalry engagements.

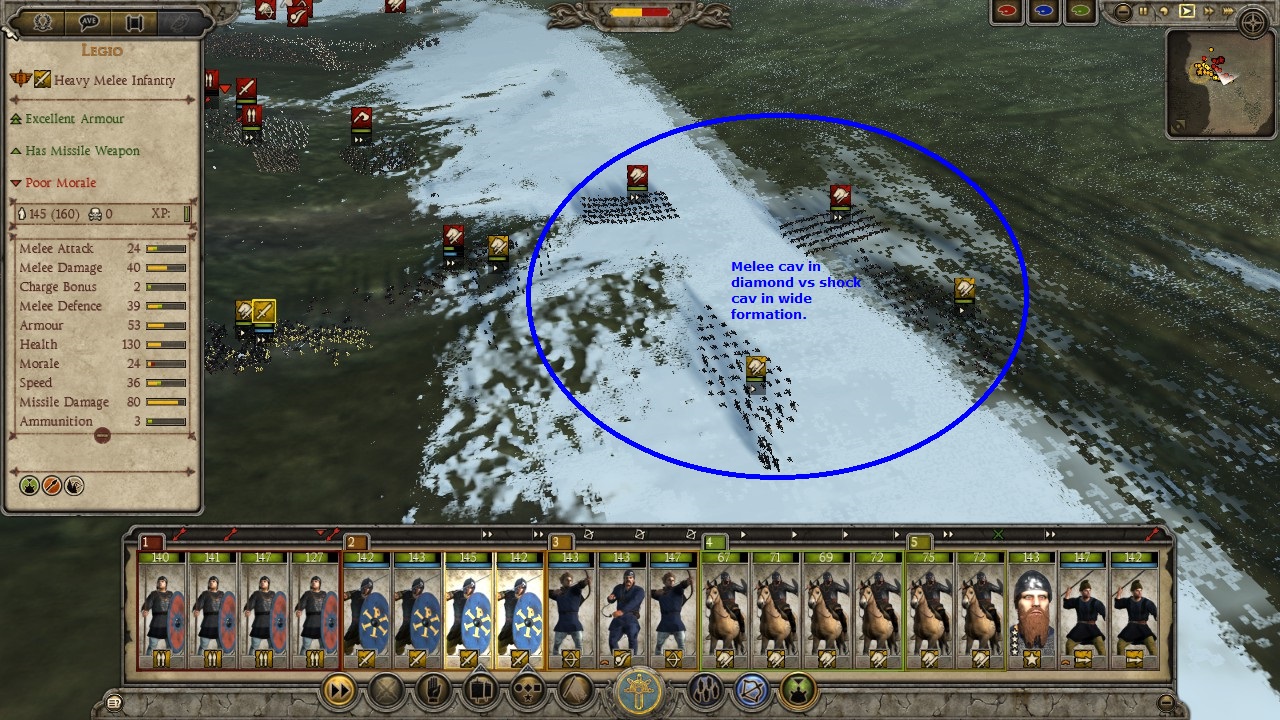
Cavalry is all about the charge, so when two units of cavalry meet formation is important. The above diagram reflects the charge potential of the diamond and wedge formations vs the standard flat formation. Using a diamond or wedge formation with shock cavalry is wasting charge potential, since mass is less of a factor in cavalry vs cavalry engagements. It will cause them to do less overall damage against other cavalry as they are sub par in extended melee engagements.

However counter charging shock cavalry with melee cavalry in a wedge or diamond will reduce the shock cavalry's effectiveness. Melee cavalry excel in extended engagements and will destroy the shock cavalry post charge. Wide formation vs wide formation the shock cavalry will destroy melee cavalry outright. If both are in diamond or wedge, melee cavalry beats shock cavalry.

So is the wedge formation useless for shock cavalry against other cavalry? No, when attacking a unit of cavalry that has sustained heavy casualties making it a skinny stack, no charge potential is wasted in diamond formation. Due to the fact the diamond charges are faster and heavier, it would do more damage than a wide charge, in most cases, instantly shattering the enemy.

Charging vs Spears/Pikes:
Chargeing into the front of spears or pikes is a death wish for cavalry and most shock infantry. Only charge the flanks or the rear.

Charging vs Line Infantry:
Cavalry and shock infantry can charge line infantry head on and do severe casualties. Still flanks and rear charges are usually best. After a cavalry charge you will want to pull your cavalry back after a couple seconds as getting blobbed by enemy infantry reduces the effectiveness of cavalry, especially shock cavalry.

"A lot of the initial damage from a cavalry charge comes from the impact and knockback of the cavalry's momentum, determined by their speed and weight. When in wedge or diamond formation, the latter two increase through the speed bonus and the density of the formation, causing more knockback on the initial impact, leaving less soldiers standing up to fight in the onset of prolonged melee. This means that the charging cavalry receives less counterattacks and thus less casualties from charging. While it is true that a wide formation enables more individual engagements, each of those engagements is less favorable than it would be in a wedge.

Also, the wedge and diamond break up the formation of the unit which seems to negatively affect morale. The use of diamond and wedge on infantry to me seems to be to negate more counterattacks and casualties to the cavalry in a frontal charge. I do however completely agree on the wide formation for flank or rear charges, especially in hammer and anvil situations because the unit isn't braced and can't counterattack properly so maximum contact does seem to be much better there. " valco66


Charging vs Skirmishers:
Usually charging skirmishers with cavalry is a cake walk, allowing you to shatter them with ease. However be aware that crossbows and javelins hurt cavalry a lot. If you can distract these units with a screen or other unit, the cavalry can get in without eating heavy fire.

Shock infantry will often be kited by retreating skirmishers and eventually killed. It's not a good idea unless you can sneak up on them.

The Hammer and Anvil:

This maneuver is the bread and butter of most engagements. The anvil, a unit of infantry fixing another unit in place by engaging them. The hammer, a unit of cavalry circling around behind the fixed enemy for a devastating rear charge.

The hammer works best as shock cavalry or shock infantry. However any unit can be a hammer as they will inflict a morale penalty "attacked from behind" on the enemy. The difference in units determines how devastating the charge is.

The anvil can be any unit that won't break before the hammer swings, however, line infantry, pikes in phalanx, or spears in spear wall work the best.

Charge Optimization:
Not all targets are equal. In this section I will cover in more detail what makes a good target good and what makes a bad target bad. Thanks to valco66 for his input.
"My experiences in Atilla are based on playthroughs with the Sassanids and the Huns, as with both factions being cavarly heavy I was able to effectively field cavalry only armies." valco66
    Good Targets: get a lot of kills and take few casualties.
  • Light Units: on foot will have a very low mass. Charging them with cavalry, especially cavalry in a diamond or wedge which increases mass, will cause the light unit formation to take huge impact damage from the horses. The units will also be knocked down or thrown out of formation making it easy to pull through with your cavalry.
  • Moving Units: can not be braced. Moving units take more damage than stationary braced units.
  • Thin Lines: of only one or two ranks deep cannot properly brace and have a low mass. With no comrades behind them in the formation, the unit will be thrown about and shattered quickly. Thin lines are also very easy to pull through with minimal casualties.
    Bad Targets: get few kills and take more casualties.
  • Heavy Units: have a high mass and receive a charge well. If a unit's mass is high enough, the knock back effect can be nonexistent, greatly reducing the effectiveness of a charge.
  • Special Formations: such as spear wall or testudo further increase a unit's mass and may even give bonuses against cavalry. A heavy unit in testudo, which doubles a unit's mass, is like hitting a brick wall. There will be no throwing of units, no knock back, or knock down greatly reducing the effectiveness of the charge.
  • Phalanx: is deadly to a frontal charge. Yes phalanx gets it's own bullet point, it's that bad. Pike units may be light, they may be only two or three ranks deep, but if they are in phalanx, your cavalry is dead.
Tactics: Skirmishing
Zone of Fire:
In general skirmishers are the first units to engage do to their range however once your main battle line has met the enemy you must be aware of the zone of fire.

Your skirmishers have a limited accuracy and will fire into an area. This area where the missiles land is the zone of fire. If your screen or main battleline is engaged with the target unit they will take friendly fire, but it will only be about 25% of the missiles in a best case scenario.

Now if your skirmishers are right up against the screening unit and it is engaged with the target, your skirmishers will be shooting your troops in the back 90% of the time. Avoid being too close as flaming shot will also reduce your friendly units morale, even if they are not being hit directly. A good distance is a gap roughly five ranks deep, though you should experiment with what works best for you.

Shattering Broken Units:
When a unit has been broken, their icon is blinking and they run away from the engagement. A broken unit, however, can recover and rejoin the battle if they are not shattered.

As these units flee use your skirmishers to shatter them instead of your infantry. This allows you to keep a solid main battle line. Archers are especially good at shattering as they have flaming and whistling shot that deal additional morale damage.

Fire:
It should be noted that Attila: Total War has a bias toward fire. In most cases fire beats vanilla ammo hands down so, use fire on all skirmish and artillery units when possible.
How to Counter Onagers.
Open Field Example
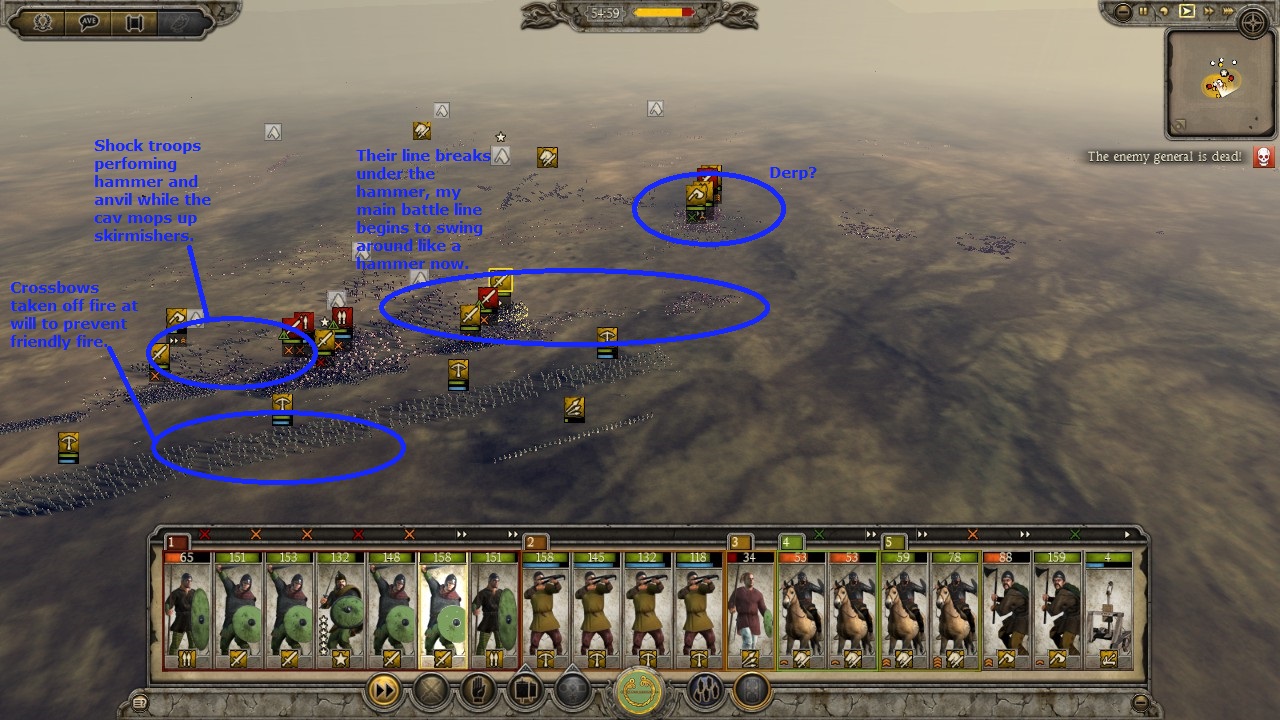
In this example I used custom battle on high funds to simulate a campaign battle. I played as the Burgundians against the WRE. I purchased units that can be acquired in a campaign setting within the first 50 turns. I used the WRE as the opponent because they are the punching bag for most factions during the first 50 turns. For the WRE I used better units than you will see from the WRE in the campaign, ever, so that the balance of power would be even.

You will notice I use a general campaign build. For my preferance units I brought two more melee cavalry to strengthen my flanking forces. I also brought two spear units to cap the ends of my main battle line. In the case I lost a flank battle those spears could shift into a screen position for my main battle line.


Heroic victory is easily achieved. The pike unit that shattered still did not lose enough men to be disbanded in a campaign setting, if you were in a situation where you could get reinforcements. After the battle you could merge the pikes and buy a cheap mercenary pike unit to repeat this victory if you were deep in enemy territory.
Siege Example (unwalled)
For this battle I used my Burgundian campaign. Combat realism is turned off to facilitate screenshots, but battle difficulty is maxed out. This battle takes place on turn 77 against Septimania, the WRE is long since gone.

The dog screen is demo'd here as well.


Hun Hunting Example
This battle is not my best, by far, lol. My army was not optimized for hunting Huns and I was suffering from winter attrition. I also started taking screenshots a little late, after I realized what a good example this would be.

In this example I am playing the Ostrogoths and attacking the Huns. Through a series of retreats and using a river I managed to isolate a Hun stack from the group of five. It was winter, knowing I'd take attrition losses I attacked anyway because it was the only way I was getting a single stack fight. I was surprised to find they had an onager.

There are examples of how to render an onager useless, screen against skirmishers, and using the diamond cavalry formation to counter shock cavalry.


Pre made formations
Pre-Made battle formations


We know that CA just love to think they know best and that is why they give us some rather useful but difficult to use formations pre-made. Now this section is to teach you about the different formations and what they do so that when you go into a battle you know which one means what.


1) Single Line, this is where you have a very unorganized single line of units. This really has no benefits and many downfalls. You should only use this if very confident of victory. The downfalls are that you are open to attack, with no real formation the enemy will break you easily.


2) Sorted single line is a bit more organized and might prove more helpful will put your archers to the flanks and place everything else in the centre,again not massively useful but better than having a weak centre of the line.


3) Simple Acies will place cavalry front and then two unorganized lines behind them. This is good for getting the cavalry out quick Though past that there is not much more use to it...


4) Double line is another unorganized line, though you will have two lines instead of one this time, more useful that the single line formation but depending on your troops, not by much.


5) Double Line sorted will place missile infantry at the front line and melee infantry at the back line. This will provide you with a great skirmisher tactic, you can get further range and retreat your missile infantry as soon as needed.


5) Double Acies is yet another of the cavalry orientated formations that CA seems to love giving us. This will place cavalry on the flanks while having two unorganized lines in the centre. This is good for keeping our flanks secure and for charging, it however is just the same as double line if you don't have cavalry. The downside is that the centre is unorganized.


6) Cavalry front triple line is a much more useful information, it puts cavalry on the front line and melle at the back, missile infantry in the centre line. Use your cavalry to charge directly at the enemy, cover the flanks and lure the enemy into yours archers range. Then when the enemy engage get your infantry in with a short charge forward!


7) Melee front triple line is sort of like the cavalry front triple line but different, you have the melee infantry at the front, missile infantry at the centre with cavalry covering the back. Good if you have pikemen at the front. However even if you don't you archers will still cover your infantry very well, in Rome II this was always my favourite formation. Gets the job done!


8) Missile front triple line places the archers at the front, melee infantry in the middle and cavalry at the rear,I don't know how the cavalry is meant to be used in this formation but the missile troops are meant to weaken the enemy and retreat when they get close, providing extra range and damage for the first moments of battle.


9) Triple axis is a formation where cavalry goes on the front line with three unorganized lines behind it, this will really thin out your army because if you had say 5 cavalry that leaves 15 none cavalry in a full army. For 15 divided by three equals five, that means your army is much narrower and more ways to be flanked, be aware of that before saying "golly that formation sounds fantastic!".


10) Skirmish is where the missile infantry goes at the front line with any missile cavalry protecting them. This is very good as it provides a screen of missiles directed at the enemy. For back up we have the melee infantry protected by melee cavalry (E.I Shock and Swords). This is a two line formation that is good for killing of barbarian tribes with a weaker cavalry force than you.


11) Column is the final formation CA gave us, this formation is where you have an unorganized column of troops, the default formation for ambushes is column. This is good for attacking settlements through narrow holes in walls though the downfall is there is 0% chance you will be defending flanking attacks in this formation.

Done by Gaius Julius Caesar
67 Comments
eureka 27 Jun, 2023 @ 3:38pm 
the first steam guide that actually helped me, thank you
The Black Samurai 13 Oct, 2022 @ 5:46am 
Nah, Roman spears can defensive tustodo, and last longer against huns thanks to high army and added block chance. Skirmishers will delete Hun archers. Don't know why he's sending out cavalry though. They'll outrun and gun down pretty much any heavy melee calv, and straight up obliterate light calv.
Cioby 25 Nov, 2021 @ 9:04am 
is this for easy AI?
Out Hun the Huns lol, the Huns beat mostly any army 1 on 1 unless you're playing easy.
The best way to beat them is to let them attack you in cities and you nullify their cavalry. But even then you need elite infantry that can do shield formation and can withstand the Elite Uar.
Legend Z 9 Oct, 2021 @ 7:03pm 
Amazing work! Thank you.
Hungrycats 17 Apr, 2021 @ 2:43pm 
Best guide I've read on Steam. Ever. Thanks so much, maybe now I can get back to winning campaigns when outnumbered!:steamthumbsup:
YakubsNo1Guy 29 Mar, 2021 @ 5:10pm 
Nice. Thanks. :bonfire2:
Lil' Remi 15 Nov, 2020 @ 5:26pm 
First guide I ever bothered to read to full extent. Great work.
Pawaris 5 May, 2020 @ 9:03am 
Great guide
A2O2 23 Jul, 2018 @ 2:08pm 
Amazing guide. Thank you. I usually run pretty much the same units you use. But I always prefer more cavalry than infanrty in my army, cavalry can always switch the battle into your favor if used right. Basically, cheapest infantry that can hold the enemy line. and very good cavalry to flank massacre the enemy.
Sammykaiser 2 Feb, 2018 @ 4:12am 
On big open areas I usually make a pentagon formation with the edges composed of pikemen . If cavalry attacks I can just stop moving and Order Pike wall and be protected from charges on all sides