Underground Blossom

Underground Blossom

73 ratings
Full Underground Blossom Walkthrough/Guide [NEW UPDATE INCLUDED]
By Z.
Full Walkthrough of Rusty Lake: Underground Blossom.
7
   
Award
Favorite
Favorited
Unfavorite
Station 1: Crib Station
Once you exit the train, click on the suitcase and collect the items inside. Go around the station and collect the cloth and saw from the box.

Time:
Go to the baby crib (continuously click on the baby's head until she cries to get an achievement) and give the baby the bottle. Use the cloth, collect and use the safety pin. Continuously click the baby until she poops herself, this will unlock another achievement.

Take the dirty diaper and put it in the trash can, light the trash can on fire and collect the scrapper. Scrape off the poster to reveal the pendant code. Go to Rose and put the code into her pendant. Take note of the time (10:15).

Ticket:
Use the saw to file down the vent and collect the metal rod. Use the metal rod to get the key, then use the key to open Ticket Window #1. Use the rod to poke the attendant until she wakes up.

Set the time to 10:15 and interact with the conductor. Click on his pocket to obtain the coin. Go back to the attendant, give her the coin, and collect the ticket.

End:
Give the train conductor the ticket and leave the station, giving you a third achievement.
Station 2: Child Lane
Collect the poster laying on the floor.

Time:
Use the scraper to scrape off the gum on the panel near Rose and Laura. Give the gum to Laura, make her blow a bubble, pop the bubble and collect chewed gum. Use the gum to hold the poster down on the frame. Follow the text on the poster and click the person's smile -> eyes -> bracelet -> hair -> eyes -> smile -> box. Watch the animation and take note of the number 53114.

Click on the other poster, drink -> hat -> kite -> camel -> airplane -> pyramid -> sun. Take the key and use it to unlock the phone booth. This will pop an achievement.

Click on Laura hiding behind Mr. Owl -> Newspaper stand -> Owl statue. Collect the window panel, place it in the second window and switch the panels around to make this tree. Get the crank and put it on the newspaper stand and crank it open. Continuously click on the photo service sign until someone says something for an achievement.

Give the newspaper to Mr. Owl and rearrange the headlines to make sense. Then, take the coin from his pocket. From the phone booth, place the coin inside and call the number: 53114.

Go to the owl statue and click on its eyes to make them bright. Wedge the metal rod into the crevice to reveal the code: 8827. Put the code into the box next to Mr. Owl and collect the camera. Give the camera to Laura and let her take two pictures of you.

Go around to where Rose is and interact with her, once you back out she will be gone. Go to the metro area and take the screwdriver and pendant out of her bag. Use the screwdriver to unscrew the panel where you got the gum and collect the glass pane. Place the pane onto the first window and complete the picture.

Interact with Laura, who is hiding in the space under the statue, pick up the dropped film and put it in the box where you got the newspaper. The man will tell you to come back in 20 minutes so change the time on the clock to be 20 minutes in the future. When you come back there will be developed photos and the time: 4:05.

Ticket:
On the 4 pre-completed glass windows there are different combinations. Use those combinations to get the code for the ticket. Once you put in the pattern the ticket should drop.

End:
Change the time to 4:05 and give the ticket to the conductor, granting yet another achievement.
Station 3: School Street
Collect the peanut from the peanut bag. Fold the paper into an airplane and collect it. Saw the sausage can open and get the sausage.

Time:
Talk to the nerd with the yearbook and sort the pictures in his book, unlocking an achievement. Give him all the collected items and take the worm. Feed the bird and make it lay an egg, which drops on Johnny. Click on Johnny until the other girl yells at him for an achievement. Go through Johnny’s dropped book bag and measure out the lollipop, sharpener, and cigarette. The code is: 637. Return the photos to Laura and get the time, 2:45.

Ticket:
Behind Laura there is a ticket machine. Follow the arrows and make sure every button is pressed down. The number of arrows corresponds to how many spaces you move (i.e. ^ means move up one and >>> means move right three times). Once you solve the puzzle, the ticket should drop.

End:
Change the time to 2:45 and give the ticket to the conductor. This earns you another achievement.
Station 4: Bird Bridge Station
Collect the sausage piece and pencil.

Time:
Give Laura the pencil and use it to trace a portion of Rose’s face, collect the line. Uncap the sewer and tie the line to the stick. Interact with the singing woman poster and hold the woman’s mouth. Remember the notes and play them on the trumpet (1 2 3 1 2 3). This will grant an achievement, along with playing random notes on the trumpet for a while.

Take the fish and obtain the hook. Now go back to the sewer and connect the hook to the makeshift rod. Attach the sausage piece and reel up a rat. Follow the rat around the room and read the note that drops when it goes into the crevice.

Set the time to 5:00 and talk to Bob to get money. Buy a coffee and a sandwich. Give Bob the sandwich and drag the worms off of the bottom bread piece and obtain breadcrumbs. Give Laura the coffee, drink it, and collect the cigarette.

Talk to anyone at the station, then red hat, check brown suitcase’s pocket, give glasses to hard hat, check tall smiley’s pocket, give tie to tie-less businessman, talk to green tie, check other red beard w/ hat man’s pocket, obtain lighter.

Take the cigarette and the lighter to the suspicious man, get ROBBED (!!!!!) and collect the paper clip inside the paper bag.

Go to where Laura and Bob are sitting and look through Laura’s sketchbook. Flip through the pages and find the time (3:45).

Ticket:
Use the paper clip to lockpick the electricity box. Solve the three puzzles.
After solving the puzzles go to the speaker and take note of the announcement, go back to the trumpet player and play the notes (1 1 2 2 3 3). Free the bird and go to where Laura and Bob are sitting. Once the bird is perched on Laura’s hand, feed it the breadcrumbs. Remember the song it sings.

Go back to the trumpet player and play the notes (3 3 1 3 1 1). Obtain the ticket.

End:
Change the time to 3:45 and give the ticket to the conductor. Netting another achievement.
Station 5: Sorrow's Cross
Talk with Laura and Bob.

Time:
Get the clock hand inside the box underneath the bench. Place the hand on the clock and turn the time to 4:00. Send Bob off and collect the money in his wallet. Use the coin to buy 3 different vending machine snacks, the 25, 35, and 45 ones. Click on where the snacks got deposited and complete the sorting puzzle. The objects can be sorted into three categories: animals, foods/drinks, and modes of transport. Finishing this puzzle will unlock an achievement.

After getting the cookie, go to where the pigeon is and give the pigeon the cookie. The seed puzzle can be done many ways, but just make sure that there is one white after every red and two white after every green.

After the pigeon flies off, follow it throughout the station until it gets run over by a train (😭). Take the key and unlock the shady fellow’s cage. After seeing he has your stuff, put the rest of the money from Bob’s wallet into the box underneath the bench and set the time to 9:00. Afterwards, you will get the saw back but not the timepiece. Saw off the lock on the cabinet behind Laura and obtain the painting panel.

Put the painting panel onto the painting and move it around until you find all 12 locations in the painting. Make sure you click the circle you’ve located to progress.

Look at the knocked over trash can and sort all of its contents into pairs. Read the letter and obtain the pill.

After giving the pill to Laura, talk to her and back off, once you back off the scenery will completely change into a creepier scene. Follow Laura’s instructions and place the correct objects into the hands of the correct people.

Once that is done, click on the portrait next to Laura’s dead body. Take the paintbrush and dip it into the pigeon's blood. Go back to the portrait and use the paintbrush to draw all over Rose’s face until you get the time. (7:55).

Ticket:
Click on Laura’s dead body and collect the ticket, clicking on Laura’s head multiple times until a bug comes out will get you an achievement.

End:
Change the time to 7:55 and give the ticket to the conductor. Again, this will give an achievement.
Station 6: Soul Street
Obtain the crowbar leaning on the lockers.

Use the crowbar to unlock the crate, vent, and oil container. Collect key no.6 from the crate and unlock locker no.6, collecting a bucket. Light the spilled oil from the container on fire.

Go to the wall with the various holes and blockers. Your objective is to get the butterfly to the circled hole using the blockers. The direction of the blocker will determine the direction the butterfly goes next. Once the butterfly gets to the circled hole it will fly off.
Come to where the butterfly is, near the black pile. Click on the pile and Laura’s soul should appear. Talk with the soul and collect the offered key. Use the key to unlock locker no.7, collecting the pincers.

Using the pincers to unlock the locked doors, you are greeted with a prisoner. Unroll the tape from his mouth and store it for later use. Click on his nipple and attach the paper clip onto it. Pulling the nipple a couple times will grant an achievement.

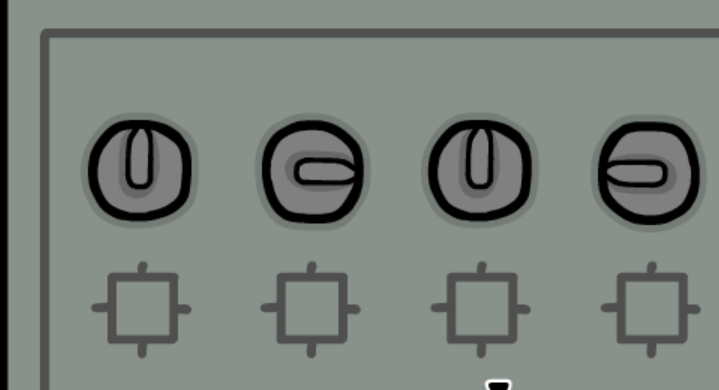
Use the tape to secure the first exposed bit of wire. Turn the first and second knob to face upwards. Go to the left and crank open the compartment on the wall, obtaining the valve.

Attach the valve to the faucet and use the bucket to collect water. Use one bucket of water to splash onto the prisoner, use another to fill up the vent on the ground, and one to extinguish the burning oil stuff. The vent gets you a clamp and the extinguished ashes get you an iron wire.

Use the clamp on the prisoner’s other nipple and use the iron wire to connect the second group of exposed wires. Turn the knobs up, right, up, left to turn on the power for electrocuting the prisoner. Once you electrocute him, he’ll start talking and give you an achievement.

Go to the poster of the dead woman and click her hand a couple of times, grab the key and the tape. Use the key to unlock locker no.8 and the tape to tape off the final exposed bit of wire. Inside the locker is a box, we will come back to that later.

After taping the wires, turn the knobs up, right, up, up, right. This will illuminate the room and give us the code. Going back to the prisoner, the pictures match up with his tattoos, which have designated numbers. The code in the end is: 4195.

Give the newly acquired timepiece to Laura’s soul and put in the code on the wall. Watch the clock inside spin faster and faster until it finally cracks. After clicking the timepiece one final time, it is time to go with Laura’s soul. No time or ticket is required for this.

End:
Laura’s soul is waiting for you at the train, go with her. Achievement gained.
The Lake
There's not a lot to say about this section since there are no puzzles, but make sure to click the black butterflies floating around at least twice to get a missable achievement. At this point just follow what the characters say and enjoy the stunning artwork and the rest of the game !
Post-Game Stuff
After you finish the game and go back to the starting screen, you can collect a watch that will let you jump between stations. You also get a note from Mr. Owl saying to meet him at the lake.

Cubes

Station 1: Fill up a bucket of water from Soul Street and empty it down the drain of Bird Bridge Station. This will get you a fishing net which you can use the catch the fish jumping around the puddle in Soul Street. Use the crowbar on the fish to receive a key. Use this key to unlock the second ticket booth in Crib Station. The bronze cube will be there.

Station 2: Use the crowbar on the open cabinet in Sorrow Cross. Put the button layout into the ticket box in Child Lane, switching the white and the black and vice versa. The Marble cube will be there.

Station 3: Fill the bucket up with water from Soul Street and empty it out in the crate on the floor in Crib Station. Punch in the symbols you see in the water into the ticket machine of School Street. The Ice cube will be there.

Station 4: Using the coin you got from the man at the lake, buy the nut bar from the snack vending machine in Sorrow Cross. Put the nut bar on the student who's allergic to nuts (blond hair, glasses) from School Street. Remember the notes from his scream and play them on the trumpet in Bird Bridge Station (2 2 2 1 2 3). The Stone cube will be in the trumpet.

Station 5: Use the crowbar to pry open the loose tile from Bird Bridge Station. Use the $50 to buy a donut. Once you give the donut to Bob he will tell you to go the the red tiled station at noon. Go to Sorrow Cross and set the time to 12:00. An elderly woman will appear in the prison and the Bone cube will be there.

Station 6: Paint the owl statue's eyes red in Child Lane and pick up the key. Use the key to unlock locker no.9 in Soul Street. The Copper cube will be there.

The Lake: To the left of the blossoming tree, there is a part where you can click, as depicted in Laura's sketchbook. The Wooden cube will be there.

The Underground

Place the cubes inside the box to enter the underground. Placing the cubes in the order of cube escape collection, clicking on all the animal souls in the white cube, and entering the door will give an additional achievement.

There is an unmissable achievement for reaching the Rusty Lake Hotel.

The rest of the missable achievements for the underground I was unable to figure out on my own and it feels wrong putting them here without credit soo if you would like to know how to get the rest of the achievements I suggest you check out this lovely guide here: https://steamoss.com/sharedfiles/filedetails/?id=3042134246
The Lab
Child Lane
Use the phone to call 36133
Change the time to 2:40

The Lab
Talk to the man mopping the floor and take the coffee filter
Go to the right and place the coffee filter into the machine
Take the can
Open the toilet door and flush the toilet
Use the can to collect toilet water
Fill machine up with water
Go to the right and open up the briefcase
Take cup and coffee
Go back to the coffee machine and make the coffee
Give the man the cup and fill it with coffee
Take the discarded mop
Go to the right and take the key from the jacket pocket

Research Facility
Go to the power room and place the fuse on the top space
Exit the room, go straight and left
Pick up the glass and use the mop to jam the fan, obtaining another fuse
Make sure to take the mop out of the fan afterwards
Go back to the power room and place the fuses in the second and third spaces
Exit the room and continue going straight until you enter the storage room
Use the paper on the floor to decipher the code
Open the top box to get the ID, open the bottom box to get the valve
Exit the storage room and go to the left
Place the valve on the panel to the left of the cell
Turn the valve to free the corrupted soul
Enter the cell and collect the kidney from the dead rat on the floor
Go back to the power room and place the fuses on spaces four and six
Exit and go as far right and up as you can, then turn left
Collect the matches from the vent
Go back a few rooms and follow the arrows to the potion room
Use the key card to unlock access

Enter the potion room
Get the floppy disk and the toilet paper from the file cabinets
Place the coffee pot on top of the desk

Exit the Research Facility entirely and give the toilet paper to the poor man in the toilet
Give him some privacy, then collect some ♥♥♥♥ water in the glass

Go back into the Research Facility and into the potion room
Place the glass of water on the table
Place the kidney in the dish
Turn on the bunsen burner
Use the matches to light the burner

Using the papers on the floor you can deduce the order to pour the liquids
coffee, hot water, potion
Click the mass of flesh and it'll squirm off the table
Use the mop to push the mass of flesh through the rooms
When you get near the power room, go inside first to switch one of the fuses to the first space
Continue to push the mound of flesh until it gets brutally cut by the fan
Enter the vents, obtain the third fuse

Return to the power room and put the fuses in spaces four, five, six
Go back to where to obtained the matches and enter the memory extraction room

Talk to Rose and follow her instructions
Take the black cube

Exit the room and follow the trail of blood (poor dude can't catch a ♥♥♥♥♥♥♥ break)
Talk to Rose again, close the cell gate, obtain key

Return to the big doors and insert the key
Enter the door
Follow instructions on the device

Done!
End
Thank you so much for reading this whole guide and I hope I helped even just a little bit !! Feel free to lmk if I got anything wrong or if anything doesn't make sense ^^.
10 Comments
pepperberry0712 24 Sep, 2024 @ 7:09am 
:Wut_Leeches: How can I trigger the Steam achievement of the Lab?
I did the Lab correctly (I played the game until I got 3:45 again and went back to Child lane) and in-game I got the achievement Run Harvey, Run but it didn't trigger on Steam :steamsad:
Biophage (LuBu[RotK]) 22 Aug, 2024 @ 2:04pm 
i have no coin, never got one
Spiritfarer 22 Jun, 2024 @ 2:46pm 
I finished this game a while ago and hopped on today to play the Lab update, but I can't get it to trigger. Did 36133 on the phone and 2:40 on the station clock but the train doesn't ever come. Is this happening to anyone else? I even tried closing out and restarting the game.
Malkavian 2 Feb, 2024 @ 11:18am 
@Convenient Spider Thanks for that tip!
Meanwhile 21 Nov, 2023 @ 3:25pm 
The butterflies at the Lake are not missable. I got them in the post-game.
Z.  [author] 23 Oct, 2023 @ 5:37pm 
@Convenient Spider thank you ! fixed o7
Convenient Spider 23 Oct, 2023 @ 4:52pm 
For those struggling with the ticket puzzle in School Street, Here's a hint: Start with the bottom right corner and go from there.
Convenient Spider 23 Oct, 2023 @ 4:05pm 
In the second poster puzzle when clicking objects from small to large, You're missing one in the order. It's airplane, Pyramid, then sun.
Z.  [author] 1 Oct, 2023 @ 1:25pm 
@Mori which station ?
Mori 1 Oct, 2023 @ 1:14pm 
where does the code for the book at station come from?