Batman: Arkham City GOTY

Batman: Arkham City GOTY

370 avaliações
100% Achievement Guide: Batman - Arkham City Part 2
Por Cynic 0055
This is a comprehensive 100% Achievement guide detailing a step-by-step walkthrough to take you from 0 all the way to 100%. If you are looking for a particular Achievement or Collectible, use Ctrl+F & type it into the search bar for more direct help.

I run support & debug help on all my guides. If you have any questions, problems, or find errors in the guide itself, do not hesitate to leave me a comment & I will get back to you as soon as I am able to. Happy Hunting!
7
17
   
Premiar
+ favoritos
Nos favoritos
- favoritos
Introduction:


Achievement Breakdown: (44)
Story Related: (16)
Side Missions: (10)
Collectibles: (7)
Slay: (2)
Miscellaneous: (2)
Challenges: (7)

DLC – Catwoman Bundle Pack: (6)
Story Related: (3)
Collectibles: (1)
Challenges: (2)

DLC – Robin Bundle Pack: (2)
Challenges: (2)

DLC – Nightwing Bundle Pack: (2)
Challenges: (2)


This is Part 2 of 2 for the 100% Achievement Guide: Batman Arkham City. Part 2 only covers NG+, Batman’s Physical Challenges, Harley Quinn’s Revenge DLC, & all levels of Riddler’s Revenge for the four playable Characters. Part 1, linked in the Conclusion of the guide, covers: our first playthrough & the locations of all 360 Riddler Collectibles as well as Catwoman’s DLC & its Collectibles/Challenges.

Batman – Arkham City is going to a true test of your discipline & combat prowess; it is an extremely challenging 100%. For the Perfect Knight – Day Two Achievement, we will have to beat the game once on any Difficulty (Normal or Hard), beat NG+ on any Difficulty, beat all 12 Side Missions on BOTH the Base Game & NG+, as well as purchasing all Upgrades/Gadgets, finding all 400 of Riddler’s Collectibles, & beating all 72 Ranked Challenge Medals & 108 Campaign Challenge Medals of Batman’s difficult Riddler’s Revenge Challenges. Only the Side Missions need to be completed on both playthroughs; the Gadgets/Upgrades & Riddler Collectibles/Challenges, will remain completed & carry over into NG+ fortunately.

The Harley Quinn’s Revenge DLC is a simple linear expansion where we get to play as Robin. For the most part, it is straight forward & relatively short. There are only 30 Collectibles across the DLC we have to worry about. Some of the combat related Achievements take a bit of set up but are not too difficult; they can also be unlocked during the Riddler’s Revenge Challenges if we play as Robin.

If you played through Batman – Arkham Asylum, you will remember the brutal Combat & Predator Challenges we had to get 48 Medals in for the 100%. In Arkham City’s Riddler’s Revenge, we have to get 180 Medals in these kinds of Challenges. What is even worse… is that three of the DLCs add in Catwoman, Robin, & Nightwing as playable characters. We must also earn 180 Medals with each of these characters making 720 Medals total. Nightwing & Robin also have a few extra Challenges to boot; it is actually 744 Medals total. These 12 Achievements will seriously test your abilities & commitment as a gamer.

For those interested, here is an organized list of all the Achievements/Secret Achievements. This is how I derive my Achievement Breakdowns & the first reference I create before I begin my 100% journeys.
https://steamoss.com/sharedfiles/filedetails/?id=2773373426

Before You Play! – Game Stutter Fix!: Arkham City has an awful port to PC. No matter how good your PC is, when you are outside in Arkham City proper you will notice severe lag & drop in FPS; it is not as bad in doors. To fix this without mods you will need to go into your Save File settings & change some code around; this is not as hard as it sounds. First, go into the Computer Folder – Documents – WB Games – Batman Arkham City GOTY – BmGame – & Config. In the Config Folder, look for the Configuration Setting File called BmEngine; this will directly affect your Save File so be careful & only change what I list.

In the BmEngine File, press Ctrl+H to bring up the Find Bar; this will allow us to search for things within the BmEngine File. Type poolsize into the “Find what” bar & select “Find Next” to where the Pool Size is located. Set the Pool Size to 4096 (this translates to 4gb & is safest if you are unsure what your VRAM is). Feel free to set it higher if you have more than 4gb of VRAM.

The next step is to type sizeofpermanentobjectpool into the Find bar (if it says it could not find it, change the direction of the search to up instead of down so it searches above where we are located right now). Double the current value from 1160000000000 to 232000000000. Just change the first three numbers, leave all of the 0s. Lastly, we need to adjust the hysteresislimit & set it to 0.

That is the last adjustment we need to do, but do not close out of BmEngine File just yet. Minimize the File, & right click it & bring up the File’s Properties. In Properties, set the Attributes to “Read-only”. If we close the File without doing this, all of our adjustments will not save; set it to read-only to hard save our changes so it will not reset when we close down the File. With that set, close the File & we can begin playing Arkham City as it was intended… don’t ask me why Rock Steady couldn’t Patch this themselves though…

*Guide contains major spoilers.
Sequence 1: NG+
1. Main Story: Catwoman Episode 1 DLC, Bruce Wayne Held Hostage, Rescue Catwoman, Track Down Joker, The Steel Mill, Catwoman Episode 2 DLC, Finding the Cure
2. Side Missions: 1/12
3. Achievements: 38/64
-----------------------------------------------------------------------------------------------------

To unlock NG+ you must have beaten the game once already on Normal or Hard Difficulty. With the bulk of the game completed previously in NG, we can breeze through NG+ very quickly. All we need to do is beat all Main Story Missions, all 12 Side Missions once again, & make sure we have all 40 of Batman’s Physical Challenges completed (the ones we completed previously in NG will stay completed).

Some things to note about NG+:
1. Enemies deal more damage & take more damage
2. Counter Icons are removed (making certain Boss fights a lot more challenging than they originally were in NG)
3. Harder enemies such as Shield Thugs, Armored Thugs, etc. are no longer Story Locked & will spawn at the very start of NG+

Park Row:
Progress through Catwoman’s Episode 1, & the Prologue (if you have a good memory, you might be able to pick out Deadshot in Line A of the Arkham City Processing Center as we make our way through as Bruce Wayne…)

Industrial District:

Side Mission #1 – A.R. Training Basic 1-4: After we track down Joker at the Church, we will unlock the A.R. Training Side Mission. Head to the Waypoints & complete all four Gliding Challenges. Re-collect the Grapnel Boost to complete the first set of Challenges. 50% Complete

Side Mission #1 – A.R. Training Advanced 5-8: With the Basic A.R. Training Missions complete we can now access the Advanced Training Missions. Go to the Waypoints, & complete the four Missions. Some of these can be pretty tricky; especially Advanced A.R. Training Mission #1. 100% Complete

Amusement Mile:

Side Mission #2 – Fragile Alliance 1: Head to the Krank Co. Toys building to initiate Bane’s Side Mission. Right off the bat, we can destroy the Titan Containers found in the Industrial District & in The Bowery. 30% Complete

Park Row:

Side Mission #3 – Acts of Violence 1: Head to the far West end of Park Row & we can find a hexagonal shape appearing on our World Map. Go to the Waypoint & rescue Jack Ryder from the Thugs. Speak with Ryder to initiate this Side Mission.

Speaking with Ryan after he is rescued will now unlock instances of Political Prisoners needing to be saved from abusing Thugs. Once again, are 16 instances that we need to do to complete the Side Mission; they will randomly appear as we play the game. If possible, try keeping track of where you have already encountered an Act of Violence to save yourself backtracking at the end of the game; consult the event map for this Side Mission at the end of Sequence #34 in Part 1.

Complete Main Mission – Rescue Catwoman.

Side Mission #4 – Cold Call Killer 1: After we have rescued Catwoman, this Side Mission will now have the random chance to become active. As we explore Arkham City, keep your ears open for a ringing phone. If you hear one, quickly track it down & answer it to hear Victor Zsasz on the other end…

Side Mission #4 – Cold Call Killer 2: Explore around some more in Arkham City & chip away at some Physical Challenges to pass some time. After a bit, there is a chance that we can hear another phone ringing. Turning on Detective Mode can help you triangulate the phone; it will have orange semi-circles denoting sound emitting from it. Answer the phone & it we will begin this Side Mission in full.

After Zsasz hangs up, we will be timed to quickly locate the next phone. Follow the Waypoint through the city to a random phone location & answer it before the timer runs out. When you get to the phone, we will need to trace Zsasz’s signal while he talks. We can only trace up to a certain point before progress stops & we will need to locate a new phone. 19% Complete

Side Mission #5 – Watcher In the Wings 1: Make your way to the location marked in the Screenshot to find the first location of the Mysterious Watcher. 20% Complete


Steel Mill:
Carry on into the Main Story Missions to complete the Steel Mill & Catwoman Episode 2 DLC.


Achievement #38 – Gadget Attack: Use 5 different Quickfire Gadgets in one fight (any play mode).
As we playthrough NG+, keep your eyes out for large fights we can take advantage of for this Achievement.

In the same fight (not all in one Combo) use the Quick Gadgets: Batarang, Batclaw, REC, Freeze Blast, & Explosive Gel. The Explosive Gel is the hardest to use; after getting a Combat Multiplier of at least 1, use the Quick Explosive Gel first. Use Evade to get distance from enemies to fire off the last few Quick Gadgets.

Look in your Waynetech Tab of the PDA to see the controls for each Quick Gadget if you need to.
This Achievement is almost guaranteed if you will be attempting Riddler’s Revenge later on…

Side Mission #2 – Fragile Alliance 2: After completing the Main Story Mission – The Steel Mill, head to the ground floor entrance of the building at the South end. Head through the door here & we can find a Titan Container around the corner to our left. 45% Complete

Industrial District:

Side Mission #5 – Watcher In the Wings 2: With the Steel Mill complete, Grapple to the top of the Ferris Wheel in the Industrial District to find the Mysterious Watcher; Scan the Symbol he makes to progress the Side Mission. 40% Complete

Amusement Mile:

Side Mission #6 – A Shot In the Dark 1: Enter into the Amusement Mile after completing the Steel Mill & if you look on your World Map, we can see a Side Mission Waypoint reading “S.O.S. Broadcast Source” where a Political Prisoner is trapped on the rooftop of the Gotham FM building. Get to the Waypoint & speak with the man who will shortly be shot.

Set up a crime scene & follow the bullet trajectory back into the Industrial District. Find the shell casing from Dead Shot & we will end the first section of the Mission. We now need to be on the lookout for other murders to progress the Side Mission.

Kind of an oversight on Deadshot’s part not to have sniped Batman right away after killing that Political Prisoner… 15% Complete
Sequence 2: Enigma Conundrum Redux
1. Main Story: Finding the Cure
2. Side Missions: 1/12
3. Achievements: 38/64
-----------------------------------------------------------------------------------------------------

Park Row – Church/Medical Center:
Complete Main Mission – Finding the Cure to progress.

Side Mission #7 – Enigma Conundrum 1: When we exit the GCPD Building after dealing with Mr. Freeze, we can now access Riddler’s Side Mission in the Church.
We will need to solve the Riddle “I am an instrument whose music always comes from the heart. What am I?”

Go to the far end of the Church & enter Detective Mode; Scan the pipe organ at the back to complete the Riddle.

Park Row – Solomon Wayne Courthouse:

Side Mission #7 – Enigma Conundrum 2: Immediately after solving the first Riddle in the Enigma Conundrum, The Riddler will tell us that a Hostage can be found in the Courthouse.

Enter the Courthouse, & we can find the Hostage being held by a group of Thugs. Dispatch the Thugs, & untie M.P.T. Eddie Burlow. He will then give us the Enigma Machine; open up the Enigma tab of your PDA & solve the Riddle: “If you know me, you’ll want to share me but if you share me, I’ll be gone. What am I?” The answer to the Riddle is “Secret.” After solving the Riddle, we will then be able to locate the next Hostage. 5% Complete

Park Row:

Side Mission #7 – Enigma Conundrum 3: Complete the Enigma Machine Riddle we unlocked; we can now locate our first official Hostage. Approach the Waypoint just West of the Church & interact with the wall of The Black Canary with a green question mark painted on it. Enter into The Black Canary & throw a Batarang at the Question Mark above the door we came through to unlock the way ahead.

Enter the next room to find it full of electrified tiles; the Hostage tied up above us. Directly across from us is a Question Mark that will turn off a pathway through the tiles for 20 seconds; there is another one just to the right of the rooms entrance. Make your way from safe zone to safe zone until you reach the lift at the other side of the room. Strike the Question Mark on the wall to our left to activate the lift & take us to the top. Glide off the top of the lift over to the Hostage & rescue them.

After saving the Hostage, we receive The Riddler’s next coded radio broadcast 6-2-5, 9-2-5. 20% Complete

Amusement Mile:

Side Mission #7 – Enigma Conundrum 4: Since we have already completed 400/400 Riddler Collectibles/Challenges we can unlock every single Hostage Rescue Mission one after the other & complete the Enigma Conundrum right away.

Use the Cryptographic Sequencer & we can decode The Riddler’s next broadcast to receive the Riddle: “The more there is, the less you see. What could I be?”

The answer is “Darkness”. Solving the riddle will let us go & save another Hostage.

Make your way to the next Hostage Waypoint in Amusement Mile. Interact with the wall with the green question mark painted on it & enter the hideout. In the first room of the hideout, stand on the Pressure Plate on the lower floor & we will activate the mini-game to save the Hostage. The Hostage will be hidden behind one of three containers that will be shuffled around. This puzzle is rigged however as you will find out if you turn on Detective Mode as the Hostage is actually shuffled below the containers. Throw a Batarang at the Question Mark below where the Hostage is located & jump over to rescue them.

Failing will kill the Hostage, & give us a Game Over Screen which we can Retry the mini-game from. 30% Complete

Industrial District:

Side Mission #7 – Enigma Conundrum 5: Use Hostage M.P.T. William North’s next coded radio broadcast 8-6-0, 1-2-0 & open up the Enigma Machine & solve the puzzle. The riddle is: “I have a head, a tail, but never any legs. Do you know what I am?” The answer is Penny.

Make your way over to the third Hostage’s Waypoint in the Industrial District & head to the spray-painted question mark in the alley near some dumpsters. Sparta kick the wall & enter the lair.

To solve this puzzle, use the Line Launcher to get over to a walkway across the water. From the walkway, look up to see that the water flowing over the two Question Marks can be manipulated by using the Remote Electrical Charge on the Industrial Motors. The Question Mark on the right can be hit with a simple Batarang while the Question Mark on the left will need to be hit by a Remote Controlled Batarang. With the Security Gate disabled, use the Line Launcher to ride past the first set of circular saw traps. Once you are through, fire another Line off to your right before passing through the next set & you will enter the next puzzle room.

For this puzzle, simply use the Remote Electrical Charge to guide a Sionis Steel Pallet over towards a Pressure Plate with the three Industrial Motors nearby. With the next Security Gate disabled, we can now save an unnamed Doctor. The code she gives us is 6-0-6 1-2-0. 37% Complete

Side Mission #7 – Enigma Conundrum 6: Enter the code 6-0-6 1-2-0 into our Cryptographic Sequencer & we will unlock the next Riddle for the Enigma Machine. The Riddle is: “I’ll be right under your feet, in the midday sun; you cannot lose me, no matter how you run. What am I?” The answer is: Shadow.

Completing the Riddle will unlock the location of the fourth Hostage in the Industrial District. Head to the Waypoint, & break into the next one of Riddler’s hideouts. Use our Cryptographic Sequencer to disable a path through the Electrified Security Floor tiles to the safe zone. From there, throw a Batarang across the room at a Question Mark to disable another pathway over to the far side of the room. Climb up to the second floor & quickly get across the other end where we can use the Line Launcher to get inside a room to the left of the Hostage.

Turn on Detective Mode here & we can see the Security Gate is being controlled by a Question Mark past a Structural Weakness. Destroy it with Explosive Gel, & use your Remote Electrical Charge on the Industrial Electromagnet to move a Steel Crate away from an opening in the fence; we can now deactivate the Question Mark with a Remote Controlled Batarang. Stand on the Pressure Plate in the next room to disable the final Security Gate & use the Line Launcher twice to tackle the Hostage in mid-air & safely take him through a glass window to escape. He will tell us the next digits for the code which are: 1-1-5 7-8-0. 60% Complete
Sequence 3: The Toxicity of Our City
1. Main Story: Finding the Cure, Disable the Disrupters, The Museum, Mr. Freeze, Rescue Vickie Vale
2. Side Missions: 6/12
3. Achievements: 38/64
-----------------------------------------------------------------------------------------------------

Amusement Mile:

Side Mission #7 – Enigma Conundrum 7: Open up the Enigma Machine after entering in the code & the next Riddle to solve will be: “Hit me hard & I will crack but you’ll never stop me from staring back. What am I?”The answer is Mirror.

The fifth Hostage can be found in Amusement Mile. Enter the next hideout & rescue M.P.T. Anne Bishop. The puzzles here are not that difficult, we basically have to utilize each of our Gadgets one by one to solve mini puzzles to get to her. 75% Complete

The Bowery:

Side Mission #7 – Enigma Conundrum 8: When we exit the last Riddler hideout, Oracle will tell she has triangulated the Riddler’s final hideout location. Get to the Waypoint just below where the Iceberg Lounge entrance is & we will need to Glide over an electrified fence like how we previously did to collect a Riddler Trophy down here. Dive Bomb down towards the Waypoint & quickly pull up & Glide over the electrified fence. On the other side of the fence, we can find a door leading into the hideout.

Carefully navigate around the track where the Riddler has the kidnapped Cops & medical staff walking & get below the Riddler’s position to perform a Takedown to put this Side Mission to rest once & for all... 100% Complete

Subway:
Enter the Museum to initiate the Main Story Mission – Disrupt the Disrupters. Disable the two Disrupters in Arkham City proper then head into the Subway for the final one.

Side Mission #2 – Fragile Alliance 3: Head through the Subway Tunnels & we will come across our third Titan Container guarded by a few Thugs on our way to the final Disrupter. Dispatch them & use our Explosive Gel to destroy the Container. 60% Complete

The Bowery:

Side Mission #8 – Identity Theft 1: Exit the Subway after destroying the Communication Disrupter & head to the front entrance of the Arkham City Processing Center in the East side of The Bowery. From here, climb over the chain link fencing at the gates & make your way down the alley to the right of the Center entrance along the Perimeter Wall where we can find a dead body near a barrel fire. Approaching the body will activate the Side Mission; turn on Detective Mode & enter the Evidence Scanner which will allow us to track the victim’s blood on the ground.

Follow the blood trail & it will lead us to a Political Prisoner, progressing the Side Mission. 35% Complete

Museum:
Carry on with the Main Story & enter the Museum; we can use the large battle in the Gladiator Pit to complete a lot of our Physical Challenges if you still need to…

Side Mission #4 – Fragile Alliance 4: We can find the next Titan Container in the War Room of the Museum around the corner, after we dispatch the second Abramovici Brother. 75% Complete

Park Row:


Side Mission #8 – Identity Theft 2: After tracking down the Assassin & obtaining the Line Launcher, make your way to the Waypoint on the map above in Park Row where can find our next victim in the case in an isolated alley. Use the Evidence Scanner to collect more information on the killer. 50% Complete

Wonder City:
Make your way into Wonder City now & deal with Rā’s al Ghūl in the Main Story Mission – Wonder City. By this point I had 61% Complete in Cold Call Killer & 24% Complete in Acts of Violence.

Side Mission #4 – Fragile Alliance 5: Enter Wonder Tower Foundations & rescue Dr. Fiona Wilson from Joker’s Thugs; we can find the last Titan Container on the second floor of the room to destroy with Explosive Gel. 90% Complete

The Bowery:


Side Mission #5 – Watcher In the Wings 3: After completing Wonder City, exit the Subway & go interrogate Quincy Sharp for information. When we fling him away, we can actually see the Mysterious Watcher on the rooftop across from us. Grapple over to him & Scan the next Symbol he makes to progress the Side Mission. 60% Complete

Museum:

Side Mission #9 – Remote Hideaway: Once we complete the Main Story Mission – Wonder City, we can see a new Waypoint on our World Map near The Museum reading “Undercover Cops with Gadget Upgrades”. Dispatch the Thugs outside North entrance to the Museum & head inside.
Speak with Officer Jones & we will be given the Mine Detonator Upgrade for our Disrupter. As simple as that. 100% Complete

Amusement Mile:

Side Mission #2 – Fragile Alliance 6: Return to Krank Co. Toys after destroying all 6 Titan Containers & deal with Bane to compete the Side Mission. 100% Complete

GCPD Building:

Side Mission #10 – Heart of Ice 1: Carry on with the Main Story Mission – Mr. Freeze & head to the GCPD Building in Amusement Mile.

Mr. Freeze is extremely difficult in NG+; take advantage of: Industrial Motors, Floor Grates, Drop Attacks, Sneak Attacks, Electrified Wires, & Explosive Gel. If you use a specific Environmental Move on him (such as Drop Attack from Railing) quickly guide him to all the railings & use that move on him as soon as possible before he disables that Environmental Move with ice. He disables Environmental Objects almost immediately after we use them on him which can actually screw you over if you are not fast at taking advantage of them. If you are quick, you can sometimes use the same Environmental Move multiple times if Freeze gets distracted trying to disable other things; I finally beat him after 5 tries because he kept trying to freeze a window & I was able to spam Drop Attack off a railing multiple times to finish him off.

Also be sure to use Detective Mode sparingly; if you remain in it too long, Freeze will permanently jam it for the fight. Use it only for a second at a time just so you can quickly find his current location. Deal with Freeze, & we will begin the Heart of Ice Side Mission. 0% Complete

Park Row:
Complete Main Mission – Rescue Vicki Vale to continue.

Side Mission #11 – The Tea Party: After we have rescued Vicki Vale, & we will receive a new Side Mission in Park Row. Go to the Waypoint marked “Cure drop off point” & go collect the cure… or try to. Batman got a dose of the good stuff instead… Complete Mad Hatter’s waves of Thugs & finish the Side Mission. 100% Complete

Side Mission #8 – Identity Theft 3: Make your way over to the South face of the Ace Chemical Building in an alley way & we can find the third & final Victim. Use the Evidence Scanner to case the area & follow the bleach trail the killer left behind… past Jack Ryder… & to the Inmate who will tip us off to the killer’s hideout.

Make your way over to the hideout, in the same complex as Catwoman’s apparently, & head inside. Escape the trap to complete the Side Mission. 100% Complete
Sequence 4: Bitter Sweet
1. Main Story: Steel Mill 2: Electric Boogaloo, Catwoman Episode 3, Protocol Ten, Wonder Tower, Monarch Theater, Catwoman Episode 4, Post-Game
2. Side Missions: 12/12
3. Achievements: 39/64
-----------------------------------------------------------------------------------------------------

Park Row:

Side Mission #6 – A Shot In the Dark 2: As we roam around Park Row towards, Hush’s Hideout or when we found his third Victim, we will shortly hear a gunshot marking the second part of this Side Mission. Head to the Waypoint, & we can locate the body on top of the broken overpass just above the Political Prisoner Camp in the North end of Park Row. Use the Evidence Scanner to find another clue about Deadshot’s where abouts. Only one body more to go… 40% Complete

Amusement Mile:

Side Mission #5 – Watcher In the Wings 4: Make your way over to the GCPD Building, & we can find the Mysterious Watcher on a rooftop near a water tower just West of GCPD.

Scan the Symbol he leaves behind & we will now get to complete a puzzle aligning the circular emblem over all four of the Symbols we Scanned. When properly aligned, the Symbols will guide us to the Mysterious Watcher’s final location just outside the Church/Medical Center in Park Row.
Head to the location, & there will be a large Symbol on the Church wall; Scan it & the Mysterious Watcher will have an over-the-top entrance to greet us. He will reveal himself as Azrael, the Angel of Death, & leave us with an omen completing the Side Mission. 100% Complete

Industrial District:

Side Mission #10 – Hearts of Ice 2: Head to the North East end of the Industrial District at the waterfront. In the area with the two cranes, turn on Detective Mode & we can see a door in the building off our left. To get inside, Glide over to the Falcone Shipping barge in the water & look back at the building in Detective Mode to see a Structural Weakness in the wall above the water.

Use the Freeze Blast to make a platform & pull yourself over to the wall using the Anchor Points & our Batclaw. Destroy the Weakness with Explosive Gel & continue to pull yourself into the building using Anchor Points & enter into the building. Nora will be on the main floor; dispatch the Thugs inside & return to Freeze to complete the Side Mission. 100% Complete

Side Mission #4 – Cold Call Killer 3: As of this point, we can now access all of Zsasz’s phone mini-games to locate him. You need to progress the Side Mission to 80% Complete before we can discover his location. This takes at a minimum of 6 phone mini-games depending on if you can max out your triangulation every time; this can take up to 8 phone mini-games at a maximum if you do not.

To know where to search, access Cold Call Killer from your Side Mission tab & you can see all possible pay phone locations. Ones that are completed will be check marks instead of the phone symbol. Glide around to each of the pay phones still available & one will eventually start ringing. If none do, try entering/exiting a building or quitting to the Main Menu & reloading your game to reset Arkham City.

Zsasz’s Hideout is located near the waterfront in the Industrial District.

Sneak around the room in his hideout & perform a Takedown on Zsasz through a glass window once you get behind him. Note that we can chip away at this Side Mission while we do Acts of Violence at the very end of NG+ if we like as it can be completed in Post-Game. 100% Complete

Steel Mill:

Side Mission #12 – Hot & Cold 1: Enter into the Steel Mill & get to the Assembly Line where we can find Harley Quinn tied up during the Main Story Mission – Steel Mill 2. Take the tape off & she will give us our final Side Mission.

Enter the Boiler Room from the Loading Bay/Freight Elevator & dispatch the Thugs inside; loot the Freeze Technology to complete the Side Mission. 100% Complete

With that, we are in the home stretch. Complete all of the remaining Main Story Missions now & enter us into Post-Game

Monarch Theater:


Achievement #39 – Twice Nightly: Complete New Game Plus.
Story Related. We need to play extremely defensively for the Clay Face final boss battle. Always position yourself near the exploding corners to bait him into when he rolls; when in doubt, always dodge. If we die at any point in the fight, we have to restart the entire battle. Try not getting hit as best as you can for his first two phases to save all of your health for when we fight him with his Minions. The biggest thing is to not get greedy with our Freeze Bomb spamming.
The Achievement will unlock as soon as he is defeated.

Quickly blast through Catwoman Episode 4; since this is DLC we do not need to collect her Loot, unless you want to, as it won’t affect the Perfect Knight – Day 2 Achievement.

Park Row:

Side Mission #6 – A Shot In the Dark 3: As Batman, make your way into Park Row & we will hear a gunshot marking another Crime Scene by Deadshot. The trigger for the final Crime Scene is a bit unknown. We need to be in Post-Game for sure but other than that it can trigger at any time.
We can find the Crime Scene at the far West end of Park Row near a Tyger Checkpoint in the Perimeter Wall with a bunch of Thugs gathered around him. Investigate the Crime Scene & we will narrow Deadshot’s location to three possible buildings: 12A, 12B, or 12C. To save you the time of guessing… he is in 12A. Head up the set of stairs on the building to tear down a Hatch on the back of a small room to find Deadshot’s weapons & PDA. Hack the PDA with the Cryptographic Sequencer to learn of Deadshot’s next targets. Jack Ryder is next.

In NG+, we will only have 2 minutes to get to Ryder’s location in the upper Bowery. Get to Ryder & save him before having to deal with Deadshot himself; just get below where Deadshot is standing & perform a Takedown. 100% Complete

Side Mission #3 – Acts of Violence 2: Now all we need to do is clean up this Side Mission. There are a set 16 locations that these assaults take place at, but they may not always spawn. Cycle around Arkham City to all of the locations & if some do not spawn (you may have already done them) quit to the Main Menu to reset the area & cycle through them again until you complete all 16. Since we are in Post-Game, all possible assault locations will be accessible. 100% Complete
Sequence 5: Physical Challenges 1
1. Main Story: Post-Game
2. Physical Challenges: 13/40
3. Achievements: 39/64
----------------------------------------------------------------------------------------------------

All we have to complete now for the Main Campaign is making sure we have all 40 Physical Challenges completed for Batman. To give yourself an easier time, I would recommend completing these on your NG file instead of our NG+ one so we can take advantage of Counter prompts. If you need to, Save & quit to the Main Menu to reset Thug spawns. Scroll through the list of Challenges below to the ones you still need to complete for their associated walkthroughs; if you have them all completed, you can skip down to where we start the Harley Quinn’s Revenge DLC.

Navigational Challenge #1: Glide continuously for over 150m. (without using the Grapnel Boost Upgrade)
This is best attempted from one of the tall smokestacks in the Industrial District. Grapnel Boost off of a high point (just to get started) & Glide, uninterrupted for over 150m. We cannot use the Grapnel Boost but can use Dive Bomb to give us a bit more altitude when we need it. Doing this from the Industrial District is good because we can Glide out over the ocean which is the lowest point in the city. This is very easy to do; I have a Glide record of over 215m…

Navigational Challenge #2: Glide continuously for over 250m. (Grapnel Boost Upgrade permitted)
The premise for this Challenge is identical to the first except this time we get to use our Grapnel Boost making it even easier. If you start from a high point in the Industrial District, Grapnel Boost up off a smokestack & down through the Amusement Mile Boosting off nearby buildings until the Challenge completes.

Navigational Challenge #3: Perform a Vertical Dive for over 50m.
The best place to complete this Challenge is once again using the tall smokestacks in the Industrial District in the North West corner near the waterfront. Grapnel Boost off the tall stack & as soon as we clear the buildings roof, immediately fall into a Dive Bomb. The stack should be well over 50m & it will unlock after touching the ground after your Dive Bomb.

Navigational Challenge #4: Perform five consecutive Line Launches without touching the ground.
This is best attempted in an area like The Bowery or Park Row where there are a lot of buildings. Simply engage the Line Launcher & continually fire off new lines to ride, without bumping into walls, to complete the Challenge.

Navigational Challenge #5: Glide for 30m while maintaining a height of less than 5m above the water.
This Challenge is a bit finicky & will take the most attempts out of the Navigational Challenges. Use are favourite Gliding smokestack in the Industrial District & when you get over the water drop into a Dive Bomb. As you get close to the water, pull up, & Glide as low as you can to the water for as long as you can. Since there is no distance gauge, it is very annoying to guess if you’re are 5m above the water or not.

Combat Challenge #6: Achieve a x20 Combat Multiplier.
Find a large group of Thugs like in front of the Solomon Wayne Courthouse or in front of the Church. Engage the Thugs & focus on using Cloak Stun & the Beatdown Attack to quickly rack up a Combo. Ignore Combat Finishers & just build that Combo up; it is extremely likely that you unlocked this Challenge through naturally play.

Combat Challenge #7: Use 3 Quickfire Gadgets in one combat encounter.
The easiest Quickfire Gadgets to use are: Batarang, Remote Electric Charge, Freeze Blast, or Batclaw. Use any of the three in a single encounter with a few Thugs to complete the Challenge. This will automatically unlock if you completed the Gadget Attack Achievement.

Combat Challenge #8: Achieve a x5 Variation Bonus in one combat encounter.
Similar to the above Challenge, though this includes none Quickfire Gadgets such as: Ground Takedown, Combat Takedown, Cloak Stun, & Evade. You most likely unlocked this when you attempted the Gadget Attack Achievement.

Combat Challenge #9: Aerial Attack off a stunned Thug into another 3 times.
Cumulative. To perform an Aerial Attack, Cloak Stun a Thug & double tap the Evade button to run up & slam the Thug (how we dispatch Shield Thugs). What you may not have known is we can redirect this attack at a different enemy mid-air. When you double tap Evade to perform the slam, push the move stick towards a different Thug & press your Punch button to launch at that Thug & perform the slam on them instead. Do this three times to complete the Challenge.

Combat Challenge #10: Use the Slide to trip a Thug 3 times.
Cumulative. This is very simple & can even be done on the same poor Thug over & over again. Simply sprint at a Thug & press the Crouch button to Slide into them, knocking them over. Do this three times to complete the Challenge.

Combat Challenge #11: Perform a Beat Down to finish a Thug 5 times.
Cumulative. To perform a Beat Down Takedown, Cloak Stun a Thug & repeatedly flurry punch them until Batman performs a Beat Down Takedown on them. This probably unlocked for you through naturally progression.

Combat Challenge #12: Counter an enemy projectile 3 times.
Cumulative. When a Thug picks up an Object, a Counter prompt will appear when they throw it at us; Counter a throw times to complete the Challenge.

This is a much more specific Combat Challenge that is best attempted during the Main Story Missions as there are a lot of instances of enemies picking up objects. Trying to simulate this in Post-Game is trickier but not impossible; you just need to find Thugs near Environmental Objects… It is very annoying to do that in Post-Game, but fortunately I found a reliable place to do this.

On NG, go to just outside of the Museum’s two entrances. Near the Iceberg Lounge will be three Green Crates & a group of Thugs, near the main Museum entrance will be two more Green crates & a Fire Extinguisher. That Fire Extinguisher is essential for the next Challenge… Make sure at least two Thugs don’t have a Shield or Bat in their hands or you will have to build up a small Combo to destroy their Weapons so they will grab objects to throw at us. The best way to reset these Thugs if you need more attempt is Saving & quitting from inside the Church; doing it from a Museum entrance won’t reset the Thugs that spawn directly outside of it.

Combat Challenge #13: Hit an Explosive Object with a Batarang before it is thrown.
Remember that respawning Fire Extinguisher outside the main Museum entrance? Bait a Thug into picking it up, & when they do, use Batarang Quickfire to destroy it in his hands to complete the Challenge.
Sequence 6: Physical Challenges 2
1. Main Story: Post-Game
2. Physical Challenges: 28/40
3. Achievements: 39/64
----------------------------------------------------------------------------------------------------

Combat Challenge #14: Take out 2 Thugs at once with the Glide Boost Attack.
This Challenge you most likely will not get through naturally progression unless you have previously looked up how to perform this. To do a Glide Boost Attack, stand on a tall building over a Thug & perform a Glide Kick. As soon as you Glide off the building towards the Thugs, hold down the Crouch button in the air & a yellow bat symbol will appear over the Thug & begin to fill. When it maxes out it will flash red & we will perform a Glide Boost Attack that will Takedown that Thug. For this Challenge, we need to do that when two Thugs are standing side by side to Takedown both of them simultaneously.

Once again, we will return to the main entrance to the Museum. Disturb the Thugs crouching outside the entrance & Grapple away to the building to the tall building to the South East, just past the Jezebel Center roof. From here, wait for two of the Thugs to pace beside each other & perform your Glide Boost Attack/Takedown.

Gadget Challenge #15: Use a Combo Batarang in combat 10 times.
Cumulative. Use Quickfire Batarangs will having a Combo of at least 1 ten times… extremely easy to do.

Gadget Challenge #16: Perform a Batclaw Slam 5 times.
Cumulative. Find some Thugs, ideally two or three, & use the Quickfire Batclaw to pull a Thug towards you. Follow up with an attack to Batclaw Slam them to the ground; do this five times to complete the challenge.

Gadget Challenge #17: Use the Quickfire Remote Electrical Charge during a Combo 5 times.
Cumulative. Find a group of Thugs & build up a Combo of at least 1. With that, just use the Quickfire Remote Electric Charge five times on the Thugs; it can even by all on the same poor guy…

Gadget Challenge #18: Use the Quickfire Explosive Gel during a Combo 5 times.
Cumulative. Quickfire Explosive Gel is a lot more finicky than the other Gadgets. Build up a Combo of at least 1 & lay down a Quickfire Explosive Gel. Then, while still holding onto your Combo, detonate the Gel & make sure it hits at least one Thug. Do this five times to complete the Challenge.

Gadget Challenge #19: Use the Quickfire Freeze Blast during a Combo 5 times.
Cumulative. This is similar to the Quickfire REC Challenge. Build up a Combo of at least 1 then spam Quickfire Freeze Blast on a group Thugs… or the same Thug to complete the Challenge.

Gadget Challenge #20: Use the Smoke Pellet to disorientate Thugs into attacking each other.
This is another very specific Challenge. We need either a large group of Thugs or some Thugs in tight quarters. Bunch the Thugs together & select your Smoke Pellet from our Gadget wheel (we have to manually select/throw it since they probably don’t have Guns). Throw the Pellet down in their midst & they will start swinging around blinded. If you are lucky, a Thug will stagger into another & punch them, completing the Challenge. Too often though they will stagger/punch away from each other & it won’t work. This may take a few tries to get right.

Gadget Challenge #21: Finish a fight with a Combo Batarang 3 times.
Cumulative. When facing a single Thug or the last remaining Thug of a group, spam Batarang Quickfire & it should slow down time & perform a Takedown on them. If it just knocks the Thug down, wait until they get back up, & spam Quickfire again at them. Takedown Thugs this way three times to complete the Challenge.

Gadget Challenge #22: Use the Remote Electrical Charge to get a Gun Thug to fire his weapon & surprise at least one other nearby enemy.
In Post-Game, there will be a lot of Gun Thugs on the rooftops around Arkham City. Approach a group of them unaware & wait until there are two of them close together. Aim your REC at one of them & fire a charge at them; they will begin firing their gun in shock which should startle the other Thug, completing the Challenge.

Gadget Challenge #23: Use the Remote Electrical Charge to force a Thug to hit another 3 times.
Cumulative. For this Challenge, we need to find a group of Thugs with some of them holding Weapons. Engage the Thugs & get them grouped together. Fire a REC charge at a Thug holding any Weapon & they should take a swing; if that swing hits another Thug it will count towards the Challenge. Do this three times to complete it.

Gadget Challenge #24: Use the Remote Electrical Charge to blast one Armored Thug into any other Thug.
In NG, we can find Armored Thugs in the Industrial District in Post-Game (in NG+ they spawn all over the place). Find an Armored Thug & engage him with his group of Thugs. Get them clustered together & fire a REC charge at the Armored Thug which will launch them backwards. We will complete the Challenge if they slam into some other Thugs will they are launched.

Gadget Challenge #25: Use the Freeze Cluster Grenade to immobilize three or more Thugs at one time.
The Freeze Cluster Grenade, when thrown, will make a small impact on the ground & then explode to freeze nearby Thugs. Find a large group of Thugs & bait them close together. When they are, throw down your Freeze Cluster Grenade at their feet, & we will complete the Challenge if at least three or more of them are frozen in that single blast.

Gadget Challenge #26: Use the Freeze Blast to freeze a Thug then a Batarang to knock them down.
This Challenge is literally self explanatory, we can even use the Quickfire versions of these Gadgets.

Gadget Challenge #27: Perform a Grapnel Boost Takedown.
To perform a Grapnel Boost Takedown, we need to perform a Grapnel Boost when a Thug is directly above where our Grapple lands. This is best done in the Industrial District where there are Gun Thugs up in easy to see towers. Position yourself below a Thug & make sure they aren’t going to walk away. Fire your Grapple directly below them & initiate a Grapnel Boost; if done right, we will launch up at the Thug & instantly perform a Takedown.

Gadget Challenge #28: Use the Reverse Batarang to knock down a Thug.
Reverse Batarang throws can only be performed using a Remote Controlled Batarang. When we hold a Remote Controlled Batarang, we will have the option of doing a Reverse Batarang throw; you need to hold down the button until it locks on to them. Simply target any unaware Thug & perform a Reverse throw to knock them down & complete the Challenge. They must be unaware, or it will not knock them down as well.
Sequence 7: Physical Challenges 3
1. Main Story: Post-Game
2. Physical Challenges: 40/40
3. Achievements: 39/64
----------------------------------------------------------------------------------------------------

Gadget Challenge #29: Kick a Thug while riding on the Line Launcher 3 times.
Cumulative. Find an unaware Thug a little ways away from you & fire your Line Launcher at them. As you ride by, Batman will kick them & knock them down; do this three times to complete the Challenge. While it can be done in combat when you have a group of enemies in front of you, this is much more difficult as more often then not they will just dodge out of the way.

Gadget Challenge #30: While riding on the Line Launcher towards an unaware Thug, use the Takedown attack to drop down & knock them out.
Similar to the last Challenge, find a Thug that is a little ways away from you & fire your Line Launcher at them. If you were far enough away, you will have the option of pressing Line Launcher Takedown. When we do, Batman will ride towards the Thug as per usual, but drop off the Line & perform a Takedown when he gets to them.

Gadget Challenge #31: Catch a Remote Batarang.
Very simple. Stand on a high point & throw a Remote Controlled Batarang & guide it back to Batman. Before it hits him, he will catch it... no matter what part of his body you try & hit. Don’t ask me how it gets to his hands when you hit his foot… he’s just the Batman. If you played Arkham Asylum, you will remember this being an Achievement we had to unlock for it.

Gadget Challenge #32: Fly a fully boosted Remote Batarang into a Thug & send him flying through the air.
Find an unaware Thug & throw a Remote Controlled Batarang at them. As soon as you throw it, hold down the Boost button so that when it hits him, it will knock them over.

Invisible Predator Challenge #33: Use the Freeze Blast to freeze a Gun Thug before taking him out.
Locate any Gun Thug & while they are unaware, throw a Freeze Blast to freeze them. While frozen, walk up to them & we will be able to perform an Ice Smash Takedown which completes the Challenge.

Invisible Predator Challenge #34: Use the Smoke Pellet to disorientate a Gun Thug & follow up with a Takedown.
Once again, find a Gun Thug & this time provoke them so they start shooting at us. When prompted, throw down a Smoke Pellet beside them & they will become disoriented. Immediately after throwing it down, while they are confused, press Crouch beside them & perform a Silent Takedown to complete the Challenge.

In theory this can actually be done on any Thug; Gun Thugs are easiest as they provoke us to throw down a Smoke Pellet automatically.

Invisible Predator Challenge #35: Disarm a Thug using the Batclaw disarm 3 times.
Cumulative. Find any Thugs holding Weapons (except Shields) & use the Batclaw to yank the Weapon out of their hands. This can even be done repeatedly on the same poor Thug so long as you’re not following up with Batclaw Slams.

Invisible Predator Challenge #36: Use the Disruptor to jam the gun of a Gun Thug & then get him to try & fire.
Locate a Gun Thug & use the Disrupter Firearm Jam to jam the Thugs gun. With it disabled, approach the Thug & provoke him so he tries shooting us with the gun. When it inevitably does not work, we will complete the Challenge.

Invisible Predator Challenge #37: Use the Remote Electrical Charge to temporarily disable a backpack Jammer Device.
This is best done during the Main Story when we have options presented to us. To complete this in Post-Game, make your way to the large Subway Terminal room in the Subway Station. In this room is a guaranteed Jammer Backpack Thug spawn we can use to complete this Challenge.

Invisible Predator Challenge #38: Take down a Thug using the Sonic Batarang.
First find any Thug & equip our Sonic Batarang. Throw the Batarang at their feet (not into the Thug) & we will have the option of detonating it. Do so, & the blast will knock out the Thug, completing the Challenge.

Invisible Predator Challenge #39: Perform an Inverted Takedown from a Vantage Point.
There are a few places around Arkham City we can perform this. The easiest is once again in the Subway Terminal (Subway, Armory room (Museum), or Wonder Tower Foundations (Wonder City). Grapple onto a Gargoyle & wait for a Thug to walk underneath it. When they do, Invert yourself, & we can then perform an Inverted Takedown completing the Challenge.

Invisible Predator Challenge #40: Perform a Knockout Smash 5 times.
Cumulative. Simple perform a Silent Takedown behind a Thug & while we are choking them out, we can press the attack button to Knockout Smash them hastening the process. Do this five times to complete the Challenge.

As of this point, we should have completed: all Main Story Missions in NG & NG+, all 12 Side Missions in NG & NG+, collected all Gadgets, purchased all Waynetech Upgrades, & collected/completed all 400 Ridder Collectibles & Challenges. With this all out of the way, we just need to earn all 180 Riddler’s Revenge Medals as Batman to unlock the Perfect Knight – Day 2 Achievement. But we will not worry about that just yet… one last matter of business to attend to.

60% Complete
Sequence 8: Harley Quinn's Revenge
1. DLC: Episode 1
2. Harley Balloons: 6/30
3. Achievements: 43/64
----------------------------------------------------------------------------------------------------
DLC – Harley Quinn’s Revenge: (10)
Story Related: (4)
Missable: (2)
Collectibles: (1)
Slay: (3)


There are a few Combat related Achievements we will have to keep on eye on throughout this DLC (note that they can be unlocked while playing as Robin in Riddler’s Revenge).
1. We need to equip Robin’s Bullet Shield & Shield Bash 5 different Thugs.
2. We need to equip the Zip Kick & perform a… Zip Kick on 5 different Thugs.
3. Equip the Snap Flash & use it on an Unarmed Thug, Gun Thug, on an Environmental Object to knock over a Thug, & on a Titan Thug (I will note each instance to remind us; this must be done all in the same playthrough of the DLC).
4. Use all 5 different Quickfire Gadgets in the same fight (not Combo)
On top of these we need to destroy all 30 Harley Balloons scattered around the DLC; let’s get to it!

Shipyard:


Dry Dock:
Harley Balloon #1: When the DLC begins, make your way through the Dry Dock until we have to manually press a button to enter into the next room. As soon as we walk through the doorway, look up to your left & we can see a pink Harley Balloon hanging off of the room we exited; strike it with a Shuriken to destroy it.

Access Corridor A:
When we enter the Access Corridor, we will find three Thugs standing there; use this opportunity to perform a Zip Kick & Shield Bash on each of them.

Zip Kick Quickfire is identical to the Batclaw (Lt + Y) & Shield Bash works like Freeze Blast (Rt + Rt).

Harley Balloon #2: After dispatching the first group of Thugs in the Access Corridor A, walk to the far East dead end of the room. At the steel doors here, look up & we can spot a Balloon attached to the ceiling.

Harley Balloon #3: Use Explosive Gel to carry on down the corridor until we enter the next room that will be divided by water. From where we are standing, turn around & look up to the left of the doorway we passed under to see a Balloon near the ceiling.


Achievement #40 – Frequent Flyer: Zip Kick 5 different Thugs.
When we reach our next encounter in Access Corridor A, there will be a group of four Thugs. If you used Zip Kick on each of the three Thugs we fought previously, we can unlock this Achievement after performing this move two more times on any of these Thugs.


Achievement #41 – Battering Ram: Shield Bash 5 different Thugs.
Identical to the last Achievement; if you took advantage of the Thugs we fought previously, perform Shield Bash on at least two more of the Thugs in this encounter to unlock the Achievement.

Pump Room:
Harley Balloon #4: After we use our Bullet Shield to navigate to/dispatch the Sniper Thug, we can spot a Balloon off our right attached to a chair out in the open.

Snap Freeze #1 – Unarmed Thug: When we head up the stairs from the Sniper Thug, we can see a group of Thugs trying to seal a door. Either stealthily place a Snap Freeze on one or use Snap Freeze Quickfire to place one on them & detonate it to count towards the Achievement.

Harley Balloon #5: With the Thugs dispatched, look near the doors they were cutting into & we can see a Balloon attached to the iron bars up to the doors left.

Harley Balloon #6: When we pass through the steel doors into the South corridor of the Pump Room, we can find a Structural Weakness at a dead end & a door off our right. Ignore the door & use Explosive Gel to destroy the Structural Weakness in the wall. Enter the room & we can spot a Balloon to our left past a pool of water full of trash.

Do not enter through the door or we will unable to collect Harley Balloon #6 until we come back here as Batman! Fortunately, this makes the Balloon not missable in case you accidentally do enter into the Warehouse.

Warehouse:


Achievement #42 – A Few New Tricks: Use 5 different Quickfire Gadgets in one fight as Robin in Harley Quinn's Revenge.
While these have to be used in a single fight, we do not have to use all five Quickfire Gadgets in the same Combo. When we enter the Warehouse, there will be a large group of Thugs in its center, giving us the perfect opportunity to attempt this Achievement.

The Quickfire Gadget moves for Robin are:
Lt: Quickfire Shuriken
Rt Rt: Quickfire Bullet Shield
Lt + Y: Quickfire Zip Kick
Lt + B: Quickfire Snap Flash
Lt + X: Quickfire Explosive Gel


Achievement #43 – Lost Property: No crimefighter should be without this.
Story Related. After dispatching the Thugs in the Warehouse, Robin will discover Batman’s discarded Bat-Belt, completing the first Episode & unlocking the Achievement.
Sequence 9: Loose Ends, Loose Cannons
1. DLC: Episode 2
2. Harley Balloons: 25/30
3. Achievements: 44/64
----------------------------------------------------------------------------------------------------

Industrial District:


Harley Balloon #7: When Episode 2 begins, we will get to play as good ol Batman. Before doing anything else, after speaking with Conditioner Gordon, look up to see a Balloon attached to an archway just in front of the GCPD blockade.

Harley Balloon #8: When we enter the Industrial District, head to the far East compound in the area. If we look back towards the entry way into where we came from, the archway will have a nutcracker on either side of it; a Balloon will be in the hands of the nutcracker off the left.

Harley Balloon #9: Carry on to the far East end of the Industrial District & follow the waterfront South. Before we reach the Ferris Wheel, we can find a destroyed rooftop with two Gun Thugs patrolling on it. This rooftop will have a very large smokestack on it; a Balloon will be attached to the top of the stack.

Harley Balloon #10: Now head over to the Ferris Wheel & Grapple up to its highest point where we can find another Balloon.

Harley Balloon #11: From the Ferris Wheel, Glide over to the next building due West that has a Sionis Industries sign on its roof; there will also be three patrolling Gun Thugs up here as well. We can find a Balloon attached to a loudspeaker in the center of the roof.

Harley Balloon #12: Carry on West along the line of buildings, past the large smokestacks, all the way to the end of the line where we can find a Balloon attached to a Sniper Thugs tower close to the Perimeter Wall.

Harley Balloon #13: Drop down into the street below us & head down it to the East past another compound; we can find a Balloon attached to the hat of a nutcracker just past the compound archway.

Harley Balloon #14: Head over to the South West corner of the Industrial District, near the West Perimeter Wall, & we can find a compound with some Thugs in it. Dispatch the Thugs down here & we can find a Balloon attached to the broken chest of a nutcracker leaning against one of the compound’s wall.

Harley Balloon #15: Make your way over to the compound encircling the South entrance to the Steel Mill. If you are standing at the door leading inside the Steel Mill here, follow the compound walls around to the East & we can spot a Balloon close to a dumpster down here.

Harley Balloon #16: Grapple onto the Steel Mill roof now & head to its West side; we can see two nutcrackers reaching out to one another here. The elevated nutcracker reaching down will have a Balloon attached to its extended hand.

Harley Balloon #17: Make your way East along the Steel Mill roof until we are close to the massive chimney. Grapple up to the highest tower right beside the chimney up here & we can spot a Balloon attached to its highest point.

Harley Balloon #18: For our final Balloon in this Episode, drop down to the ground floor & find the small railway tunnel that passes straight through the Steel Mill. Near the center, inside this tunnel, we can find a Balloon attached to an overturned barrel.

Steel Mill:


Harley Balloon #19: Enter into the Steel Mill from the rooftop entrance & we will be inside the old manager’s office. Head down the stairs into the office & look off to our left to see a Balloon attached to a baby’s cradle.

Harley Balloon #20: Before we drop down into the main Loading Bay room from the manager’s office, look out to your right; we can snipe a Balloon attached to a spotlight to the right of where the GCPD Cop is hanging.

We can also strike it after dispatching the Thugs below, but not after we save the Cop!

Industrial District:


Achievement #44 – Breaking & Entering: Find a way to the secret base.
Story Related. Progress the DLC Story until we are tracking the blood trail of GCPD Cop Tony Wicker over towards the Shipyard. Retrieve the three Codes to the Shipyard’s Modified Security Console & hack it with the Cryptographic Sequencer to enter the Shipyard & unlock the Achievement.

Harley Balloon #21: When we enter the Shipyard as Batman, we can spot this Balloon immediately on a Harley Quinn mannequin to the right of the entrance doors.

Shipyard:


Pump Room:
Harley Balloon #22: Use the Line Launcher to get across the water pools in the south corridor of the Pump Room. When we enter the room to the West, we can see a Balloon at the top of the stairs we must walk up attached to its railing.

Warehouse:
Harley Balloon #23: Enter the Warehouse & begin making your way up the staircase to the top. Here, the stairs will break away & there will be an upper level that is isolated; look up to this level & we can see a Balloon close to the ceiling.

Harley Balloon #24: Inside the main room of the Warehouse, we will have to save a GCPD Officer from a large group of Harley’s Thugs. Dispatch the six Gun Thugs, but do not untie the Officer yet!

From where the Officer is in the center of the room, look directly West on the ground level to see a Balloon attached up to the right of the exit doors to the next area.

Harley Balloon #25: While still on the ground floor, head to the very far North East corner of the room, under the walkway, & we can see a Balloon attached to an open locker.

When we rescue the Officer as Batman, we will end Episode 2 & return to playing as Robin in Episode 3.
Sequence 10: End of An Era
1. DLC: Episode 3
2. Harley Balloons: 30/30
3. Achievements: 49/64
----------------------------------------------------------------------------------------------------

Shipyard:


Our time as Robin is limited, make sure you take advantage of opportunities for his combat related Achievements & the Snap to It Achievement.

Joker Shrine Room:
Harley Balloon #26: When we regain control of Robin, leave the Warehouse & enter into the Joker Shrine Room. As soon as we pass through the door, we can see a Balloon attached to some crates beside a steaming vent in our way.

Harley Balloon #27: Enter into the main room of Joker’s Shrine & we can spot a Balloon stuck up in the ceiling in the center of the room.

Access Corridor B:
Snap Freeze #2 – Gun Thug: Enter Access Corridor B & we will appear behind two Gun Thugs. Use this opportunity to place a Snap Freeze on one & detonate it; we will even get a hint telling us to do so.

Harley Balloon #28: When we exit the Floor Grate into the next room after dispatching the Gun Thugs, we will be pinned down by a Sniper Thug at the end of a corridor. Before engaging Bullet Shield & making your way down to them, look behind us to find a Balloon attached to a barrel at the dead end.

Snap Freeze #3 – Environmental Object: Do not approach the Sniper Thug as this is where we will get our Environmental Object Snap Freeze for the Achievement! After destroying the Balloon, we can see a small barricade of boxes in between us & the Sniper Thug. To the right of these boxes will be an open vent we can crawl through. Do so, & we can enter a small room to the right of the Sniper. In here we can see an open window with crane hooks on a conveyer belt passing right to left. Approach a crane hook & attach a Snap Freeze to it. Wait for the crane to move away & get behind the Sniper Thug before detonating it to knock them over.

If you are able to knock him over with bad timing or you run out of Snap Freezes, reload your last save & try again. Failing to do this will void the Achievement & you will have to replay the DLC to attempt this again.

Harley Balloon #29: After dispatching the Sniper Thug & his men, enter the final section of the corridor. Immediately after passing through an open set of steel doors, look to our left to find a Balloon tucked up on top of a disposal bin.

Dry Dock:


Achievement #45 – How’s It Hanging?: Clean up the Dry Docks.
Story Related. Enter into Dry Dock & dispatch Harley Quinn to unlock the Achievement. She is not all that difficult, take out the Sniper Thug & a few of her Gun Thugs. If you corner her, you can basically continually beat her down with your Quarter Staff.

Harley Balloon #30: With Harley taken care of, we can now destroy our last Balloon in the DLC. The Balloon can be found in the far South West corner of the room attached to some rubbish in the water just in front of a large tidal grate.


Achievement #46 – Party’s Over: Destroy all 30 Harley Balloons.
If you have been following along with this guide, the Achievement will unlock after popping the final Balloon.

With how linear the DLC is, it is very easy to get locked out of a Balloons location if you progress too far. If this happens, you will need to run through the DLC once again to get back to its location; any destroyed Balloons will stay destroyed across your playthroughs of the DLC. Fortunately, this is a very short set of Episodes…

Joker Shrine Room:
Navigate back to the Joker Shrine Room & we will have a very large group of Thugs to deal with. Take advantage of these Thugs to perform our Zip Kicks, Shield Bashes, & the other three Quickfire Gadgets for our three Achievements if you have not already done so.

Snap Free#4 – Titan Thug: When we enter the Joker Shrine room near the end of Episode 3, a Titan Thug will join the final battle. Run up to it & place a Snap Flash on it; when it is detonated, & you Snap Flashed the three other previous variables, the Achievement will unlock.


Achievement #47 – Snap to It: Snap Flash an unarmed Thug, a Gun Thug, an environmental object, & a Titan.
Missable. All four Snap Freeze targets must be completed in a single playthrough of the DLC. If you restart the DLC you will have to do all four Snap Flashes over again.


Achievement #48 – Bomb Squad: Defuse all Bombs in 3 minutes or less.
Missable. After we rescue Batman, we will need to go & disable a nearby Bomb.

After this first Bomb is fully disabled, a timer of 5 minutes will appear & we must quickly locate & disable the next Bombs; we need to have above 2 minute on the timer to unlock the Achievement. Any Thugs we come across need to be taken down as fast as possible, no funny business; take advantage of Ground & Combat Takedowns. Quickly make your way to the main room in the Warehouse & Grapple up to the rafters. From up here, head to the far North end across from where the Sniper Thug is (who you will need to take out our he will shoot us; unless you use a Smoke Pellet) & we can see some steaming vents barring our way. Block the vents with Freeze Blast & we can find our second Bomb to disable. This should only take a minute tops with at least 3 minutes still remaining on the timer.

We can find the third Bomb in the Pump Room. When we enter the Pump Room, Grapple onto the platform held by a crane hook at the South end of the room. Use the Remote Electrical Charge on the Industrial Motor to move the platform to the North & it will put us in front of a Structural Weakness (you may need to shoot multiple charges at the Motor to get us over there). Destroy it with Explosive Gel & we can find the final Bomb to diffuse.

If you have over 1 minute remaining on the timer, we will unlock the Achievement. I finished this with 2:15 still remaining. Note that if you ever get stuck or side tracked & fall under 1 minute; reload your last Checkpoint to be sent back to the beginning to try again. If you complete the Bomb diffusing with it under 1 minute you will need to replay the DLC fully to this point to try again…


Achievement #49 – The Last Laugh: The joke's on who?
Story Related. Deal with Harley & her Robots in the final confrontation to complete the DLC & unlock the Achievement.

76% Complete
Sequence 11: Riddler's Revenge
1. Achievements: 49/64
----------------------------------------------------------------------------------------------------

It is best to start as one character & complete all of the Combat, Predator, & Campaign Challenges before moving on to the next character. That way you can master the flow & Variations as well as Predator Challenges of the character instead of having to swap your play style constantly as they do play quite a bit differently.

Combat Challenges:

The only DLC maps we need to complete are Freight Train as Robin & Wayne Manor Armory as Nightwing. Only these two Challenges will count towards Achievements; Catwoman & Batman strictly play Base Game Maps. We do not need to complete the Joker’s Carnival or Iceberg Lounge VIP Room Challenges at all for any character.

Combat Challenge Basic Tips:
1. Keep your Combo going as long as possible for the highest amount Points
2. To maintain your Combo, constantly jump over/Evade enemies to give yourself ground or shuffle enemies around so you do not lose it
3. Use as much Quickfire Gadgets or Abilities as you can during your Combos for Variation Bonuses. There are 15 Variations for Batman & only 13 for Catwoman, Robin, & Nightwing
4. Armored Thugs are Point banks; Stun them & begin beating them down while simultaneously Countering the other attacking Thugs. The longer you can stretch out that Armored Thug/Countering cycle, the more Points you will chain together.
5. While difficult to pull off, completing Blade Dodge Takedowns gives you a very high amount of Points (100xCombo)
6. Normal knockouts are worth 10 Points with Combat Finishers earning around 50 Points (xCombo)
7. Ground Pounds are worth 75 Points (xCombo) & are the best way to end every Round when possible
8. Not getting hit at all during a Round will net you the Perfect Round Bonus for 500 Points
9. Maintaining a continuous Combo for an entire Round will net you a the Flawless Freeflow Bonus for 1000 Points

1. Batman: Batman is by far the easiest character to complete the Combat Challenges as. We have access to his full arsenal of Gadgets as well as all his Combat Moves. Try disabling/destroying Stun Batons, Knives, & Shields first with your Combos so you can just beat on the Thugs without fear. This will prevent a buildup of Weapons on the ground that will carry over across the Rounds.

2. Catwoman: Catwoman is sort of a one trick pony but that doesn’t necessarily mean she is bad to play as; in fact, I found it being the opposite. Her moves are limited & you will basically be Stunning enemies with your Whip & building up your Combo to use her Whip Trip or Whiplash Special Move. Catwoman is insane at crowd control & I found I ended up getting final scores way higher than I did with Batman. Catwoman suffers though because she cannot disable/destroy any Weapons which leads to a build-up of them on the ground to be picked up; her only Counters are Stunning & Whip Trip to get the Weapons safely out of Thug’s hands. She is also the only character that cannot ride Titans which means her only offense against them is just to Stun them & do Beat Downs until they are knocked out.

3. Robin: Robin is the most difficult character to play as I found. His moves are typically slow (especially his Ground Takedowns) & he is often left overextended to be hit by Thugs. His Combo Moves are also not great; Thug Throw has its uses but compared to Catwoman’s or Batman’s it is nothing special at all. Robin’s only golden Gadget trio is his Zip-Kick, Shurken, & Shield Bash; his Snap Freeze can also be very useful if you can land it without being hit in the process.

4. Nightwing: Nightwing has the highest attack speed of the four characters. His Gadgets are the worst in my opinion for combat however his Group Attack Special Move is only slightly worse than Catwoman’s Whip Trip & great for crowd control. Nightwing annihilates the Mr. Sickle/Hammer, Armored Thugs, & Titans with his high speed & can build up a Combo extremely fast. Nightwing also has an Electrical Blast Gadget that can temporarily daze nearby enemies which is also very useful. A downside of Nightwing is that I found his Escrima Stick Throw Gadget would fail my Combo 9/10 times I used it for some reason & reset it to 1; I recommend using it as an opening move for the Variation but then try not to use it through the fight. It did sometimes work, but rarely enough for what it is worth...

For a full in depth look out each character’s Variations & how to perform them, check out the guide on Arkham Wiki. Just be sure to scroll down to the section for Arkham City…
https://arkhamcity.fandom.com/wiki/Combat_Variations#Batman

Predator Challenges:

The Predator Challenges function identically as they did in Arkham Asylum. To unlock all 3 Medals in a Challenge, you need to take out Thugs in 3 specific ways. Unfortunately, since each of the 4 Characters have different moves & Gadgets, they have completely different Medal Objectives for obtaining the Medals.

Much like the Combat Challenges in terms of difficulty, Batman’s Challenges are the easiest while Robin’s are the hardest. To a point; Nightwing might have the hardest Challenges though he has the best Gadget loadout second only to Batman.

Due to the high specificity of the Medal Objectives & the number of them, it is extremely difficult for me to create a text guide around them. To assist you, I have included video guides by Batman Arkham Videos. While video guides are useful, they are also very specific, I never actually used many myself & opted to figure out my own strategies that worked. The Predator Challenges require a LOT of trial & error as well as memorization.

While the videos listed here can be crucial for success, it should be noted that there is a lot of variance between Thugs reactions. Because of this variance, always stay vigilant for opportunities to achieve the Medals when they are presented to you regardless of when they occur in the videos. Note that your final time does not matter; take as long as you need to complete the Challenges.

Campaign Challenges:

There are 12 Campaign Challenges (36 individual Challenges) we must beat with all 4 Characters with an additional 2 Campaign Challenges that must be done with Robin & Nightwing. We receive 9 Medals per Campaign Challenge (3 per individual Challenge) for a total of 108 (or 114) Medals per Character we need to earn.

Batman Arkham Videos has amazing playlists which include the Combat & Predator Challenges for every character. While the Combat Challenges are (more or less) self explanatory, the videos for the Predator Challenges can be extremely useful. They do include videos for the extra DLC maps, but we only need to do the specific Maps as Robin & Nightwing; Catwoman & Batman only need Base Game maps completed for their Achievements. Note, that Batman Arkham Videos is a legendary Arkham player, while it is unlikely you can replicate their videos, this is mostly just to give you some insight into how to attempt some of the Challenges.

Batman:
https://www.youtube.com/playlist?list=PL9342551B8C0A1630

Catwoman:
https://www.youtube.com/playlist?list=PL297C2C568B75FAC8

Robin:
https://www.youtube.com/playlist?list=PL16332961471AD09A

Nightwing:
https://www.youtube.com/playlist?list=PL8EB791753135DD51
Sequence 12: Combat Challenges
1. Batman – Ranked Medals: 18/72
2. Catwoman – Ranked Medals: 18/72
3. Robin – Ranked Medals: 18/84
4. Nightwing – Ranked Medals: 18/84
5. Achievements: 50/64
----------------------------------------------------------------------------------------------------

Blind Justice:
1 Medal – 6000 Points
2 Medals – 12,000 Points
3 Medals – 24,000 Points


For this Challenge, try maintaining a Flawless Freeflow as well as a Perfect Round to maximize your Points throughout the Challenge; apply as many Gadget Variations as you can per Round. It is good practice to try getting a Perfect Round (ideally a Flawless Freeflow as well) on every Challenge’s first Round.

Round 1: Thugs x3
Round 2: Thugs x5
Round 3: Thugs x8
Round 4: Thugs x10


Achievement #50 – Flawless Freeflow Fighter 2.0: Complete one Combat Challenge without taking damage (any character).
This is easiest attempted on Blind Justice for obvious reasons. Even with the limited amount of Thugs, it will still probably take a few tries, to get through Round 4 especially, & complete the entire Combat Challenge without being hit once. We can break our Combo however & do not need to do an actual Flawless Freeflow; just not take any damage.

Survival of the Fittest:
1 Medal – 8000 Points
2 Medals – 16,000 Points
3 Medals – 32,000 Points


We will begin to fight Thugs with blade type Weapons starting on this Challenge. Performing Blade Dodge Takedowns provides a lot of Points if you can pull them off; I would highly recommend practicing the timing with them to capitalize on what they offer.

Round 1: Thugs x4
Round 2: Thugs x8, Knife Thug x1
Round 3: Thugs x12, Broken Bottle Thug x1, Knife Thug x1
Round 4: Thugs x20


Rooftop Rumble:
1 Medal – 8000 Points
2 Medals – 16,000 Points
3 Medals – 32,000 Points


Armored Thugs are Point mines; as soon as a Round starts, make an effort to Stun them & continually Beat Down attack on them. Counter any attacking Thugs & return to Beating Down the Armored Thugs. If you get distracted by Evading a Knife Thug you may have to re-Stun them or you will risk losing your Combo. Unless you can get at least one hit on that Armored Thug before going in for a Counter, the Stun will wear off by the time you finish your Counter & you will to re-apply it. Getting a higher Combo is more important than taking out the Armored Thug, milk them for all they have to offer & get those Counter Combos going.

Round 1: Thugs x4, Broken Bottle Thug x1, Knife Thug x1
Round 2: Thugs x7, Armored Thug x1
Round 3: Thugs x13, Knife Thug x1
Round 4: Thugs x10, Armored Thug x2


Hell's Gate:
1 Medal – 8000 Points
2 Medals – 16,000 Points
3 Medals – 32,000 Points


Assassins are a very annoying enemy to face; make an effort to dispose of them quickly with Combat Finishers. Assassin’s swords & Knives have different timings though so keep that in mind as you will have to learn both. If you can get the timing down, Assassins just become another high source of Points for Blade Dodge Takedowns. In my opinion, I actually find this the hardest Challenge out of the 12 due to the limited amount of Thugs & high concentration of Assassins.

Round 1: Assassins x3
Round 2: Thugs x11, Armored Thug x1
Round 3: Thugs x7, Assassins x3
Round 4: Thugs x10, Armored Thug x1, Assassins x6


Funhouse Brawl:
1 Medal – 15,000 Points
2 Medals – 30,000 Points
3 Medals – 60,000 Points


Using Mr. Sickle to beat on can seriously crank your Points up; if possible, try beating him down with the same Combo without being hit then maintaining that Combo for as long as possible. You can get a Point bonus of over 20,000 Points depending on how long you can maintain that Combo for! Mr. Sickle/Hammer enemies are probably the best in the Challenges for this reason.

Round 1: Thugs x4, Shield Thug x1
Round 2: Thugs x6, Knife Thug x2, Armored Thug x1
Round 3: Thugs x14, Armored Thugs x2
Round 4: Thugs x20, Shield Thug x1, Mr. Sickle x1


Prison Riot:
1 Medal – 8,000 Points
2 Medals – 16,000 Points
3 Medals – 32,000 Point
s

For the Shock Tygers, build up a Combo fast & disable the Shock Batons as soon as possible so you do not have to worry about them as Batman. For the other characters, pay attention to where they are in the room & either Whip Trip, Combat Finish, or knock them down with Gadgets.

Round 1: Thugs x2, Tyger x3, Shock Tyger x1
Round 2: Thugs x4, Tyger x2, Knife Tyger x1, Shield Tyger x1
Round 3: Thugs x3, Tyger x5, Armored Tyger x1
Round 4: Thugs x3, Tyger x4, Knife Tyger x1, Armored Tyger x2, Shield Tyger x1, Shock Tyger x1
Sequence 13: Combat (Extreme)
1. Batman – Ranked Medals: 36/72
2. Catwoman – Ranked Medals: 36/72
3. Robin – Ranked Medals: 39/84
4. Nightwing – Ranked Medals: 39/84
5. Achievements: 50/64
----------------------------------------------------------------------------------------------------

Blind Justice (Extreme):

1 Medal – 8000 Points
2 Medals – 16,000 Points
3 Medals – 32,000 Points


While you think that the Extreme Challenges are harder than the basic Challenges, but they technically are not. We face more Thugs & Thugs worth more Points like Armored Thugs which translates to longer fights & in turn more Points.

Round 1: Thugs x3, Knife Thug x1
Round 2: Thugs x5, Armored Thug x1
Round 3: Thugs x8, Knife Thug x1, Armored Thug x1
Round 4: Thugs x10, Armored Thug x2


Survival of the Fittest (Extreme):

1 Medal – 15,000 Points
2 Medals – 30,000 Points
3 Medals – 60,000 Points


Round 1: Thugs x4, Armored Thug x1
Round 2: Thugs x8, Knife Thug x1, Titan x1
Round 3: Thugs x12, Broken Bottle Thug x1, Knife Thug x1, Armored Thug x1
Round 4: Thugs x20, Titan x1


Achievement #51 – Bronze Revenge: Obtain 24 Medals on the original Arkham City Ranked Maps (as Batman).
If you have earned all 3 Medals for the 8 Combat Challenges we have done so far, this is the soonest we will unlock this Achievement.

Rooftop Rumble (Extreme):

1 Medal – 10,000 Points
2 Medals – 20,000 Points
3 Medals – 40,000 Points


Since this Challenge has Mr. Sickle, it is not too bad getting a high score right at the end of the Challenge.

Round 1: Thugs x4, Broken Bottle Thug x1, Knife Thug x1, Shield Thug x1
Round 2: Thugs x7, Armored Thug x1, Assassins x3
Round 3: Thugs x13, Knife Thug x1, Shield Thug x1
Round 4: Thugs x10, Armored Thugs x2, Mr. Sickle x1


Hell's Gate (Extreme):

1 Medal – 12,000 Points
2 Medals – 24,000 Points
3 Medals – 48,000 Points

Round 1: Thugs x8, Assassins x3
Round 2: Thugs x11, Armored Thug x1, Shield Thug x1, Shock Thug x1
Round 3: Thugs x7, Shield Thug x1, Assassins x3
Round 4: Thugs x9, Armored Thug x2, Shock Thug x1, Assassins x3


Funhouse Brawl (Expert):

1 Medal – 15,000 Points
2 Medals – 30,000 Points
3 Medals – 60,000 Points


Focus on the Mr. Hammer & Mr. Sickle enemies, then the Titans, then the rest of the Thugs as an order of operations to maximize our Points. While going after the Titans first can work, you have a high chance of damaging the one-armed brothers while riding the Titan which will reduce the amount of punishment we can deliver to them with our fists which could make us lose out on a lot of Points.

Round 1: Thugs x4, Shield Thug x1, Shock Thug x1
Round 2: Thugs x6, Knife Thug x1, Armored Thug x1, Titan x1, Mr. Hammer x1
Round 3: Thugs x14, Armored Thug x2, Shock Thug x1
Round 4: Thugs x14, Shield Thug x1, Titan x2, Mr. Sickle x1


Prison Riot (Extreme):

1 Medal – 12,000 Points
2 Medals – 24,000 Points
3 Medals – 48,000 Points


With the two Shock Tygers right at the beginning of the Challenge, unless you are Batman, you will have to play on your toes the whole Challenge. At any point Thugs can pick those Batons up to use against us.

Round 1: Thugs x3, Knife Thug x1, Tyger x4, Knife Tyger x1, Shock Tyger x2
Round 2: Thugs x6, Tyger x4, Knife Tyger x1, Shield Tyger x1, Assassins x3
Round 3: Thugs x5, Tyger x7, Armored Tyger x1
Round 4: Thugs x4, Tyger x5, Knife Tyger x1, Armored Tyger x3, Shield Tyger x1, Shock Tyger x1, Assassins x5


Freight Train (DLC): Robin Only

1 Medal – 8,000 Points
2 Medals – 16,000 Points
3 Medals – 32,000 Points


The side scroller nature of this Challenge works against us & makes it difficult to track Thugs; it is very easy to lose our Combo on this Challenge. Since space is limited, only a few Thugs can attack us at once making the Perfect Knight Bonus a lot easier to achieve. Rack up as high of a score as you can manage & make up the difference in Round 4 when Mr. Hammer arrives.

Round 1: Thugs x4
Round 2: Thugs x3, Baseball Bat Thug x1, Metal Pipe Thug x1
Round 3: Thugs x8, Baseball Bat Thug x1, Metal Pipe Thug x1
Round 4: Thugs x4, Mr. Hammer x1, Black Mask x1


Wayne Manor Armory (DLC): Nightwing Only

1 Medal – 15,000 Points
2 Medals – 30,000 Points
3 Medals – 60,000 Points

This Challenge almost solely relies on your ability to perform Blade Dodge Counters. If you cannot, really focus on hammering on those Armored Tygers & maintaining a Combo for as long as possible.

Round 1: Tyger x6
Round 2: Tyger x9, Armored Tyger x1
Round 3: Tyger x15
Round 4: Tyger x19, Armored Tyger x3


Iceberg Lounge VIP Room (DLC): Batman Only
We do not need any Medals from this Challenge for any Achievements; it is simply the best map to acquire this Achievement on.


Achievement #52 – Perfect Freeflow 2.0: Perform a Perfect Combo including all of Batman's combat moves (any play mode).
This is a very difficult Achievement to perform. Since the Iceberg Lounge VIP has infinitely spawning Thugs, this is the best Challenge Map to attempt this on. The one major downside of the Iceberg Lounge though is that since there is infinite enemies, getting that Ground Takedown can be extremely challenging & will require a lot of care. If not the Iceberg Lounge, then most players suggest attempting this on Round 3 of the Challenge Map Survival of the Fittest (Extreme). This Achievement will take many attempts to unlock… really memorize the order you use the moves & keep repeating that order over & over until you land all the moves. The memorization is important!

The 13 moves we need to use are:
Basic Moves:
1. Strike (X)
2. Cape Stun (B)
3. Evade (A)
4. Counter (Y)
5. Aerial Attack (X, Left Stick+A, A)
6. Batclaw Slam (Lt+Y, X)
7. Ultimate Cape Stun (B, B, B)
8. Ground Takedown (Rt+Y)
9. Beat Down Finisher (B, X multiple times)


Special Moves:
10. Combat Takedown (Y+B)
11. Special Combo Bat Swarm (X+A)
12. Disarm & Destroy (Y+X)
13. Multi-Ground Takedown (B+A)


Gamecreeps has a very useful video guide giving us a tutorial on how to go about this with visual inputs. The hardest part about this Achievement is simply remembering which Moves you have or haven't done yet.
https://youtu.be/9nmgd6ktGDE
Sequence 14: Predator (Batman)
1. Batman – Ranked Medals: 72/72
2. Achievements: 54/64
----------------------------------------------------------------------------------------------------

Meltdown Mayhem:
Gun Thugs: x5

1 Medal: Smoke Detector – Use the Smoke Pellet to create a smoke cloud & take down a Thug as he panics in the smoke.
2 Medals: Mind Your Head – Knock down a Thug with a Batarang & then finish him off with a Ground Takedown.
3 Medals: Shock Tactics – Shoot a Thug with the REC Gadget & cause him to fire into the air, scaring another Thug.


Police Brutality:
Gun Thugs: x5

1 Medal: Blast Zone – Explode a Structural Weakness into a Thug to knock him out. (Best attempted at the beginning before Thugs are alerted/patrolling)
2 Medals: Knockout Smash – During a Silent Takedown perform a Knockout Smash to takedown the Thug instantly.
3 Medals: Window Pain – Perform a Takedown through a glass window.


Natural Selection:
Gun Thugs: x6

1 Medal: Weapon Jam – Use the Disruptor on one Thug's gun, let him try to use it & then take him down.
2 Medals: Aerial Assault – Glide kick a Thug & then knock him out on the ground.
3 Medals: Friends Fly Free – While hanging from a ledge, grab two Thug simultaneously & pull them down over the ledge. (Best attempted at the beginning before Thugs are alerted/patrolling; Thugs on the bridge)


End of the Line:
Gun Thugs: x6

1 Medal: Kick Off – Use the Line Launcher to kick a Thug off an edge & knock him out. (Best attempted at the beginning before Thugs are alerted/patrolling)
2 Medals: Scare Tactics – Appear out of nowhere to surprise a terrified Thug.
3 Medals: Freeze Frame – Use the Freeze Blast on a Thug, then take him down while frozen.


Lost City:
Gun Tygers: x7

1 Medal: Grate Moves – While in a Floor Grate perform a Takedown on a Thug.
2 Medals: Fall Guy – Batclaw a Thug & pull him off a walkway to take him down.
3 Medals: Breaking & Entering – Perform a Takedown through a Soft Wooden Paneling.


Achievement #51 – Silver Revenge: Obtain 48 Medals on the original Arkham City Ranked Maps (as Batman).
If you have collected all 3 Medals on all Combat Challenges & the previously completed Predator Challenges, then this is the soonest you will unlock this Achievement.

Top of the World:
Gun Tygers: x7

1 Medal: Fire Hazard – Batarang a fire extinguisher & silently Takedown a Thug caught up in the smoke.
2 Medals: Confiscated Weapon – Use the Batclaw to disarm a Thug, then take him down.
3 Medals: Mined Your Step – Detonate a Mine using the Mine Detonator as a Thug walks over it.
Use the Gargoyles on the outside of the map to circle around the building & observe from the outside to sneak in to take out Tygers when possible.


Meltdown Mayhem (Extreme):
Gun Thugs: x6
Armored Thug: x1
Sniper Thug: x1

1 Medal: Armor Piercing – Take out the Armored Thug first. (Inverted Takedown from the Gargoyle above him)
2 Medals: Bringing Down the Roof – Explode a Structural Weakness ceiling onto a Thug to knock him out.
3 Medals: Venting Anger – Perform a Takedown through a vent cover on a Thug.


Police Brutality (Extreme):
Gun Thugs: x6 (Very Hard)
Jammer Thug: x1

1 Medal: Don't Touch That Dial – Leave the Thug with the Jammer Backpack until last.
2 Medals: Feet First – While standing on a ledge directly above your target, perform a Reverse Ledge Takedown on the Thug below you.
3 Medals: Smash & Grab – Perform an Inverted Takedown from a vantage point through the glass ceiling. (Can be done immediately at the beginning with the Gun Thug below us to the right where we spawn)


Natural Selection (Extreme):
Gun Thug: x5 (Very Hard)
Armored Thug: x1
Armored Sniper Thug: x1

1 Medal: Boom Box – Use Explosive Gel to stun a Thug getting a Weapon from the Weapons Crate.
2 Medals: Chaos Theory – Perform an Inverted Takedown from a vantage point on a Thermal Thug.
3 Medals: Deep Impact – Use the Shock Wave Attack on two or more Thugs.


This is one of those Challenges with very obscure strategies; these can be done any whichever order you find works. For me, I did Chaos Theory, Boom Box, then Deep Impact with that final Challenge being the most difficult to set up.

End of the Line (Extreme):
Armored Thugs: x5
Armored Snipers: x2
Armored Jammer: x1

1 Medal: Perpetual Motion – Shoot an Armored Thug with the REC Gadget & send him over an edge to knock him out.
2 Medals: What Goes Up – When a Thug climbs to the top of a ladder, send him flying back down.
3 Medals: Don't Touch That Dial – Leave the Thug with the Jammer Backpack until last.
Since Batman has the REC, this is actually an extremely easy Challenge. Outside of the Challenges, we can simply blast the majority of the Armored Thugs off of the trains or ledges to knock them out.


Lost City (Extreme):
Gun Tygers: x5 (Very Hard)
Armored Tygers: x3

1 Medal: Bullet Proof – Take down all of the Thugs without taking damage.
2 Medals: Switch Hitter – Kick one Thug while on the Line Launcher, then fire the Line Launcher again from the current line & kick a different Thug. (Best attempted at the beginning before Tygers are alerted/patrolling)
3 Medals: High Speed Impact – Use a boosted Remote Controlled Batarang to knock a Thug over an edge.


This is another difficult Challenge that will require a lot of your own trial & error; using the Floor Grates & winding halls at the bottom floor were the safest places to be I found to lure in Tygers/escape them.

Top of the World (Extreme):
Gun Tyger: x6 (Very Hard)
Armored Tyger: x1
Jammer Thug: x1

1 Medal: Fists of Fury – Take down a Thug with a Beat Down.
2 Medals: Human Cannonball – Shoot an Armored Thug with the REC Gadget to send him flying back into another Thug.
3 Medals: Cold War – Use the Freeze Cluster Grenade to immobilize three or more Thugs at one time.


For this Challenge, I liked Grappling along the Gargoyles counter clockwise to the lone Tyger on the balcony & taking him out with a Sonic Batarang. Then I would try luring a group of three or more Tygers out; either they would come out right away or I would have to bait them out by throwing Batarangs & Grappling between Gargoyles until enough come out. I could also complete Human Cannonball sometimes while luring out Tygers. Which sometimes got me discovered & I would die. After completing Cold War... the rest of my Challenge strategies would fall apart for me & I would just adlib things on the fly.


Achievement #54 – Gold Revenge: Obtain all 72 Medals on the original Arkham City Ranked Maps (as Batman).
We will unlock this after unlocking all 36 Combat Challenge Medals & all 36 Predator Challenge Medals for Batman.
Sequence 15: Predator (Catwoman)
1. Catwoman – Ranked Medals: 72/72
2. Achievements: 55/64
----------------------------------------------------------------------------------------------------

Meltdown Mayhem:
Gun Thugs: x5

1 Medal: Whipped Up – While climbing on the ceiling perform a Takedown on an enemy above you.
2 Medals: Silence Is Golden – Sneak up behind a Thug & perform a Silent Takedown.
3 Medals: Break Your Fall – Drop down on top of a Thug & then knock him out on the ground.


Police Brutality:
Gun Thugs: x5

1 Medal: Whip Into Shape – Trip up a Thug with the Whip & then finish him off with a Ground Takedown.
2 Medals: Scare Tactics – Appear out of nowhere to surprise a terrified Thug.
3 Medals: Hit & Run – Punch a Thug.


Natural Selection:
Gun Thugs: x6

1 Medal: Cat Nap – While climbing on the ceiling perform a Takedown on an enemy below you.
2 Medals: Grate Moves – While in a Floor Grate perform a Takedown on a Thug.
3 Medals: Have A Nice Trip – Slide into a Thug & then knock him out on the ground.


End of the Line:
Gun Thugs: x6

1 Medal: Bola'd Over – Knock down a Thug with the Bolas & then finish him off with a Ground Takedown.
2 Medals: Over the Ledge – While hanging from a ledge, grab a Thug & pull him down over the ledge.
3 Medals: Breaking & Entering – Perform a Takedown through a Weak Wooden Wall.


Lost City:
Gun Tygers: x7

1 Medal: Caltrop Trip – Knock down an enemy with the Caltrops & then take him down.
2 Medals: Round the Bend – Use Corner Cover to hide & then take down an approaching Thug.
3 Medals: Pouncer – Perform a Pounce Attack on a Thug & then knock him out on the ground.


Top of the World:
Gun Tygers: x7

1 Medal: Gun Thief – Disarm a Thug with an aimed Whip Attack.
2 Medals: Have A Nice Trip – Slide into a Thug & then knock him out on the ground.
3 Medals: Feet First – While standing on a ledge directly above your target, perform a Reverse Ledge Takedown on the Thug below you. (This is best done if you can wait for a Tyger to take the Hostage as they stand right below a walkway every time; setting this up “naturally” can be challenging)


Meltdown Mayhem (Extreme):

Gun Thugs: x6
Armored Thug: x1
Sniper Thug: x1

1 Medal: Lone Gunman – While climbing on the ceiling, perform a Takedown on a Sniper Thug above you. (Best attempted at the beginning before Thugs are alerted/patrolling)
2 Medals: Grate Moves – While in a Floor Grate perform a Takedown on a Thug.
3 Medals: Window Pain – Perform a Takedown through a glass window.


Police Brutality (Extreme):
Gun Thugs: x6 (Very Hard)
Jammer Thug: x1

1 Medal: Gun Thief – Disarm a Thug with an aimed Whip Attack. (Quickfire Whip disarms Weapons)
2 Medals: Knockout Smash – During a Silent Takedown perform a Knockout Smash to takedown the Thug instantly.
3 Medals: Bullet Proof – Take down all of the Thugs without taking damage.


This is the first Challenge that will probably make you want to tear your hair out with Catwoman. Make a point of taking out the Jammer Thug first so that we can use Thief Vision properly. Since the Challenges themselves are simple (minus Bullet Proof of course), really take your time & only take out lone Thugs. Save Knockout Smash & Gun Thief for the final two Thugs.

Natural Selection (Extreme):
Gun Thug: x5
Armored Thug: x1
Armored Sniper Thug: x1

1 Medal: Cat Fight – Perform a Beatdown on a Gun/Armored Thug.
2 Medals: Breaking & Entering – Perform a Takedown through a Weak Wooden Wall.
3 Medals: Pouncer – Perform a Pounce Attack on a Thug & then knock him out on the ground.


End of the Line (Extreme):
Gun Thugs: x3 (Very Hard)
Sniper Thug: x1
Armored Thug: x2
Armored Sniper: x1
Armored Jammer: x1

1 Medal: Whip Into Shape – Trip up a Thug with the Whip & then finish him off with a Ground Takedown.
2 Medals: Friends Fly Free – While hanging from a ledge, grab two Thugs simultaneously & pull them down over the ledge.
3 Medals: Grate Moves – While in a Floor Grate perform a Takedown on a Thug. (Best attempted at the beginning before Thugs are alerted/patrolling)


This Challenge becomes the new hardest Predator Challenge unfortunately. When the Challenge begins, immediately sneak to the Floor Grates at the far-right end of the map undiscovered & wait in there for the Armored Jammer to walk by. The Jammer’s undisturbed route will always walk him over there by himself where we can then perform the Takedown; we can then escape into the crawlspace dead ahead of us undiscovered & plot out the next moves. I usually then complete Whip Into Shape with the lone Armored Sniper in the upper balcony while the other Thugs are distracted; my strategy then always falls apart with no consistent way of getting Friends Fly Free.

Lost City (Extreme):
Gun Tygers: x5
Armored Tygers: x3

1 Medal: Whipped Up – While climbing on the ceiling perform a Takedown on an enemy above you.
2 Medals: Knockout Smash – During a Silent Takedown perform a Knockout Smash to takedown the Thug instantly.
3 Medals: Three Strikes – Punch any three different Gun/Armored Tygers.


Top of the World (Extreme):
Gun Tyger: x6 (Very Hard)
Armored Tyger: x1
Armored Jammer Tyger: x1

1 Medal: Cat Fight – Perform a Beat Down on a enemy.
2 Medals: Caltrop Trip – Knock down an enemy with the Caltrops & then take him down.
3 Medals: Don't Touch That Dial – Leave the Thug with the Jammer Backpack until last.
For the most part, all Challenges can be completed at the very end of the Challenge; the hardest part is just surviving to even get that far. Play extremely cautiously & use the Floor Grates, Vents, & Gargoyles to navigate around undetected.


Achievement #55 – Feline Revenge: Obtain all 72 Medals on the original Arkham City Ranked Maps (as Catwoman).
We will unlock this after unlocking all 36 Combat Challenge Medals & all 36 Predator Challenge Medals for Catwoman.
Sequence 16: Predator (Robin)
1. Robin – Ranked Medals: 69/84
2. Achievements: 55/64
----------------------------------------------------------------------------------------------------

Meltdown Mayhem:
Gun Thugs: x5

1 Medal: Shield Bash – Knock a Thug down with the Shield Bash & then take him down.
2 Medals: Over the Ledge – While hanging from a ledge, grab a Thug, & pull him down over the ledge.
3 Medals: What Goes Up – When a Thug climbs to the top of a ladder, send him flying back down.


Police Brutality:
Gun Thugs: x5

1 Medal: Bullet Shield – Block a Thug’s bullets before performing a Shield Bash, then take them down.
2 Medals: Feet First – While standing on a ledge directly above your target, perform a Reverse Ledge Takedown on the Thug below you.
3 Medals: Smash Landing – Smash through a glass ceiling onto a Thug below to take him down. (Best attempted at the beginning before Thugs are alerted/patrolling)


Natural Selection:
Gun Thugs: x6

1 Medal: Zip Kick – Knock a Thug down with the Zip Kick & then take him down.
2 Medals: Blast Zone – Explode a weak wall into a Thug to knock him out. (Best attempted at the beginning before Thugs are alerted/patrolling; there are two different Thugs on the lower level that walk in front of Structural Weaknesses)
3 Medals: Knock Knock – Distract a Thug with a Wing Ding thrown in the environment & then perform a Silent Takedown while he is distracted.


End of the Line:
Gun Thugs: x6

1 Medal: Shield Smash – Use a Shield Bash to knock a Thug off a ledge.
2 Medals: High Speed Impact – Use a boosted Remote Shuriken to knock a Thug over an edge.
3 Medals: Grate Moves – While in a Floor Grate perform a Takedown on a Thug.


Lost City:
Gun Tygers: x7

1 Medal: Snap Flashed – Knock down 1 Thug with a Snap Flash & then take him down.
2 Medals: Fire Hazard – Use a Shuriken on a fire extinguisher & silently take down a Thug caught up in the smoke.
3 Medals: Aerial Assault – Glide kick a Thug & then knock him out on the ground.


Top of the World:
Gun Tygers: x6

1 Medal: Zip Kick Off – Use the Zip Kick to knock a Thug off of a walkway.
2 Medals: Over the Ledge – While hanging from a ledge, grab a Thug & pull him down over the ledge.
3 Medals: Round the Bend – Use Corner Cover to hide & then take down an approaching Thug.


Meltdown Mayhem (Extreme):
Gun Thugs: x6
Sniper Thug: x1
Armored Thug: x1

1 Medal: Zip Kick Off – Use the Zip Kick to knock a Thug off of a walkway.
2 Medals: Have A Nice Trip – Slide into a Thug & then knock him out on the ground.
3 Medals: Friends Fly Free – While hanging from a ledge, grab two Thugs simultaneously & pull them down over the ledge. (The hardest Challenge, best to lure Thugs to the opposite end of the map from the Sniper Thug, takeout the Sniper Thug to lure the Thugs back, & try being quick enough to Ledge Takedown two Thugs as they investigate the Sniper)


Police Brutality (Extreme):
Gun Thugs: x6 (Very Hard)
Jammer Thug: x1

1 Medal: Shield Bash – Knock a Thug down with the Shield Bash & then take him down.
2 Medals: Two For Two – Take down 2 Thugs with 2 different walls at once using Explosive Gel. (Best attempted at the beginning before Thugs are alerted/patrolling)
3 Medals: Smoke Detector – Use the Smoke Pellet to create a smoke cloud & take down a Thug as he panics in the smoke.


For the Two For Two Challenge, all while being undiscovered, Glide over to the building across from where we start & quickly sneak inside to spray Explosive Gel on the Structural Weakness behind where a Thug stands; this Thug will only move if you are discovered. Now quickly sneak over to the room off our left (if facing the wall we just Gel’d) & wait for the patrolling Thug to walk out of your view in behind a different Structural Weakness. Before he can walk by it, place down the second Explosive Gel & immediately detonate. Then make an effort to Takedown the Jammer Thug so you can safely complete the rest of the Challenges.)
Sequence 16.5: Predator (Robin)
1. Robin – Ranked Medals: 84/84
2. Achievements: 56/64
----------------------------------------------------------------------------------------------------

Natural Selection (Extreme):
Gun Thugs: x5 (Very Hard)
Armored Thug: x1
Armored Sniper: x1

1 Medal: Snap Flashed – Knock down 1 Thug with a Snap Flash & then take him down.
2 Medals: Smoke Detector – Use the Smoke Pellet to create a smoke cloud & take down a Thug as he panics in the smoke.
3 Medals: Crowd Control – Take down three Thugs at once with one wall using Explosive Gel.


When the Challenge begins, we will be on the lower level. A Gun Thug will walk down some stairs off our right & walk down a hall; a different Thug will walk a little bit past the mammoth toward the other Thug before turning around & heading down a different side hall. These two halls are divided by a Structural Weakness. As soon as the second Thug turns around to begin walking back down the hall, quickly sneak past the first Thug & place Explosive Gel on the Structural Weakness. Now quickly sneak around the Weakness to Silently Takedown the second Thug right in front of the wall so that it will lure over the others. Quickly, enter into the nearby Vent & wait for the Thugs to come over; when a group of three or more Thugs arrive, detonate the wall to complete Crow Control. This is extremely finicky as the Thugs distance from the wall & variance in patrolling can make this strategy inconsistent.

End of the Line (Extreme):
Armored Thugs: x5 (Very Hard)
Armored Snipers: x2
Armored Jammer: x1

1 Medal: Triple Snap Flashed – Knock down 3 Thug with a Snap Flash.
2 Medals: Fists of Fury – Take down a Thug with a Beat Down.
3 Medals: Over the Ledge – While hanging from a ledge, grab a Thug, & pull him down over the ledge.


Similar to how we started with Catwoman on this Challenge, begin by taking out the Armored Jammer from the Floor Grate. We can then takeout the lone Armored Sniper in the balcony with a Beat Down to complete Fists of Fury. From this balcony facing into the Subway, we need to get over to the far-right end of the map where some Soft Wood Paneling & Floor Grates are. Try alerting the Thugs to come over here with Shurikens or visual contact & hide in the Floor Grates. As they begin dispersing, try placing a Snap Freeze on one of the Thugs.

Lure them back over with Shurikens, & sneak through the Floor Grates into the room behind the Soft Wood Paneling. With the Thugs in front of us, throw Shurikens at the walls or Soft Wood Paneling to alert the Thugs. Will standing out of the Grates, the Thugs should begin running around to enter into this room from behind us which is a narrow staircase. Ideally, our Snap Freeze Thug is here with them. When they group up in the staircase, detonate your Snap Freeze to complete Triple Snap Flashed. Then carefully begin luring the Thugs into this back room/staircase area to take them down; do not destroy the Soft Wood Paneling at all or it will ruin the safety of this area. Over the Ledge will have to be completed on the fly; if possible, leave a Thermal Vision Thug alive as they tend to stick to the upper levels of maps.

Lost City (Extreme):
Gun Tygers: x5 (Very Hard)
Armored Tygers: x3

1 Medal: Shield Smash – Use a Shield Bash to knock a Thug off a ledge.
2 Medals: Snap Flash Trap – Place a Snap Flash on a stunned Thug, then use it to knock down a different Thug.
3 Medals: Grate Moves – While in a Floor Grate perform a Takedown on a Thug.


Snap Flash Trap is a bit tricky to figure out. How it works in practice, is you need to knock down a Tyger either with a Shuriken or with a Super Cape Stun. With them on the ground, place down a Snap Freeze on them, & quickly perform a Ground Takedown. When the other Tygers come to investigate the body, detonate the Snap Freeze to complete the Challenge. That is the theory... but there seems to be a certain time limit for between knocking out downed Tyger & when the Snap Freeze knockdown will register. On multiple occasions I would do this & the Snap Freeze knockdown simply wouldn’t register which was really annoying.

Top of the World (Extreme):
Gun Tygers: x6
Armored Tygers: x1
Armored Jammer: x1

1 Medal: Bullet Shield – Block a Thug's bullets before performing a Shield Bash, then take them down.
2 Medals: Round the Bend – Use Corner Cover to hide & then take down an approaching Thug.
3 Medals: Fire Hazard – Use a Shuriken on a fire extinguisher & silently take down a Thug caught up in the smoke.


Black Mask (DLC):
Gun Thugs: x6

1 Medal: Shield Bash – Knock a Thug down with the Shield Bash & then take him down.
2 Medals: Zip Kick Off – Use the Zip Kick to knock a Thug off of a walkway.
3 Medals: Window Pain – Perform a Takedown through a glass window.


Achievement #56 – Robin Revenge: Obtain 78 Medals on the original Arkham City & Robin Bundle Pack Ranked Maps (as Robin).
We will unlock this after unlocking all 36 Combat Challenge Medals & all 36 Predator Challenge Medals for Robin. We will also need to earn all 3 Medals for the Robin exclusive Challenges Freight Train & Black Mask.
Sequence 17: Predator (Nightwing)
1. Nightwing – Ranked Medals: 60/84
2. Achievements: 56/64
----------------------------------------------------------------------------------------------------

Nightwing is a bit broken in terms of Gadgets as we can use the Disrupter to disable Guns as well as the use the Wrist-Dart, which if hit in the head, performs a one-shot Takedown on an enemy. His Extreme Challenges unfortunately, are the hardest in the game so brace yourself for a big headachce.

Meltdown Mayhem:
Gun Thugs: x5

1 Medal: Bullseye – Shoot a Thug in the body with a Wrist Dart to stun them, then perform a Ground Takedown.
2 Medals: Fall Guy – Batclaw a Thug & pull him off a walkway to take him down.
3 Medals: Fists of Fury – Take down a Thug with a Beat Down.


Police Brutality:
Gun Thugs: x5

1 Medal: Pound the Beat – Knock down 1 Thug with the Electrical Blast, then take him down.
2 Medals: Grate Moves – While in a Floor Grate perform a takedown on a Thug.
3 Medals: Mind Your Head – Knock down a Thug with a Wing Ding & then finish him off with a Ground Takedown.


Natural Selection:
Gun Thugs: x6

1 Medal: Stick Up – Knock down 1 Thug with an Escrima Stick, then take him down.
2 Medals: Line Drive – Kick 1 Thug using the Line Launcher.
3 Medals: Break Your Fall – Drop down on top of a Thug & then knock him out on the ground.


End of the Line:
Gun Thugs: x6

1 Medal: Head Shot – Shoot a Thug in the head with the Wrist-Dart for a one-hit Takedown.
2 Medals: Weapon Jam – Use the Disruptor on one Thug's gun, let him try to use it & then take him down.
3 Medals: Knockout Smash – During a Silent Takedown perform a Knockout Smash to takedown the Thug instantly.


Lost City:
Gun Tygers: x7

1 Medal: Stick Up – Knock down 1 Thug with an Escrima Stick, then take him down.
2 Medals: Kick Off – Use the Line Launcher to kick a Thug off an edge & knock him out.
3 Medals: Over the Ledge – While hanging from a ledge, grab a Thug & pull him down over the ledge.


Top of the World:
Gun Tygers: x6

1 Medal: Bowled Over – Sneak up behind a Thug & knock him off of a walkway with the Electrical Blast.
2 Medals: Fall Guy – Batclaw a Thug & pull him off a walkway to take him down.
3 Medals: Grate Moves – While in a Floor Grate perform a Takedown on a Thug.


Meltdown Mayhem (Extreme):
Gun Thugs: x5 (Very Hard)
Sniper Thug x1
Armored Thug x1

1 Medal: Triple Ricochet – Knock down 3 Thugs at once with the Escrima Stick. (Lure over a group of Thugs to a downed one & highlight three of them with the Escrima Stick which will knock them all down if thrown. Note that this will not work on Armored Thugs!)
2 Medals: Rope-A-Dope – While on a Line Launcher wire walk, perform a Drop Attack on a Thug.
3 Medals: Three Strikes – Punch any three different Gun Thugs.


Police Brutality (Extreme):
Gun Thugs: x6 (Very Hard)
Jammer Thug: x1

1 Medal: Triple Header – Use the Electrical Blast attack on three or more Thugs.
2 Medals: Chain Reaction – Kick 2 Thugs in one move using the Line Launcher.
3 Medals: Confiscated Weapon – Use the Batclaw to disarm a Thug, then take him down.


When the Challenge begins, Takedown the patrolling Gun Thug off our right through the Takedown through the glass ceiling. Then, quickly Grapple back up top & stand on the railing looking below. The Thugs will walk out of the entrance to the room behind us in a cluster where we can then use Electrical Blast & launch into them to complete Triple Header. If you are quick, you can also run away & then complete Chain Reaction while they are still clustered but it is very difficult; you may not to bait them over to a different downed Thug to reset them.
Sequence 17.5: Predator (Nightwing)
1. Nightwing – Ranked Medals: 84/84
2. Achievements: 57/64
----------------------------------------------------------------------------------------------------

Natural Selection (Extreme):
Gun Thugs: x5
Armored Thugs: x1
Armored Sniper: x1

1 Medal: Head Shot – Shoot a Thug in the head with the Wrist-Dart for a one-hit Takedown.
2 Medals: Weapon Jam – Use the Disruptor on one Thug's gun, let him try to use it & then take him down.
3 Medals: Triple Ricochet – Knock down 3 Thugs at once with the Escrima Stick.


Triple Ricochet has the same strategy as in Meltdown Mayhem Extreme, but easier. Grapple up to the Gargoyles above & head shot the Armored Sniper with our Wrist-Dart for Head Shot. Then when the Thugs come over to investigate, get into a position on the Gargoyles to see them all & use the Escrima Stick to knock them down. Remember that it will only work on regular Gun Thugs.

End of the Line (Extreme):
Armored Thugs: x5 (Very Hard)
Armored Snipers: x2
Armored Jammer: x1

1 Medal: Triple Header – Use the Electrical Blast attack on three or more Thugs.
2 Medals: Switch Hitter – Kick one Thug while on the Line Launcher, then fire the Line Launcher again from the current line & kick a different Thug.
3 Medals: Fall Guy – Batclaw a Thug & pull him off a walkway to take him down.


This may be the hardest Predator Challenge in the game. To start, I Grappled to the Gargoyles & used the Disrupter to disable both of the Snipers. If I was fast enough, I would also get a Head Shot in on the Armored Jammer with the Wrist-Dart. With the Snipers disabled, drop onto the walkway & use the Line Launcher to ride into the Armored Sniper here, then quickly use it again to kick an Armored Thug walking on the bridge. From there, my strategies would fall apart & I would have to adlib. This gave me a lot of trouble; video guides are very useful...

Lost City (Extreme):
Gun Tygers: x6
Armored Tygers: x2

1 Medal: Bowled Over – Sneak up behind a Thug & knock him off of a walkway with the Electrical Blast. (Best attempted at the beginning before Tygers are alerted/patrolling)
2 Medals: Confiscated Weapon – Use the Batclaw to disarm a Thug, then take him down.
3 Medals: Bullet Proof – Take down all of the Thugs without taking damage.


Play very cautiously. I found it best to leap from the Gargoyles at the beginning of the Challenge & use Electrical Blast to knock a Tyger off the walkway. This is the hardest of the Challenges here so completing it first is usually your make or break for the run as the rest of the Challenge can be completed just through stealth.

Top of the World (Extreme):
Gun Tygers: x5 (Very Hard)
Armored Tygers: x2
Armored Jammer: x1

1 Medal: Triple Head Shot – Shoot 3 Thugs in the head with the Wrist Dart for one-hit Takedown.
2 Medals: Feet First – While standing on a ledge directly above your target, perform a Reverse Ledge Takedown on the Thug below you.
3 Medals: Mined Your Step – Detonate a Mine using the Mine Detonator as a Thug walks over it.


Triple Head Shot is best attempted at the beginning since if you miss a single shot your run is ruined. Grapple around the Gargoyles & wait for Thermal Vision Tygers to come outside; they stand still & line themselves up pretty easily to be shot. If possible, though it is rare, try using a Dart on the Armored Jammer if he comes out to look out a knocked out Tyger. Mined Your Step is not too bad, but Feet First can be really annoying as we don’t have a Hostage to conveniently set this up for us.

Wayne Manor Main Hall (DLC):
Gun Thugs: x6

1 Medal Stick Up – Knock down 1 Thug with an Escrima Stick, then take him down.
2 Medals: Fall Guy – Batclaw a Thug & pull him off a walkway to take him down.
3 Medals: Knock Knock – Distract a Thug with a Wing Ding thrown in the environment & then perform a Silent Takedown while he is distracted.


Achievement #57 – Nightwing Revenge: Obtain 78 Medals on the original Arkham City & Nightwing Bundle Pack Ranked Maps (as Nightwing).
We will unlock this after unlocking all 36 Combat Challenge Medals & all 36 Predator Challenge Medals for Robin. We will also need to earn all 3 Medals for the Nightwing exclusive Challenges Wayne Manor Armory & Wayne Manor Main Hall.
Sequence 18: Campaign Challenges 1
1. Batman – Campaign Medals: 36/108
2. Catwoman – Campaign Medals: 36/108
3. Robin – Campaign Medals: 36/114
4. Nightwing – Campaign Medals: 36/114
5. Achievements: 58/64
----------------------------------------------------------------------------------------------------

Campaign Challenges are a set of three Combat or Predator Challenges that we must beat in one sitting. We do get 3 retries, but beyond that, & we must restart the entire Campaign Challenge. The Challenges are identical to the ones we have been completing previously so you should already have a good feel for how to complete them... for the most part.

Each Campaign has a set of Positive or Negative Modifiers; by the end of the Campaign we will have needed to use all of them. I will include which Modifiers I used on which Challenge but by no means are these set-in stone; these reflect my play style; you might decide to approach the Modifiers differently. Play to your strengths!

Some characters have conflicting Challenges so there isn’t always a perfect Modifier loadout for all four of them. If a character has conflicting Challenges then the base Modifiers I have set up, I will list them separately at the bottom of the Campaign.

Search & Destroy:

Modifiers:
1. Time Limit: Adds a time limit to complete the Challenge. Defeat enemies to extend your time.
2. Protective Aura: One enemy will be surrounded with a Protective Aura which prevents them from taking damage. The Aura moves from enemy to enemy over time.
3. Replenishing Health: The Player will slowly regain lost Health over time.

Challenges:
1. Meltdown Mayhem (Predator) [Protective Aura]
2. Blind Justice (Combat) [Time Limit, Replenishing Health]
3. Police Brutality (Predator)


Street Justice:

Modifiers:
1. Decreased Health: The Player starts the Challenge with reduced Health.
2. One Hand Tied: In Combat, Counter Icons will not be displayed before an enemy attacks. In Predator, the Player will not be able to perform a Silent Takedown from behind.
3. Takedown Projectile: Upgrades your primary projectile weapon to knock out enemies with a single hit when thrown with the Quickfire button.

Challenges:
1. Rooftop Rumble (Combat)
2. Natural Selection (Predator) [One Hand Tied, Takedown Projectile]
3. Survival of the Fittest (Combat) [Decreased Health]

Robin Modifiers:
Rooftop Rumble – Decreased Health
Natural Selection – Takedown Projectile
Survival of the Fittest – One Hand Tied


Offensive Maneuvers:

Modifiers:
1. Danger Zones: In Combat, Gun Racks will be activated during the Challenge for enemies to obtain Firearms. In Predator, the environment will have booby-trapped Vantage Points.
2. Scattered Weapons: In Combat, enemies will pick up & throw objects at you. In Predator, the environment will start re-mined with proximity activated explosives.
3. Replenishing Health: The Player will slowly regain lost Health over time.
4. Free Medal: Player is automatically given a Medal if they don’t complete all 3 Objectives at the end of the Challenge.

Challenges:
1. Funhouse Brawl (Combat) [Scattered Weapons, Replenishing Health]
2. End of the Line (Predator) [Free Medal]
3. Hell's Gate (Combat) [Danger Zones]


City Invader:

Modifiers:
1. Gadget Malfunction: In Combat, all Gadgets will be disabled. In Predator, Detective Mode will be scrambled for the entire Challenge.
2. Increased Aggression: Enemies will be stronger, faster, & tougher.
3. Decreased Health: The Player starts the Challenge with reduced Health.
4. Super Powered: Gain the ability to punch through Shields, Armor, & Tasers without getting blocked. In Predator, you will move faster when crouched.

Challenges:
1. Top of the World (Predator)
2. Prison Riot (Combat) [Gadget Malfunction, Increased Aggression, Super Powered]
3. Lost City (Predator) [Decreased Health]

Nightwing Modifiers:
Top of the World – None
Prison Riot – Gadget Malfunction, Decreased Health, Super Powered
Lost City – Increase Aggression


Achievement #58 – Campaign Bronze: Obtain 36 Medals on the original Arkham City Campaigns (as Batman).
If you have earned all 9 Medals on each of the 4 Campaign Challenges so far, this is the soonest you will unlock this Achievement.
Sequence 19: Campaign Challenges 2
1. Batman – Campaign Medals: 72/108
2. Catwoman – Campaign Medals: 72/108
3. Robin – Campaign Medals: 72/114
4. Nightwing – Campaign Medals: 72/114
5. Achievements: 59/64
----------------------------------------------------------------------------------------------------

Midnight Assault:

Modifiers:
1. Increased Aggression: Enemies will be stronger, faster, & tougher.
2. Scattered Weapons: In Combat, enemies will pick up & throw objects at you. In Predator, the environment will start re-mined with proximity activated explosives.
3. Danger Zones: In Combat, Gun Racks will be activated during the Challenge for enemies to obtain Firearms. In Predator, the environment will have booby-trapped Vantage Points.
4. Free Medal: Player is automatically given a Medal if they don’t complete all 3 Objectives at the end of the Challenge.
5. Replenishing Health: The Player will slowly regain lost Health over time.

Challenges:
1. Natural Selection (Extreme) (Predator) [Free Medal]
2. Hell's Gate (Extreme) (Combat) [Danger Zones, Replenishing Health, Scattered Weapons]
3. Meltdown Mayhem (Extreme) (Predator) [Increased Aggression]

Nightwing Modifiers:
Natural Selection (Extreme) – Increased Aggression
Hell’s Gate (Extreme) – Danger Zones, Replenishing Health, Scattered Weapons
Meltdown Mayhem (Extreme) – Free Medal


Hostile Takeover:

Modifiers:
1. Time Limit: Adds a time limit to complete the Challenge. Defeat enemies to extend your time.
2. Decreased Health: The Player starts the Challenge with reduced Health.
3. Protective Aura: One enemy will be surrounded with a Protective Aura which prevents them from taking damage. The Aura moves from enemy to enemy over time.
4. One Hand Tied: In Combat, Counter Icons will not be displayed before an enemy attacks. In Predator, the Player will not be able to perform a Silent Takedown from behind.
5. Super Powered: Gain the ability to punch through Shields, Armor, & Tasers without getting blocked. In Predator, you will move faster when crouched.

Challenges:
1. Prison Riot (Extreme) (Combat) [Decreased Health, Protective Aura, Super Powered]
2. Police Brutality (Extreme) (Predator) [One Hand Tied]
3. Funhouse Brawl (Extreme) (Combat) [Time Limit]

Catwoman/Robin Modifiers:
Switch Decreased Health with One Hand Tied; all others remain the same.


Double Jeopardy:

Modifiers:
1. Gadget Malfunction: In Combat, all Gadgets will be disabled. In Predator, Detective Mode will be scrambled for the entire Challenge.
2. Increased Aggression: Enemies will be stronger, faster, & tougher.
3. Protective Aura: One enemy will be surrounded with a Protective Aura which prevents them from taking damage. The Aura moves from enemy to enemy over time.
4. Scattered Weapons: In Combat, enemies will pick up & throw objects at you. In Predator, the environment will start re-mined with proximity activated explosives.
5. Takedown Projectile: Upgrades your primary projectile weapon to knock out enemies with a single hit when thrown with the Quickfire button.
6. Free Medal: Player is automatically given a Medal if they don’t complete all 3 Objectives at the end of the Challenge.

Challenges:
1. Lost City (Extreme) (Predator) [Takedown Projectile, Free Medal]
2. Rooftop Rumble (Extreme) (Combat) [Protective Aura, Scattered Weapons]
3. End of the Line (Extreme) (Predator) [Gadget Malfunction, Increased Aggression]

Catwoman/Robin/Nightwing Modifiers:
Lost City (Extreme) – None
Rooftop Rumble (Extreme) – Gadget Malfunction, Protective Aura, Increased Aggression
End of the Line (Extreme) – Takedown Projectile, Scattered Weapons, Free Medal


Ruthless Vengeance:

Modifiers:
1. Gadget Malfunction: In Combat, all Gadgets will be disabled. In Predator, Detective Mode will be scrambled for the entire Challenge.
2. Time Limit: Adds a time limit to complete the Challenge. Defeat enemies to extend your time.
3. Decreased Health: The Player starts the Challenge with reduced Health.
4. Danger Zones: In Combat, Gun Racks will be activated during the Challenge for enemies to obtain Firearms. In Predator, the environment will have booby-trapped Vantage Points.
5. One Hand Tied: In Combat, Counter Icons will not be displayed before an enemy attacks. In Predator, the Player will not be able to perform a Silent Takedown from behind.
6. Super Powered: Gain the ability to punch through Shields, Armor, & Tasers without getting blocked. In Predator, you will move faster when crouched.

Challenges:
1. Survival of the Fittest (Extreme) (Combat) [Gadget Malfunction, Time Limit, Decreased Health]
2. Top of the World (Extreme) (Predator)
3. Blind Justice (Extreme) (Combat) [Danger Zones, One Hand Tied, Super Powered]


Achievement #59 – Campaign Silver: Obtain 72 Medals on the original Arkham City Campaigns (as Batman).
If you have earned all 9 Medals on each of the 8 Campaign Challenges so far, this is the soonest you will unlock this Achievement.
Sequence 20: Campaign Challenges 3
1. Batman – Campaign Medals: 108/108
2. Catwoman – Campaign Medals: 108/108
3. Robin – Campaign Medals: 108/114
4. Nightwing – Campaign Medals: 108/114
5. Achievements: 62/64
----------------------------------------------------------------------------------------------------

Combat Expert:

Modifiers:
1. Time Limit: Adds a time limit to complete the Challenge. Defeat enemies to extend your time.
2. Increased Aggression: Enemies will be stronger, faster, & tougher.
3. Danger Zones: In Combat, Gun Racks will be activated during the Challenge for enemies to obtain Firearms. In Predator, the environment will have booby-trapped Vantage Points.
4. Replenishing Health: The Player will slowly regain lost Health over time.

Challenges:
1. Survival of the Fittest (Combat) [Increased Aggression, Danger Zones, Replenishing Health]
2. Funhouse Brawl (Combat) [Time Limit]
3. Prison Riot (Combat)

Predator Expert:

Modifiers:
1. Gadget Malfunction: In Combat, all Gadgets will be disabled. In Predator, Detective Mode will be scrambled for the entire Challenge.
2. Scattered Weapons: In Combat, enemies will pick up & throw objects at you. In Predator, the environment will start re-mined with proximity activated explosives.
3. One Hand Tied: In Combat, Counter Icons will not be displayed before an enemy attacks. In Predator, the Player will not be able to perform a Silent Takedown from behind.
4. Takedown Projectile: Upgrades your primary projectile weapon to knock out enemies with a single hit when thrown with the Quickfire button.

Challenges:
1. Meltdown Mayhem (Predator) [Gadget Malfunction, Scattered Weapons]
2. Lost City (Predator) [One Hand Tied, Takedown Projectile]
3. Top of the World (Predator)

Robin Modifiers:
Meltdown Mayhem – Gadget Malfunction, One Hand Tied
Lost City – Takedown Projectile, Scattered Weapons
Top of the World – None

Combat Master:

Modifiers:
1. Decreased Health: The Player starts the Challenge with reduced Health.
2. Scattered Weapons: In Combat, enemies will pick up & throw objects at you. In Predator, the environment will start re-mined with proximity activated explosives.
3. One Hand Tied: In Combat, Counter Icons will not be displayed before an enemy attacks. In Predator, the Player will not be able to perform a Silent Takedown from behind.
4. Gadget Malfunction: In Combat, all Gadgets will be disabled. In Predator, Detective Mode will be scrambled for the entire Challenge.
5. Protective Aura: One enemy will be surrounded with a Protective Aura which prevents them from taking damage. The Aura moves from enemy to enemy over time.
6. Super Powered: Gain the ability to punch through Shields, Armor, & Tasers without getting blocked. In Predator, you will move faster when crouched.

Challenges:
1. Blind Justice (Extreme) (Combat) [One Hand Tied]
2. Rooftop Rumble (Extreme) [Scattered Weapons] [Decreased Health]
3. Hell's Gate (Extreme) (Combat) [Gadget Malfunction, Protective Aura, Superpowered]

Predator Master:

Modifiers:
1. Time Limit: Adds a time limit to complete the Challenge. Defeat enemies to extend your time.
2. Increased Aggression: Enemies will be stronger, faster, & tougher.
3. Danger Zones: In Combat, Gun Racks will be activated during the Challenge for enemies to obtain Firearms. In Predator, the environment will have booby-trapped Vantage Points.
4. Protective Aura: One enemy will be surrounded with a Protective Aura which prevents them from taking damage. The Aura moves from enemy to enemy over time.
5. Scattered Weapons: In Combat, enemies will pick up & throw objects at you. In Predator, the environment will start re-mined with proximity activated explosives.
6. Free Medal: Player is automatically given a Medal if they don’t complete all 3 Objectives at the end of the Challenge.

Challenges:
1. Police Brutality (Extreme) (Predator) [Time Limit, Increased Aggression]
2. Natural Selection (Extreme) (Predator) [Free Medal, Scattered Weapons, Protective Aura]
3. End of the Line (Extreme) (Predator) [Danger Zone]

Catwoman/Robin/Nightwing Modifiers:
Police Brutality (Extreme) – Protective Aura
Natural Selection (Extreme) – Increased Aggression, Scattered Weapons
End of the Line (Extreme) – Time Limit, Danger Zones, Free Medal


Achievement #60 – Campaign Gold: Obtain all 108 Medals on the original Arkham City Campaigns (as Batman).
If you have earned all 9 Medals on all 12 Campaign Challenges, we will unlock the Achievement.


Achievement #61 – Perfect Knight – Day 2: Complete every Challenge in Arkham City – 15 Main Story, 12 Side Missions, 27 Upgrades, 400 Collectables, New Game Plus & 180 Riddler’s Revenge Medals (as Batman).
Story Related. If you have 100% NG, NG+, as well as earned all 180 Riddler’s Revenge Medals as Batman, we will finally unlock this Achievement.


Achievement #62 – Campaign Kitty: Obtain all 108 Medals on the original Arkham City Ranked Maps (as Catwoman).
If you have earned all 9 Medals on all 12 Campaign Challenges, we will unlock the Achievement. While Combat is a no issue, Catwoman really suffers from a lack of Gadgets. While in concept, what we need to do for her Predator Challenges are not too bad, we have very little room for being ingenuitive & are very limited in our options for taking Thugs down.
Sequence 21: Campaign Challenges 4
1. Robin – Campaign Medals: 114/114
2. Nightwing – Campaign Medals: 114/114
3. Achievements: 64/64
----------------------------------------------------------------------------------------------------

Black Mask Campaign (DLC): Robin Only

Modifiers:
1. Decreased Health: The Player starts the Challenge with reduced Health.
2. One Hand Tied: In Combat, Counter Icons will not be displayed before an enemy attacks. In Predator, the Player will not be able to perform a Silent Takedown from behind.
3. Gadget Malfunction: In Combat, all Gadgets will be disabled. In Predator, Detective Mode will be scrambled for the entire Challenge.
4. Super Powered: Gain the ability to punch through Shields, Armor, & Tasers without getting blocked. In Predator, you will move faster when crouched.


Challenges:
1. Black Mask (Predator) [One Hand Tied]
2. Freight Train (Combat) [Decreased Health, Gadget Malfunction, Super Powered]


Achievement #63 – Campaign Wonder: Obtain 114 Medals on the original Arkham City & Robin Bundle Pack Campaigns (as Robin).
If you have earned all 9 Medals on all 12 Campaign Challenges as well as the extra 6 Medals for Robin on the Black Mask Campaign, we will unlock the Achievement.

Wayne Manor Campaign (DLC): Nightwing Only

Modifiers:
1. Protective Aura: One enemy will be surrounded with a Protective Aura which prevents them from taking damage. The Aura moves from enemy to enemy over time.
2. Danger Zones: In Combat, Gun Racks will be activated during the Challenge for enemies to obtain Firearms. In Predator, the environment will have booby-trapped Vantage Points.
3. Scattered Weapons: In Combat, enemies will pick up & throw objects at you. In Predator, the environment will start re-mined with proximity activated explosives.
4. Takedown Projectile: Upgrades your primary projectile weapon to knock out enemies with a single hit when thrown with the Quickfire button.


Challenges:
1. Wayne Manor Armory (Combat) [Danger Zones, Scattered Weapons]
2. Wayne Manor Main Hall (Predator) [Protective Aura, Takedown Projectiles]


Achievement #64 – Campaign Nightwing: Obtain 114 Medals on the original Arkham City & Nightwing Bundle Pack Campaigns (as Nightwing).
If you have earned all 9 Medals on all 12 Campaign Challenges as well as the extra 6 Medals for Nightwing on the Wayne Manor Campaign, we will unlock the Achievement. I found Nightwing had the most difficult Campaigns due to his Predator Challenges; this will be the most daunting of the Riddler’s Revenge Achievements & will require many Campaign attempts…
Conclusion:
Arkham City is a grueling 100%, but not insanely difficult, it just takes a while; fortunately the story is actually really good & this is the best written take on Batman since Christian Bale. For some, Riddler’s Revenge will break your 100% due to difficulty of Predator/Campaign Challenges or for how long it all takes. Riddler’s Revenge is all memorization & knowing your order of operations per Challenge Map. It took me 120 hours to 100% the game; though at least 40-50 of those hours were added on for writing the guide on the side. Let me know in the comments how long an actual 100% run takes you; I am genuinely curious to know... It should take you much less time then I took with the majority of your time spent during playthrough one & in Riddler’s Revenge.

Special shout out & thanks to Caelan1963, for meticulously helping me with quality control on the guide & Collectible Maps!

If this guide helped you achieve 100%, rate the guide or let me know in the comments. Helps me know if I am doing things right!


100% Complete
Thank you for choosing Cynical Guides, & I will see you in the next one!

If you are interested in a little bit of patronage, support my projects & consider buying me a coffee. If not, no worries; my guides are, & will always be free content. Achievement Hunting is my passion, & writing these guides is a way for me to give meaning to a life long hobby!
https://www.buymeacoffee.com/cynic0055

Other Cynical Guides:
If you are looking for the guide covering the first playthrough of the game along with all 440 Riddler Collectibles/Challenges, click/Favourite the guide below.
https://steamoss.com/sharedfiles/filedetails/?id=2771214926
If you enjoy this game & my style of writing guides, be sure to check out my:
https://steamoss.com/sharedfiles/filedetails/?id=2434426635
Check out my profile for a full list of my works.
https://steamoss.com/sharedfiles/filedetails/?id=2992727030

55 comentário(s)
unawedjoker 19 de jan. às 14:57 
Dude, thank you so much. I just got the last achievement it and I couldn't have done it without this guide. I bow to you...
Love and Sorrow 9/dez./2024 às 17:02 
81 hours of grinding and following this guide and some youtube videos have finally bore the fruit. I have to admit controls are terrible sometimes. Catwoman is brutal in Extreme Predator challenges, Nightwing was certainly much easier, thanks to Wrist Darts.
atlid 1/dez./2024 às 3:00 
This took me 77 hours. Thanks for your guide!
CaRmAgE 15/nov./2024 às 19:52 
Anyway, I also found something neat in Top of the World that made the extreme map infinitely easier. You know the room Strange is in during the story? Turns out it has a roof you can grapple up onto from the 2nd floor. Most of the outside is covered with glass, but the exact opposite end from the 2nd floor is exposed, giving you a good view of 2 possible mine locations and the Jammer thug. For medals 2 and 3, I would just throw a Freeze Cluster grenade from up there at the first group that forms near one of the mines, then back away to hide. Once they break free, I throw another grenade immediately. I keep repeating until enough thugs come by that I get 3 of them. Then I repeat some more until I get the armored thug as well to line up for the second medal. Once you've had your fun, blow up the mine to take out a bunch of them at once.
CaRmAgE 15/nov./2024 às 19:51 
Just finally got Perfect Knight - Day 2. I agree with Godzilly: booby trapping the vantage points in EotL makes it way too hard. There are 2 snipers covering most of the main map with no places to hide (unless you count the floor grates, but that doesn't give you a lot of options).

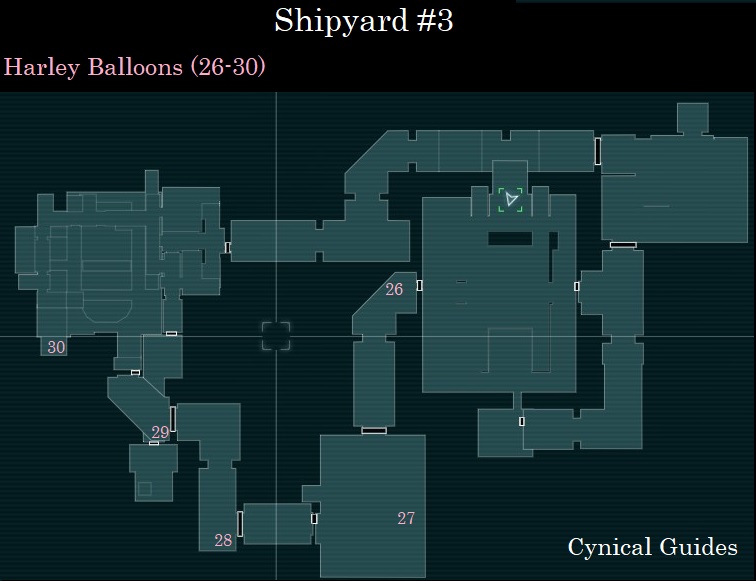
Meanwhile, NS has a convenient 3-breakable-wall room that can be used to go between floors without the vantage points. Also helps that it's near the floor grate section on the bottom floor. For the shockwave medal, having mines at the bases of the stairs allowed me to detonate 1 of them to attract the last 2 thugs to the spot for an easy setup. I started the glide from the display cases on the top floor. I tried the bridge on 1 attempt, but the angle was too awkward to get it to work.
The Wild Fire 2/nov./2024 às 23:23 
Exceptional guide mate, massive helps. Thank you
WeeHammy 22/ago./2024 às 15:44 
I have to say - what an exceptional guide both part 1 and 2. Extremely well detailed from start to finish. Tells you exactly what to do, where to go, easiest place to do it and it even offers alternatives.

You even took the time to detail all the riddlers revenge challenges and offer help for ALL of them for EACH and every single character.

10/10. This should be in a "PRIMA GUIDE" book (if you remember them) and hardcovered!

Also, it took me 57 hours to reach 100% following your guide step by step. Thank you so much man and my props to all the people that helped you make this guide too!
Relyks2000 4/jun./2024 às 20:41 
Perfect Freeflow 2.0 achievement - in case nobody has mentioned this as a suggestion:
I used the Campaign Challenge "Combat Master" which starts off with "Blind Justice" but you can choose the modifier for "Super Powered", which allows you to treat all enemies the same, freeing the brain of one less thing to have to pay attention to. There are plenty of enemies by round 4 to get the achievement (maybe round 3?). https://www.youtube.com/watch?v=qk5YalCTYaw
ZeOwls 23/mai./2024 às 11:54 
Something very helpful for any challenge or campaign in the Top of the world map, if you're in danger you can just jump off a ledge and it will "reset" you to the hanging platform and it works for every character
Godzilly ^~^ 20/abr./2024 às 18:45 
third i dont think there was any perks left so i did how i did it outside campaign, grapple to gargoyle right outside the gate i exit through, zip to far left from that pov, rec the guy getting up the ladder getting two medals in one, disabling both snipers cause they annoying as heck, and picking of the rest using rec when near ledges, but becareful cause you cant rec jammer guy since its to risky.

my playstyle totally didnt work with yours and i found mine to actually be alot easier.