Close Combat - Gateway to Caen

Close Combat - Gateway to Caen

174 ratings
Close Combat Tactical Guide
By crackwise
This guide aims to illustrate the tactical aspects to consider when playing Close Combat. With this guide, new players will hopefully have an introduction to some common and useful tactics, and veterans alike may find things they did not consider much in the past.
4
4
5
2
   
Award
Favorite
Favorited
Unfavorite
Introduction
In this guide some common and useful tactics for this game are illustrated. The focus is on the tactical mutliplayer aspect of the game, meaning the battlefield command on the tactical map is considered. Many of the tactics and concepts explained here are also applicable to other Close Combat titles. I would strongly encourage people to play multiplayer against human opponents to get the real taste of this game, where you can apply more realistic tactics as explained in this guide.

We have not covered the strategic aspect of the game in this guide, i.e. how to play the Grand Campaign, which battle groups should move to which maps during the campaign etc. This part could further be investigated in a future Gateway to Caen Strategy Guide.

Many things in this guide come from my personal experience with the Close Combat series. I have also made use of the precious tactical handbook written for the CC5 GJS mod by PZT clan members. Some tactics and illustrations were taken from the famous "Close Combat Marines Workbook". You can find these sources in the "Bibliography" section.

Close Combat is a very realistic game, therefore my first advice to people who are new to the multiplayer arena would be to think in realistic terms. When you are planning your approach, always think if it could be applicable and whether it makes sense in a real life situation. You already know that in real life, advancing carelessly without support and covering fire would cost lives, and believe me, there is nothing different to it in Close Combat!

Finally, I would like to thank the precious Close Combat community, most of all, Mooxe for keeping CloseCombatSeries.net alive, to my fellow PZT clan members and of course to developers for continuing to make CC games.

Cheers,

Pzt_Crackwise
1. Settings and Options
1.1. General Settings

Close Combat is best played with these settings to get the most possible information about your troops from the game.

In the game options:

- Set the team info icon display to: show cover
- Set the soldier outline display to: show morale (You don't get this information from any other place in the game so it is important to turn this on if you want the info!)
- Remove trees (Makes the armor and troops under trees easier to see by eye.)

(click the picture to see it larger)

Cover:
Cover is a vital factor which gives you a good idea how long your troops are likely to last when under fire.

Morale:
Knowing the morale level of individual troops is also important because it indicates how likely they are to not follow orders, get broken and even surrender.

- If the soldier outline appears green, your troops have a good morale and they can perform significantly well on their own and can charge the enemy properly.
- If it is yellow, they sill hold on well, but try not to charge without any other team nearby.
- If it is red, try not to leave them on their own and charge with them only if you have a command team nearby. (For more on command teams, see the "Individual Team Types" section.)

As for the User Interface (UI), I personally recommend leaving all of them intact. The more info you have about your troops, the better. (You can turn the UI pieces on or off during the battle with F5, F6, F7 and F8. F9 brings you the option menu during the battle.) Minimap is especially very crucial so try to have it on all the time.

1.2. Mission Settings

In my opinion the best settings for a multiplayer battle/operation/campaign are as follows:

- Both sides are on Line difficulty settings. (Generally this works well, however can be changed depending on the operation or GC played.)

- Check never act on initiative! Normally when you leave your troops unattended for some time - i.e. do not give any orders, they act on their own and start moving forward stupidly, which gets them killed most of the time. This prevents it from happening.)

- Always obey orders check or uncheck: Your troops tend not to initiate proper charges or retreats when under fire when this is unchecked. The overall infantry movement under fire is considerably better when it is checked, however this also disables the "morale failure" aspect of the psychological engine. (If you check this, your troops and enemy troops won't surrender even though they have very low morale.) I would leave it unchecked since the "individual troop morale" is a vital part of the Close Combat engine.

- Force morale gets too low: A general tendency in the previous CC releases was to play with this setting unchecked (off). Since, it may cause early unexpected retreats or disbands (which could perhaps cause some strange bugs - not sure about GtC though). However, it can be argued that it encourages more careful game-play and results in not sacrificing everything reclessly. It is up to the players to play with this setting on or off. I usually play with it being off.

- I think 20 minute games are the best. Not so short and not so long.
- Game ends when every Victory Location is captured or when the time ends after 20 minutes.
- Two minute warning: When every VL is captured a 2:00 minute counter starts. I think this should be checked, since it gives the losing side a chance to get back one of the VLs in 2:00 minutes and continue the fight.

Here is how it should look like when these settings are chosen:


2. Movement, Orders, Line of Sight
2.1 Movement and Orders

Your troops in Close Combat can move in various different ways:

- Move fast: The fastest way, good for assaulting. But units tend to get spread out and winded a lot, so it is best used in shorter intervals. I.e. move fast for some distance and then stop, wait for team to recover slightly and then move fast again.

- Move: Slow but cautious movement. Good if you have a team behind ready to provide covering fire (in case there is enemy contact) while you are approaching a bush, forest etc. What I have understood from the game manual is that it is the best movement type to discover enemy ambushes.

- Sneak:: Sneaking infantry are harder to spot, less vulnerable to mortar fire, but get winded easily and move very slowly. Good for taking positions when defending close to enemy. Especially sneaking AT inf. teams such as piat or panzerschreck into bushes or buildings is a good way to keep the enemy further unaware of their presence.


You can number your troops by CTRL + ... (numbers 1 - 9) It is especially useful to number your mortar teams during the deployment phase like this. Then you can call them easily by only pressing the numbers during the battle.

Also try to get used to issuing commands by keyboard, saves lots of time especially when assaulting and you need to micromanage lots of things at the same time:

Move: Z
Move fast: X
Sneak: C
Fire: V
Smoke: B

Defend mode: N
Ambush mode: M

Note that not all of the infantry have smoke grenades. Also you can issue multiple waypoints by holding SHIFT and then continuing to issue one of the movement orders. You can cancel any of the movement / fire / smoke orders by issuing defend or ambush.

You can also hold the right click at an entity on the map to see what it is made of, how its cover properties are etc. Stone buildings and walls are best and most protective, where as wooden buildings provide less protection to your troops.

One very important thing on Gateway to Caen is that corn fields provide utmost nondetection! A unit sneaking through a corn field is hard to detect, whereas enemy ambushing in the cornfield is even harder to discover! Be very careful when moving in the cornfields agains enemy ambushes! Advancing with "Bounding Overwatch" is crucial. (See the "Attack" section for more info on this tactic.) Also moving the infantry instead of sneaking in the corn fields seem to be better to discover the hiding enemy!

2.2. Line of Sight

Line of Sight (LoS) is probably one of the most important concepts you need to be aware of while playing Close Combat. Before ordering the fire option, a line follows your mouse cursor which changes color, between light green, dark green and red. Light green means your troops see the position directly. Dark green means some of your troops see it, some don't, the position is somewhat obscured. Red means, they can not see it. Note that mortar troops do not need direct LoS to shoot mortars!

To shoot directly and accurately, your troops need to have direct LoS on the enemy (light green line). However, even though if you don't have direct LoS on the enemy and if you have LoS somewhere close to them, shoot there instead. Assuming you are shooting there with your infantry: Chances are that enemy will get supressed and you can reposition another troop to have direct LoS on the enemy. Indirect shots with tanks are even better, since the High Explosive (HE) shots they fire can kill regardless.

Line of Sight becomes very important especially during deployment of Anti-Tank Guns and AT-Infantry. During deployment of sniper and MG teams LoS should also be considered extensively.


3. Make a Battle Plan!
Whether you are playing a single battle mission or a long-lasting grand campaign, the thing you need to do first is always to check the overall map and the situation before picking your troops on the battle group screen.

Look at the map and try to roughly determine what your objectives are. Pick your troops accordingly. You can especially pick your support units flexibly according to your needs.

For instance, If it is a very dense urban map, instead of picking an anti tank gun (ATG), you may decide to pick a panzerschreck team or a flamethrower team. Or if it is a map where the enemy is going to be crossing lots of open field you may want to choose a couple more medium mortar teams, more ATGs and no AT infantry team at all.

The troops you pick and the general deployment changes of course whether you are attacking, defending, or the map is a meeting engagement.As an example, let's consider a meeting engagement battle:

At a meeting engagement, the first aim is to capture as much as land and victory locations as possible. Your opponent will also be aiming for the same thing, therefore you will likely meet each other somewhere on the middle. Your main goal initially should be to try to hamper his troops' movement so that he covers less ground than you, eventually giving you the upper hand. Look at the map and estimate the paths which he is likely to take. Also, it is generally a good idea at a meeting engagement to give your troops movement orders already during the deployment phase, putting multiple waypoints for them to move to the desired destination as soon as possible. (You can do this by holding shift and ordering consecutive move fast orders.It is also possible to adjust the movement path afterwards, by left-clicking them and dragging the lines as you wish.)

On this map, the red filled circles indicate possible locations for you to zero-in the mortars when the battle starts. Shooting mortars will seriously slow his units down, and will likely kill some of the running men. A more effective alternative is to call in off-map mortar/artillery strike on the possible movement paths. This,if his main movement path is estimated correctly, is devastating and can seriously give you the upper hand.

(click the picture to see it larger)
4. Infantry
4.1. Command Teams
Command teams are vital for your troops. They help boost the overall morale of the whole company as well as boost the efficiency and morale of the adjacent troops. Keeping a command team close to ATGs and AT Infantry especially improves their performance a lot, since these teams usually need to perform well in their first attempts or face being discovered.

Try not to be very careless with your command teams, because when these teams are destroyed, you will see that the company morale bar gets a huge hit. (on the top, you can bring it as well as the timer by pressing F8), Therefore, if you have already lost half of the team members of a command team, retreat them back and try to make the team survive. Even if it is only one person left on the team, the team is usefull.

The German command teams are called Zugführer teams and the allied equivalent are the Platoon or Company Leader teams.


4.2. Infantry Teams
Infantry teams form the backbone of your army. You will need them to capture land and spot enemy AT threats to your armor. Almost every German infantry team has a light MG42, therefore German infantry has a devastating fire-power. The only disadvantage they have is they are usually 1-2 men smaller than the Allied team sizes.

On the other hand, Allied teams have Bren light MGs and are slighly larger than the German teams overall. Although Bren is a very decent light MG, they can not win a firefight against a German infantry team on 1 vs 1. Therefore, Allied infantry needs to overwhelm the German infantry at least by one of these things to win the firefight:
- numerical superiority (i.e. 2 teams against 1)
- tactical superiority (flanking the enemy team, shooting from multiple directions)
- support (mortar, artillery)
- situated in a better position with more cover or elevation (still, may not be enough)


4.3. Machine Gun (MG) Teams

In the vanilla game (currently unmodded version) most of the infantry teams have light MGs. Therefore, necessity of an extra heavy MG team is not very apparent usually and may not be worth taking one space of the support platoon if there are tanks or light support vehicles with MGs available.

However, if there are no vehicles available for support, a heavy MG team could be a very useful asset both in the offense and defense. Heavy MG teams are particularly dangerous since they have more ammo than normal light MGs and can provide more accurate sustained fire due to being situated on tripods.

Defending with MGs:
The greatest weakness of heavy MG teams is that they are not very mobile. They can not switch positions quickly and it takes them a long time to deploy to the new position and start shooting. Therefore, the MG teams should be deployed such that they have a clear view of the attacker's advancing route, yet they are protected at the flanks by friendly infantry. More information on defense with MGs can be found in the "Defense" section.

Advancing openly against sustained MG fire is a suicide mission. Instead, pop-up some smoke rounds with your mortars in front of the MG position to block his view. Then, while shooting at the position with one team and trying to supress it, advance with another team from the flanks. If you can flank the MG team, they are much easier to disperse since they can not react as quickly. However, when trying to flank them be careful of possible enemy ambushes and don't get flanked yourself! Alternatively, if you have tank support nearby, just bust the MG position with HE rounds.

Attacking with MGs:
When attacking, try to position your MG teams such that they have LoS on the possible enemy positions while you are advancing with your assault teams. It is generally a good idea to just shoot with your MGs at the potential enemy positions (even if they have not revealed themselves). Better waste some rounds than lives! And remember, suppression of enemy troops is the key factor when attacking!

As an example, see the attack below: As the heavy MG teams and the infantry teams with light MGs provide suppression fire to the enemy positions, the assault sections move fast and take position. Note the usage of (mortar) smoke for obscuration. (Mortar was not zeroed-in initially, hence the inaccurate locations of smoke rounds.)

(click the picture to see it larger)


4.4. Snipers

Snipers are normally useful on maps where enemy has to pass through a lot of open terrain. Placing your sniper on a higher location, preferentially on a 2-story building can pick advancing units one by one. The game manual says snipers tend to target team leaders more often and hence lowers the morale of the team. I haven't had much chance to test this on Gateway to Caen. However, my personal opinion is that snipers are much less effective than previous CC releases in this game. I personally would pick an MG team instead of a sniper any day.


4.5. Anti Tank Infantry

AT infantry are close range units and are most useful when defending. The Germans have the Panzerschreck as the pinnacle of infantry AT defense at that time. Very long range, up to 150m and can kill almost any tank when it hits. However, not many battlegroups have Panzerschreck teams. Apart from this, there are teams equipped with Panzerfausts, which are useful only in smaller ranges up to 30 meters.

The allied PIAT teams have less range than German Panzerschreck, but if they can hit the tank, it is also quite deadly.

So far, what I have experienced is that any infantry AT unit tends to miss very often. To increase their performance, make sure to have a command team nearby. Also, PIAT seems to be quite a killer in this game. Don't underestimate them!

See "Anti-Tank Tactics" section for more info on how to use AT infantry.

4.6. Flamethrowers

The Allied teams do not have flamethrower infantry in this game. And Germans have them only in some of the battlegroups. However, if used right, flamethrower infantry can be very deadly. They excel especially while defending the map, in ambush mode.

On maps with forests or very dense urban settings with lots of broken LoS they do best what they are designed for: BBQ! After you have ambushed the enemy team, if there are more enemy troops nearby try to retreat your flamer team. Otherwise they will soon be destroyed, because they can not defend on their own much.

They are also marginally useful against armor. However, as stated above their best use is on broken terrain against infantry.
5. Support: Tanks, Vehicles, Guns, Mortars
5.1. Tanks

Germans:

-The PzKpfw IV (i.e. Pz. 4) tanks form the backbone of your armored forces. However, they are not particularly great against heavier Churchill tanks since they lack the armor thickness. Nevertheless, they have a slightly better gun than the standard 75mm gun of the Allies. Note that they can't penetrate Churchill Crocodile armor properly!

-Panther and Tiger tanks: They are capable of destroying the Crocodile as well as any other Allied tanks. However, Panther seems to fare better against Crocodile than the Tiger, since its gun has higher penetration capabilities.

-StuG: StuG are good assets when you are defending mainly. They have thicker frontal amor which leads to a slightly higher survival rate on 1 to 1 duels (if it comes to that) than Pz. 4. However, if they get immobilized they will have a very hard time defending on their own, since they lack turrets.

-Grille: Great against infantry with the high-calibre gun. It can also immobilize tanks with close landing shells. However, has very weak armor and shouldn't directly engage with enemy tanks.

Allied:

-Sherman: The Sherman is numerous in the armored BGs. It has a slightly worse gun than Pz. 4.

-Firefly: These are Shermans fitted witth the biritish 76 mm (17pdr) gun. They are great for destroying tanks! However, they still have the weak armor of a Sherman.

- Churchill Mark III (with 6pdr guns): These are very deadly against German tanks since they possess the 6 pdr guns with some special armor piercing Sabot ammo. They can destroy any German tank. The sabot rounds are limited though and they are slightly less accurate than normal AP rounds.

- Churchill (other variants with 75mm gun): These tanks fare good against threats other than Panthers and Tigers. They have decent armor but a mediocre gun as Sherman's.

-Churchill V: Good against infantry with its huge howitzer! Can also immobilize tanks by close indirect fire.

-Churchill Crocodile: This is the king of the field until Panthers and Tigers show up. They are almost immune to frontal attacks made by Pz. 4 and Pak40 type of guns. They have a huge flamer reach in addition to their 75mm gun. However, they have the slowest movement speed among all tanks and can be destroyed easily by Panthers. Tigers have a harder time, but still they can KO Crocodiles.

-Stuart: Has a little 37mm gun and weak armor. But very useful for recon tasks. I personally love it in dense urban maps, since it moves faster, it is easier to engage and disengage enemy tanks quickly at such maps. If used properly can even destroy Panthers from close ranges with side or back shots. (An example is shown in the "Tank Tactics" section.

-M10 (and thr 17pdr variant): M10 is a decent tank destroyer with 3inch gun. Its British version with the 17pdr gun is even deadlier. They have a slow rotating turret though and do not have proper armor. They are best used for ambushes or hit and run tactics.

5.2. Armored Vehicles, Halftracks, Trucks

I won't be going into much detail with the vehicles here at the moment. However, they can be useful depending on the situation. If you lack any tank support and have only vehicles available in your support, they can act as nice mobile support units (especially the ones with howitzers). Some vehicles who have lower calibre AT guns can also fare decently against enemy tanks. However, don't forget that their armor is literally like paper so you need to use these AT vehicles in dense terrain (e.g. small hedgerow patches) or dense urban surroundings, utilizing hit and run tactics. One shot from a tank and they are as good as dead!

Particularly the German Halftracks are quite decent vehicles. In particular, Flame Halftrack is a great asset in dense environments. The Mortar Halftrack is also great, because it has much more rounds than a normal mortar team.

The allied vehicles in the game are somehow inferior in terms of specialization. The Bren, Loyd and Uni carriers can tow guns (6 pdr) whereas Bren can also provide light MG fire support. Bear in mind that the Bren carrier, the Loyd carrier and the Uni carrier can all carry up to 5 men. The 50. cal. Halftrack is also decent, since it can carry up to 10 men and also provide HMG fire support, as well as towing guns. Humber armored car seems to move faster than the others, but cannot carry troops nor tow guns.


5.3. Anti-Tank Guns

ATGs are the guns such as the British 6-pounder and 17-pounder, or the German Pak 40 or the 8.8 cm Flak. These guns also have limited HE ammo, so they can also inflict heavy damage on infantry if the necessity occurs. However, it is generally a good idea to keep them concealed until they get a chance to shoot at what they are designed for, namely: the enemy armor. The British 6-pounder and 17-pounder have limited special Sabot type ammo in this game. This makes them very deadly, allowing them to KO any German tank in the game (Tiger, Panther included). More information on ATG deployment and tactics can be found in the "Anti-Tank Tactics" section.

5.4. Mortar Teams
Mortars are very useful for suppressing the enemy infantry, as well as denying them movement and retreat. The only drawback is they need some time to zero-in to the target. As discussed in the "Movement and Orders" section, always number your mortars and use them with keyboard commands for faster action.

When to pick mortar teams as support units and when to pick other teams instead depends on the map and the goal. It is generally a good idea to have 2 medium mortar teams on maps with large open spaces, fields, etc. If it is a map with a more urban setting, with closely packed buildings, some other teams can be substitued instead of mortars depending on the goal on the map.

There are a couple of ways to use mortars efficiently:

- You can mortar the potential approaching paths of the enemy
- You can use it to support your infantry win a firefight
- When you are charging at an enemy position and don't have any other High Explosive (HE) round shooting support nearby (no tanks, no ATGs, etc.), you can mortar the position to suppress and stun the enemy while your troops charge. Be careful to cancel the mortar attack when your troops have already reached the enemy!
- Preventing the enemy infantry to retreat: If your teams are winning the firefight and you suspect enemy will likely retreat his troops to the hedgerow behind, start zeroing-in behind the enemy team. This way he won't be able to move fast his team (he will lose a lot of them if he tries), and your team will catch up and slaughter them while they are out in the open crawling.
- Suppress the ATGs which are shooting at your tanks: If you ever see one of your tanks has somewhat entered into a duel with an enemy ATG, shoot whatever you have at this ATG, and retreat your tank back as soon as possible. (See the "Armor Tactics" section for more info.) The most straightforward thing to do is mortar the ATG. Don't hesitate to use your off-map supports in such a situation as well. A timely support can save your tank's life!
- Laying smoke screen: Whether when attacking or retreating, smoke can save lives. You can use your mortar teams to lay smoke. (Time for zeroing-in also applies to smoke rounds. Only problem is smoke rounds are rare and takes a while to shoot accurately. If there is time, shoot normal rounds first and zero-in your mortar. Then shoot smoke rounds to the zeroed-in location.)
(See "Attack" and "Defense" sections for more info on smoke screen usage in the corresponding context.)

" Mortars are inherently inaccurate. Area suppression is NOT destruction. Rounds are
limited. Use them well. Don’t waste mortars on bunkers or buildings.
" [1]
6. Attack
If you have to attack to win, one thing is very, VERY IMPORTANT! And that is TRY TO HAVE
THE INITIATIVE AS SOON AS POSSIBLE AND KEEP THE ATTACK GOING!! Such an attack needs a well balanced BG, a cunning battle plan, a sound deploy and the right orders from a good commander. Only then the flow of the battle will be in your hands! *It should be noted that gaining and maintaining the initiative doesn't always mean firing the first shot. Often the best offense is a smart defense, especially when fighting operations and grand campaigns when different fronts require diferent posturing,depending on your objectives [2].

A lot of people will choose to defend a map, but there are some advantages in attacking
too. The attacking side can focus on 1 area, while the defender needs to secure the whole
defence line. Therefore, in the attack area, the defender has usually less troops than the
attacker and it requires his best skills to hold on with his overwhelmed units. Nevertheless
knowing the map and the LOS by the defender can make for the attacker a die hard task [2].

We can summarize the points to initiate a succesful attack as follows:

1. Overwhelming Force: Use an overwhelming force whenever possible. Don't use solitary
teams, always use more teams at the same time. Work with infantry, vehicles, guns or
AT_infantry and indirect fire (like mortars) together. You will need enough teams to keep the
attack (and the important initiative) going.

2. Concentrate your fire: When assaulting positions you want to be able to concentrate your fire. Have 2 or more teams minimum, which is 1 to move and 1 to fire. Concentrating fire is
the key to win the firefight. If their heads are down, you can advance. Without direction,
soldiers tend to fire at random targets. This leads to ineffective, dispersed fires. Unit leaders
need to concentrate overwhelming fires on a single target-point fire. When that target is
destroyed, all fires can be shifted to the next target. Sequentially destroying multiple targets
with mass fires is far more effective than distributing ineffective fires across the battle field. Area fire is sometimes needed, particularly when suppressing suspected enemy positions. Assigning specific targets to specific weapons is sometimes necessary. Always realize, however, that dispersal of fires weakens your effort [1].

3. Support & suppression leads to succes. Suppress your enemies teams and they will be
much easier to kill off whilst taking only minimal casualties yourself. You get a feel for good
supporting positions and also a feel for bad ones. Place teams where they are well
protected from MG's and tanks and create zones of fire where you can concentrate the fire of perhaps 3 or 4 of your own teams. The result can be devastating [1]. Soften up
your target with tank, MG, and mortar fire before you assault, entering from 2 variant
directions while your enemy is suppressed and shell-shocked. Your odds of succes go way up
when employing these tactics. Make sure you call off your friendly fire as your squads are
entering the target in order to avoid killing your own. That way the opponents bounding
over-watch positions are suppressed and you wont get mowed down. Beware of enemy
tanks when using a tank for suppressive fire. Suppression prior to your attack is vital.
Charging in on a suppressed squad/squads who's morale is crashing yields far better results
than going hand to hand against a healthy enemy [2].

4. Be bold but carefull:
Long, unsupported assaults across open ground are deadly. A single enemy soldier with an automatic rifle can destroy a squad croosing 100 meters of open ground. Assault for short distances, from broken terrain, against weak or well-suppressed enemy positions, under the protection of suppressive fire and obscuration.

Assault only across short distances. Select the closest covered assault position available. Choose a covered and concealed approach to this position. A long covered route is always better than a short open route. A covered approach keeps you protected and concealed. Long assaults exhaust your men, leaving them vulnerable when you enter the enemy's position. Long assaults expose you to increasing enemy observation and fire. The enemy has time to react with reinforcements and supporting arms. The accuracy of his fire is increased. Casualties increase yet evacuation is difficult. Failed assaults have to withdraw under fire. Long assaults by fire and movement require more suppressive fire and are critically vulnerable when suppression stops early.

Assault only against small, lightly armed, demoralized, or well-supressed positions. Avoid mutually supporting positions [1].

5. Make a counterattack:
Whenever possible, try to perform a counterattack! Divide your battlegroup so that there are some mobile units (tanks, elite infantry, commanders) available to punch the weakest side which is an inevitable thing in combat. Try to break through and move forward when the opportunity shows itself.

6. Use bounding over-watch:
-When you expect contact.
-When you don't know where the enemy are.
-When you are not in a hurry.

The elements of the unit each alternate between moving and over-watching the movements
of the other elements. Only one element moves at a time. Each move is a short bound from
one covered position to another. The other elements provide over-watch—observation
and immediate fire support, if needed. The entire unit moves in a continuous series of short
bounds.

The figure below from the Marine Workbook [1] shows two examples on how to carry out a bounding overwatch move. As the team (1) moves, teams (2) and (3) stay where they are and have LoS on the possible enemy positions. Then the teams (1) and (3) wait as the team (2) gets into position. Finally, the team (3) moves forward while the other teams provide overwatch. As you can see, by such a routine, two teams have at all times LoS on potential enemy positions while the other team moves in. Therefore, if enemy is discovered they can lay suppressive fire instantly to cover the moving team.

On the other hand, if all teams had moved forward simultaniously, they would not be able to retaliate quickly enough to suppress an ambushing enemy. And left out in the open, they would incur heavy losses.


8. Use diversion:
This may not be applicable all the time, but initiating feint attacks can generally help the attacker to take the defender's attention from the real point of attack. Make a first attack with a few infantry teams (and maybe a tank to make it more real) in an area you only want to defend. After initial contact, withdraw your units a bit or just defend the spot, but keep the enemy busy over there. Meanwhile you have prepared your real attack in another sector. And you can start it after you have noticed some enemy troops are ordered to the other (first attack) sector.

9. Use smoke:
Using smoke screen is a must if you cannot avoid covering long open distances. It makes it harder for the enemy to have direct LoS on your troops, increasing your chance of successful redeployments. When charging a building, laying out smoke in front of the enemy is also a good idea. Smoke is vital for succesful assaults! Do not neglect it!
7. Defense
The best way to fight defence in CC is to identify the most important areas of the map and concentrate your forces accordingly. If you are playing an operation or a campaign, defending the crucial VLs which lets the enemy move to the next map, or to the map behind your BG (thus cutting your supply route) should be additional factors to take into account when you set up your defences.

When you have identified the potential objectives of your opponent, focus on defending those. Keep your forces under a tight rein, don't send little task forces enerywhere. And always have a powerful reserve with which to:
a) reinforce a flagging defensive position
b) kick the enemy out of an important real estate
c) launch a battle-ending counter attack

As we have also discussed in "Make a Battle Plan!" section, you will need to predict your opponent's possible approaches once you have an idea about his objectives. This means, predicting things such as the hedges/buildings where his infantry will move forward, the road from which his tanks will come etc. If you can predict these successfully and position your troops (especially MGs, AT infantry and ATGs) accordingly, you will give your opponent a much harder time when he is advancing.

The key points to consider when defending according to the CC Marine Workbook [1] can be summarized as follows:


A strong defence is tied directly to the terrain!

1. Try to envision the enemy's attack. Select the line (hedges, buildings, ditches...) where you will
stop his attack. Tentatively emplace your key units so their primary sector fires interlock on this
ground.
2. Envision an alternate scheme of attack, or a secondary thrust.
3. Now modify your tentative positions to cover both possible attacks.
a. Give key weapons primary and supplementary positions to cover the two approaches.
Select a covered route between positions.
b. Emplace rifle squads to observe and protect the flanks of your key weapons. Insure squad sectors contribute to the fire plan.
c. Some units will not support both approaches but will continuously cover a single sector.
4. Be elastic. The enemy will do something unexpected. You will need multiple
positions, a reserve, and a withdrawal plan.

Multiple positions: Every position has a primary sector of fire. Some have a secondary sector of fire. Alternate positions cover the primary sector from a different location. Supplementary positions cover a seperate sector. Use alternate and supplementary positions to decieve the enemy about your strength, to react to enemy moves, and to disperse the enemy's ability to effectively respond to your defence.

(click on the pictures to see the larger versions)

Defence in Depth: Some supplementary positions should cover friendly positions. How will
you engage the enemy that overruns your former left flank position?

The Reserve: A reserve force is kept back to respond to unsuspected enemy actions or take advantage of opportuneties. Squads and platoons are not large enough to designate a
reserve. All commanders should keep in mind what unit they will pull out of contact to
execute a potential reserve mission.

The withdrawal plan: All your units must be able to withdraw. This is an important skill,
essential to minimize your casualties. The goal is to delay the enemy, withdraw rapidly and
secretly, and suffer no casualties. When you are first establishing your defence, do not select
exposed positions for your units. Find positions that have at least one covered route of
withdrawal. If the enemy does not realize that a position has been withdrwan, he wastes
time and energy assaulting empty positions.


Machine Gun (MG) Defense in Urban Terrain

"Machine Guns are the backbone of the infantry defence!" [1]

Defensive positions:
Positions with deep and narrow sectors of fire - keyhole positions - are best for
machineguns. Double keyholes, primary and secondary sectors separated by frontal
protection, are far better than one wide open sector. Machinegun positions should have
defilade protection on both sides. This protects the gun from the concentrated return fire of
multiple enemy units. Narrow sectors limit the enemies that may see you to return fire.
When enemy units cannot over-watch eachother and concentrate their fire against you,
their mutual support is defeated. The strongest positions are entrenchments or strutures
that protect you from intens direct and indirect fire. The enemy will target your MG's. Observers and defensive positions on your flanks need positions with wider visibility, but MG's need the concealment and protection of narrow keyhole sectors.


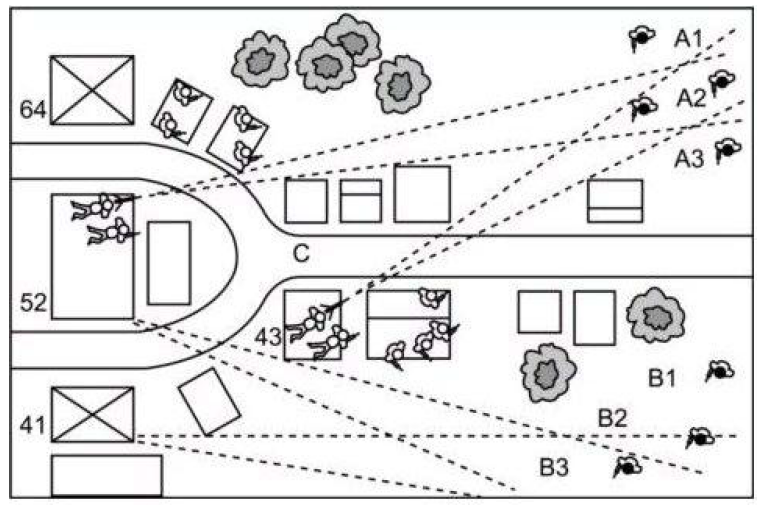
As an example, let's take a look at the illustration below from the Marine Workbook [1]. You can see that the MG team in building 52 covers the possible enemy approaches, while the teams in northern and southern buildings act as scouts and cover its flanks. The overwatching units of the enemy cannot target the building 52, due to the narrow field of fire through the buildings. If things go not so well for the support teams on the flanks, they can fall back to the buildings behind under supporting MG fire.


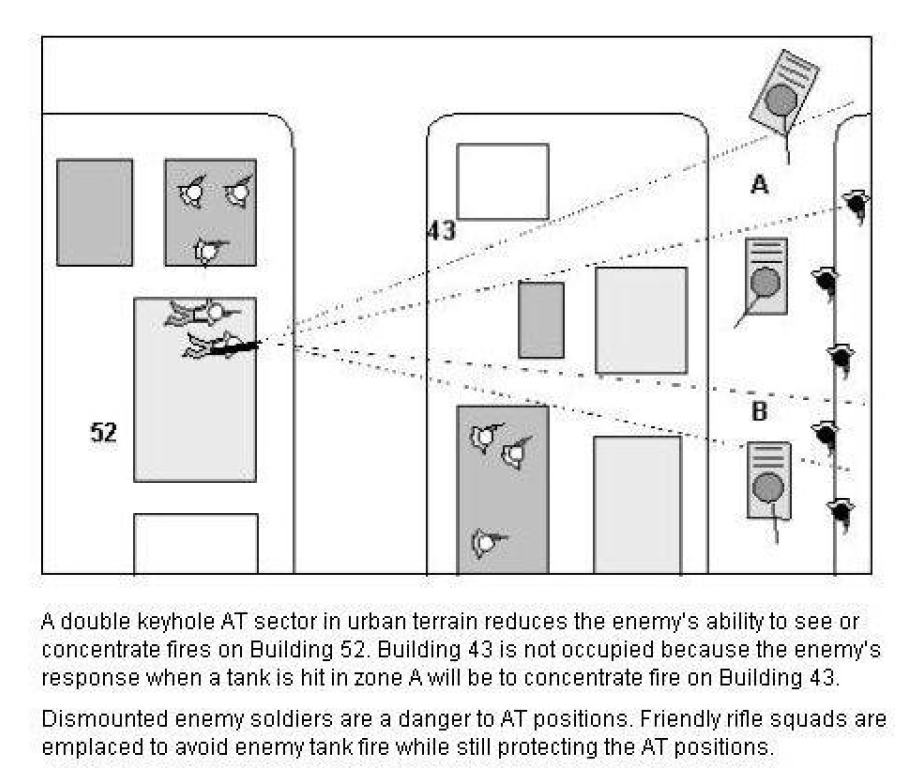
It was mentioned that narrow fields of inter-locking fire was crucial in defense. The figure below illustrates this concept. The MG teams in buildings 52 and 43 have interlocking fire on the enemy approach zone A, while the rifle teams cover their flanks. Again, due to the narrow field of fire, the MGs are less likely to be targeted by the enemy support teams. If the enemy also approaches from zone B, the MG team in 52 can switch position accordingly to cover that approach.


Some minor tips:

-Ambushing in hedgerows: say you have 2 hedges running vertically North to South with say 30 meters in between. Have one team on the left hedge and your main force on the right hedge. Once the left hedge comes under infantry fire run fast back to the right hedge with your main group. Normally (but not in all cases) your opponent will run after that initial team and take up positions on the left hedge. Now you ambush him with your main force. [2].

-Staying unseen as long as possible in a house: Your unit is in "ambush" at the back wall. Wait until everyone is close together. Then "sneak" to the middle of the house, and wait again in "ambush" until everyone is there. If the unit was spotted, wait for a minute or two, they will disappear again [2].

-Building ambushes: Don't place your infantry in the front of a building, but place them at the back wall. The enemy wont have LOS on them, he probably can't even see them. When the enemy starts to enter the building, put your unit in "defend", and they will fire their smg's. The first man entering the building will be killed soon (maybe all of them), and they won't throw their grenades if your unit is in the back of that building [2].

-Retreating with smoke: Popping up a smoke grenade before retreating a team under-fire can be a useful thing. Whether to drop smoke or not depends on the situation though. If your team is under tank gun fire with HE shells, it is usually a better idea to order them to get out of its LoS with move fast order. In case of MG fire, popping up smoke (if available) and sneaking back is generally a good idea. If you are initiating a massive retreat out in an open field, using mortar smoke rounds to block the chasing enemy's LoS would save lives!
8. Tank Tactics
Using your tanks the right way is crucial for success in Close Combat. In this section, we will cover the relevant tactics when using tanks.


Tank Security

Under normal circumstances, you should never lead with your tanks! Tanks have poor visibility. Your infantry are the eyes of your tanks. Never lead with your tanks! Always keep 2-3 squads at least 30-40 meters ahead of your tanks to flush out enemy squads and AT, more if very
open terrain. Once a threat is detected, then move your tank into position to engage that
enemy threat [2].

The bounding over-watch tactic discussed in the "Attack" section also applies to tanks. The routine can be summarized as follows according to the Close Combat Marine Workbook [1]:

1. Tank stops
2. Tank security squad (or multiple squads) bound forward. Tank over-watches.
3. Tank catches up.
4. Successive bounds are repeated. Tanks do not execute alternating bounds to precede tank security squad!

The exception to this rule occurs when the time is running up and you need to charge for a crucial Victory Location (VL). In that case, you may need to charge with your tank as fast as possible to capture that VL before the battle ends. Another exception is during the initial advancement at a meeting engagement battle. You should move fast and reach the important positions as soon as possible, you don't have the luxury to wait for the infantry to catch up.

Hunting with Tanks
If you go hunting tanks with your tanks, you need to be able to do whatever it takes to increase your chances of KOing the enemy tank, without getting KOd yourself.

There are a couple of standard tactics we will mention here. Trying to take these into account would certainly increase the success rate.

1. Know your tank's and the enemy tank's strengths and weaknesses
We have discussed the general properties of the Allied and the Axis tanks in this game in the "Support" section. You need to know the gun and armor performance of your tank compared to the enemy tank you will be hunting. For example, a Sherman with 75mm gun will have a very hard time trying to KO a Panther with a frontal shot. However, it can succeed with a flank or rear shot. On the other hand, Panther can KO the Sherman at any distance from any facing. Knowing this, necessitates the attacker with Shermans to avoid direct shoot-outs against a Panther and urges him to follow a flanking strategy. Similarly, a Crocodile is almost undefeatable from the front by any tanks except the Panther and Tiger. A player knowing this would advance his Crocodile more confidently against Pz. IVs.

2. Gang up on the enemy tank
Try to single out the enemy tank and attack it with as many tanks as you can, if possible, from different directions. Letting your Crocodile engaging on a head-to-head shoot out with a Tiger, while engaging it from the flank with your Sherman, increases your chance to send that big kitty to kitten heaven tremendously.

3. Wolf pack tactic
Advancing your tanks together in close viscinity helps them to get rid of any unexpected tank threat more easily since they can retaliate all at once. This is a good tactic if you know that your opponent's tanks are not superior than yours, e.g. you have Shermans, whereas your opponent has Pz. IVs.

If using this tactic, BE VERY CAREFUL AGAINST AIRSTRIKES! In this game, air support (especially if it is the Allied Typhoon, with rockets) can get rid of multiple adjacent tanks. The image below illustrates an instance of me pushing forward with my three Panthers, destroying every possible threat with ease until an airstrike destroys all three of them! (which by the way, I think is unrealistic) Therefore, use this tactic at your own risk in the face of a potential air strike!

(click the image to see it larger)


4. Hit and run tactic using hedges and buildings
Perhaps the most useful strategy is to make use of the hedges and building corners when shooting at an enemy tank. If your tank is behind a hedge (i.e. bocage), advance forward until you have LoS on the enemy tank. Shoot, and retreat back by placing a sneak/move/move fast order behind your tank. The more straight this move order is with respect to your tank's orientation, the smoother it will fall back, without doing any funny spin-arounds.

Similarly, if you are next to a building with your tank as can be seen in the image below, try to move slightly in front of it. Shoot at the enemy tank as soon as you have LoS on it, then retreat back without risking another shot. After having retreated, wait for your tank to reload and repeat the procedure. This tactic works best if the enemy tank is already occupied and its turret is facing another direction. We can keep him occupied by exposing one of our infantry teams to get its attention (in other words, sacrificing them). In addition to distracting him, this also results in the enemy tank to switch to HE ammo instead of AP (armor-piercing). Therefore if he shoots at our tank while he has engaged our infantry, he will be shooting with the already reloaded HE ammo at our tank (or spend time reloading an AP). Which means we can shoot another AP at him or have more time retreating.


Don't underestimate the power and speed of a Stuart. Stuarts are great in urban maps since they have a rapid shooting cannon and can move and fall back faster than the more bulky tanks, making them ideal for hit and run tactics. If you pay attention and make use of the environment you can even KO a Panther with it with some luck! Even if you don't damage it, you will certainly annoy your opponent greatly. The image below shows an example of this, where I was able to annoy the Panther for a rough 5 minutes of constant hit and run with my Stuart and eventually KOd him with a rear-shot while he was retreating.


5. Keep a command team or command tank nearby
As with all other units, tanks also benefit from having a command team nearby. If available, choosing command tank and keeping other tanks under its circle of command is a good idea as well.

6. Observe and redirect every move of your tank if necessary!
Sadly, the CC vehicle path-finding is still not very good and can be very frustrating sometimes. Therefore, what ever you are doing with your tank, micromanage it properly. If you order him to move to engage an enemy tank, and it starts doing funny spin-arounds etc. order it to defend immediately and guide its movement again. Additionally, the tanks in GtC do not rotate their body automatically to face the enemy tank from the front. Therefore, after your tank has shot, order him to move a little in the direction of the enemy so that it faces the enemy properly. Ordering it to defend towards that direction does not fix its orientation when facing the enemy tank.

7. Control target priority
You need to watch your tank very closely so it does not fire at the enemy infantry instead of the enemy tank. You can do this by either setting it to ambush or moving it with sneak command. Then you can direct its fire to the enemy tank manually. This is ok, if you have it under your direct supervision. At other times, it is best to leave them on defend.

8. Retreat immediately if facing AT infantry or ATGs
If you are caught unaware by an enemy AT team or gun, retreat your tank as soon as possible. Get out of their LoS very quickly! Move forward with your infantry to detect the threat and then you can get rid of them properly. Watch out for the smoke and gun blast of the enemy ATGs to try to detect their whereabouts. You can then mortar them to their death or call in off-map support.
9. Anti-Tank Tactics
8.1. Defending with Anti Tank Guns

ATGs can be used very effectively when defending against armor. Once discovered, they are easy to destroy with indirect fire, however if hidden in the bushes, it can take some time until they are discovered.

Before placing them, try to anticipate the enemy's plan and look for possible paths his tanks are likely to pass from. With this in mind, place your ATGs such that they have a long clear view on these spots where the enemy armor is more likely to expose its flank. Tanks have much thinner armor on the sides, so try to flank-shot them whenever possible!

Ideally, the ATGs should be covering a limited area, and should be defended either by obstacles or by troops from the flanks to reduce the chances of receiving fire from multiple directions. (But it can be sometimes also good to cover multiple directions with one gun, depends on your approach.)

As an example, the picture below shows a possibly good ATG deployment: The allied tanks are likely to cross the road at the indicated red circle. Therefore, it is a good idea to place an ATG facing the flank of this spot.
Here, a German PAK 40 has been placed on the edge of the map. Generally a good tip: If you can not find a bush to hide your ATG, place them on the edges of the map. When directed by enemy mortar fire, many of the mortar rounds will fall off-map, hence doing less damage then they normally would! (Placing another ATG further south with a Line of Sight (LoS) indicated with the green arrow below, would further double-see the spot and wherever the enemy tank faced, would result him in getting flank-shotted.)

Also note that, there is a command team nearby to enhance the ATG's performance, and the gun faces few directions reducing the chances of it getting flanked. (If the enemy pushes with a combined force on the NE hedges as well as on the crossroads, it may get flanked though)

I would set the gun to DEFEND mode on this occasion, since it has a very narrow LoS on the road and needs to shoot the instant it sees the enemy tank without me losing time to order it.

(click the picture to see it larger)


Another approach could be to place the gun at the bush a bit closer as seen below: Here, the gun sees both the crossroads and can also act against an enemy attack coming from NE. It is best to set the gun to AMBUSH here, because we don't want it to attack prematurely to any enemy vehicle. There is a higher chance of the gun getting flanked and eventually being destroyed here though. As always, command team is deployed close to the ATG.

(click the picture to see it larger)


8.2. Defending with AT Infantry

Infantry can only fight tanks in close terrain. Use broken terrain, vegetation and urban
areas to deny enemy tanks their key advantages of mobility and standoff range. Positions
with deep and narrow sectors of fire - "keyhole" - positions are best for AT missiles. Your AT
positions should have protection on both sides, with a narrow sector of fire limited to one
tank. This protects you from return fire of multiple enemies. If only one tank is engaged, only
that tank might see you to return fire. When enemy vehicles cannot over-watch each other,
and concentrate their fires against you, their mutual support is defeated [1].

Observers and flank defenders need wide visibility, but AT missiles need the concealment
and protection of narrow keyhole sectors. Fighting against well coordinated enemy armour
and infantry forces is challenging. If you attack the infantry, the tanks counterattack. If you
attack the tanks, the infantry counterattacks. Separate the tanks from the infantry then kill
the tanks first. AT teams are especially vulnerable to enemy infantry. Protect their flanks.
AT teams should withdraw when discovered and attacked by enemy infantry. Establish
supplementary positions to attack tanks in different sectors [1].

10. Conclusion
Here, we summarize the lessons to be internalized to be a good CC commander. These tips are taken from the Close Combat Marine Workbook [1]:

"Long unsupported assaults are deadly. Assault for short distances, against a lightly armed
or well-suppressed position. A single enemy soldier can destroy a squad across 100
meters of open ground."

"A long covered approach is always better than a short open route. Be careful of covered
approaches that cannot be covered by an overwatching unit. "

" Every unit needs obscuration. Smoke save lives. Every assault and every withdrawal
should use smoke. "

"Fire and maneuver is the key tactic. Use the majority of your force to overwhelmingly
suppress the enemy, and a small assault unit to rapidly close on the objective. "

"It's all about suppression. Fire without maneuver is wasteful and indecisive. Effective
suppression is the basis for all infantry tactics. "

"Units without mutual support are doomed. Mutually supported units protect each other
from being fixed or assaulted. "

"Mortars are inherently inaccurate. Area suppression is NOT destruction. Rounds are
limited. Use them well. Don’t waste mortars on bunkers or buildings. "

" Concentrate your fire. Fire control insures decisive action. In contact, men will disburse
their fire. Sequentially destroying targets with point fire is more effective than
distributing ineffective fires. "

"Every unit— squad, platoon, and company—needs antitank capability when facing tanks.
An infantry unit with no organic antitank weapon is either retreating or overrun. Tanks
can only be fought in close terrain. "

"For anti-tank positions, deep and narrow sectors of fire with defilade on both sides are
best.
The best sector of fire allows you to engage only one tank at a time. "

"Defensive positions are temporary. All units need multiple positions and the ability to
withdraw. "

"For machinegun positions, deep and narrow sectors of fire, with defilade on both sides,
are best.
Primary and secondary sectors separated by frontal protection are better. "

" Cover is life. Move from one covered position to another. Good cover is relative to a
single enemy position. Mutually supporting enemy positions can overcome the protection
of your cover. "

"Use bounding overwatch to move. A squad in contact needs immediate suppression from
another unit. The measure of success is the number of units that can immediately bring
suppression to bear upon enemy contact. "


Bibliography
[1] USMC Major B. B. McBreen. 2012. "Close Combat Marine Workbook" Marine Corps Institute
Link: http://www.closecombatseries.net/CCS/modules.php?name=Downloads&op=getit&lid=987


[2] Pzt_Cobalth, Pzt_Crackwise and Pzt_Wruff. 2011. "Field Commander's Tactical Handbook" Panzertruppen Close Combat Gruppe
Link: http://www.closecombatseries.net/CCS/modules.php?name=Downloads&op=getit&lid=4197
27 Comments
IslaDeMuerto 7 Dec, 2023 @ 2:46am 
Strangely. I can't open links from the Steam app. But the links are worked. Just "copy/paste" in a browser.
Ibram Gaunt 29 Apr, 2022 @ 12:15am 
Thanks for your hard work in writing this guide, crack. I played CC2: A Bridge Too Far as a kid on my grandfather's computer many many many years ago and picked this up to see what he saw in the series. I'm enjoying it so far immensely but it's rather daunting at first. Thanks!
Wailslake 18 Jun, 2021 @ 6:31am 
This is wonderful!
Bito808 10 Jan, 2021 @ 4:19pm 
Thank you !
Shark Dog 8 Dec, 2020 @ 9:42pm 
Outstanding
flashbackY 11 May, 2020 @ 12:11pm 
thanks a lot
SSquiDeath 5 Dec, 2019 @ 10:23am 
I am back to playing this game. Wish you has better control of tanks, IE. there was a button for
AT rounds or HE rounds/ or only use main gun on tanks.
Case 29 Jun, 2018 @ 12:37am 
great guide
referacik 21 Mar, 2017 @ 4:14am 
THANK YOU! Amazing job.
Thunder 32X 9 Mar, 2017 @ 10:33pm 
Very nice! thank you for taking the time to write such a useful guide.

PS: There is a TIGER 2 division (King tiger) in the game, and has very thick armor. NO AT or Tank can penetrate is frontal armor! ... I discovered it in the create scenario.