EVERSPACE™ 2

EVERSPACE™ 2

260 ratings
EVERSPACE™ 2 - 100% Achievement Video Guide
By Mesjaf
Get all achievements with this one guide.
All secrets, puzzles and mainframe components.
22
10
4
4
14
7
4
4
3
5
2
2
   
Award
Favorite
Favorited
Unfavorite
Hello and welcome to my guide.

To find anything on this page use search feature by pressing Ctrl+F


How To Use Autonomous Cargo Dispatcher
If you are here it means you're looking for it :)
Autonomous Cargo Dispatcher is a companion perk that you can unlock.
It allows you to send items to base.
While in space pick the item you want to send to base and hold your "sell/buy" button (default F on PC).


Tipping The Scales Side Mission - Cloaked Explosives
Smoke & Mirrors Main Mission Rune Puzzle
The Eye Main Mission - Drone Hacking

No Asteroid Unturned - Complete all locations 100%


Gotta Find 'Em All - Find all devices
Home Turf - Rhodia II (Homebase)
Home Turf - Rhodia Orbit
Home Turf - Mining Remnants - Find The Hidden Stash
Home Turf - Union Bridge
Home Turf - Station Debris - Find Hidden Stash
Home Turf - Ship Wreck - The Undead Ship
Home Turf - Ceto Outer Rim
G&B Mining Fields - Abandoned Facility - Find The Hidden Stash
G&B Mining Fields - Alcyone Station
G&B Mining Fields - Deserted Mining Station - Destroy The Rigged Asteroid
G&B Mining Fields - Outlaw Frontier
G&B Mining Fields - Charybdis Bowl
G&B Mining Fields - Nephtys Plains - Secret
G&B Mining Fields - Grady & Brunt Refinery - Break Open The Hardened Ore Patch
Deep Fields - Asteroid Field
Deep Fields - Derelict Station
Deep Fields - Outlaw Base
Deep Fields - Outlaw Outpost
Deep Fields – Siren’s Sea
Cold Sun Orbit - Ceto Orbit
Hinterlands - Abandoned Military Outpost
Hinterlands - Abandoned Structure - Find The Cloaked Containers
Hinterlands - Asteroid Cluster
Shattered Planetoid - Destroyed Mining Station - Break Open The Hardened Ore Patch
Shattered Planetoid - Ghost Fleet
Shattered Planetoid - Palaemon Wound
Emp Fields - Union Bridge - Ceto Transit Gate
Emp Fields - Cracked Asteroids - Find All Hidden Ore Veins
Emp Fields - Torn Station - Find The Hidden Stash
Emp Fields - Volta Nebula
EMP Fields - Union Outer Rim
Emp Fields - Warship Remains - Find The Hidden Blackbox
Zharkov Boundary - Abandoned Transit Point - Find & Repair The Damaged Buoys
Zharkov Boundary - Zharkov Border Control
Zharkov Boundary - The Gauntlet
Smuggler's Wheel - Cartwright's Wake
Smuggler's Wheel - Abidan II
Smuggler's Wheel - Asteroid Cluster
Smuggler's Wheel - Sato Orbit
The Concession - Prescott Starbase
The Concession - Anandra Bishop Starport
Ceto Supply Route - Ayres Relay Station
Ceto Supply Route - Freelancer Outpost - Find & Repair The Leaks
Ceto Supply Route - Station Wreck - Hidden Stash
Archer's Nave - Abandoned Station
Archer's Nave - Avonrest
Archer's Nave - Cephas Downs
Archer's Nave - Forlorn Vale
Archer's Nave - Yawen Orbit
Zharkov Supply Route - Noah Damaris Starport
Dust Rim - Abandoned Jumpgate
Dust Rim - Ancient Depot
Dust Rim - Ogni Mining Fields
Dust Rim - Outlaw Stronghold
Dust Rim - Peron IV
Dust Rim – Smuggler’s Backdoor
Dust Rim – Union Border Control
The Vortex – Crash Site
The Vortex - Devana Gas Orbit
The Vortex - Gas Field
The Vortex - Navia Orbit
Eye of the Storm - Vesna Mining Colony
Khait Trench - Rhaim Gate
Khait Trench - Okrot Trading Station
Athorian Reef - Athor Orbit
Athorian Reef - Athorian Fault
Athorian Reef - Khosh Orbit
The Naught Side - Ancient Citadel
The Naught Side - Bri Bioplant
The Naught Side - The Ascension
Chabar Sounds - Athor I
Chabar Sounds - Chabar Tower
Chabar Sounds - Immaculate Redemption
Terra Nova - Coalition Cargo Terminal
Terra Nova - Galiano Gate
Terra Nova - León Orbit
Terra Nova - Letho Starport
Terra Nova - Terra Nova Claim
Terra Nova - Ross Orbit
Gilbert Range - Gilbert Naval Base
Gilbert Range - Gilbert Shelf
Gilbert Range - Morana
Gilbert Range - Outer Rim
Alpha Draco Claim - Alpha Draco Claim I
Alpha Draco Claim - Alpha Draco Claim II
Alpha Draco Claim - Alpha Draco Thermal Plant
Alpha Draco Claim - Drake Research Station
Alpha Draco Claim - Mota Rift
Alpha Draco Claim - Quimper Belt
Ice Fields - Boreas
Ice Fields - Kheimon
Ice Fields - Khione Barrier
Ice Fields - Khione Belt
Ice Fields - Khione Gate
Ice Fields - Zethes Research Station
Vapor Cloud - Inner Flare Zone
Vapor Cloud - Outer Flare Zone
Spin Me Right 'Round

Spin Me Right 'Round - Keep the Fusion Hook tethered for 10 seconds during a single activation.


Stasis Smash

Stasis Smash - Use the Magnetic Repulsor to smash an EMP'ed enemy to death.


Press F To Pay Respects

Press F To Pay Respects - Visit a final resting place.


Credits Where Credits Are Due

Credits Where Credits Are Due - Earn at least 5000 credits by selling one stack of commodities.


I Don't Like Bullies

I Don't Like Bullies - Use the Front Shield Generator to block two Sniper Drone shots in a single activation.


High-Risk area with no shield, no armor and no primary weapons (Daredevill Challenges)

That's All You Got? - Complete all challenge collections


Legendary Lunatic Guide

Legendary Lunatic - Complete a Rift at Lunacy 500 or higher


This achievement is hard and will require some farming for specific equipment. Below is my build and video of me taking on Rift 500 with it. I was trying to make a low skill build for anyone to use that's why I decided to go with Drone Ship.

Here's a Stinger build and guide by aByZMal if you prefer lighter ship.


The Ship


It's a mk4 Vindicator aka The Drone Ship. I highly recommend mk4 for this as it has better stats and allow you to equip 2 legendary items at once.

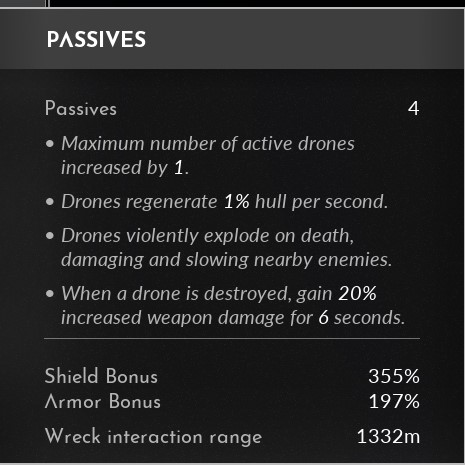
I chose to go with alternate passives giveing me additional drone and dron HP regen.

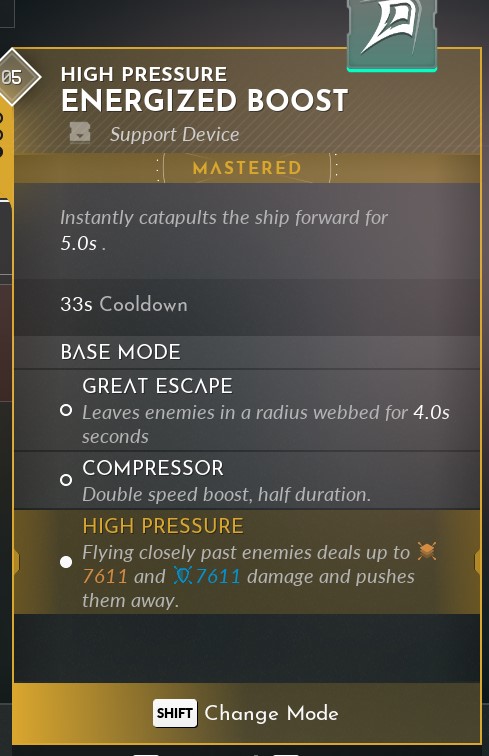
Passives


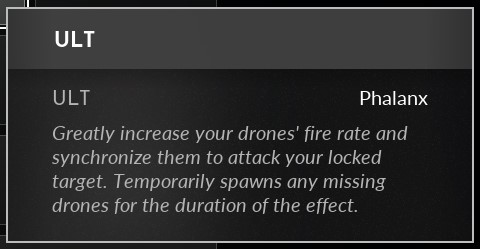
Ult and Attributes


Ult is rather straightforward, once activated drones will receive bonus to fire rate and will focus on your locked target. So lock on enemies close to you and your drones.

Max out firepower, precision and expertise. First two will affect your DPS and Expertise affets drone's damage and health, so it's a must.

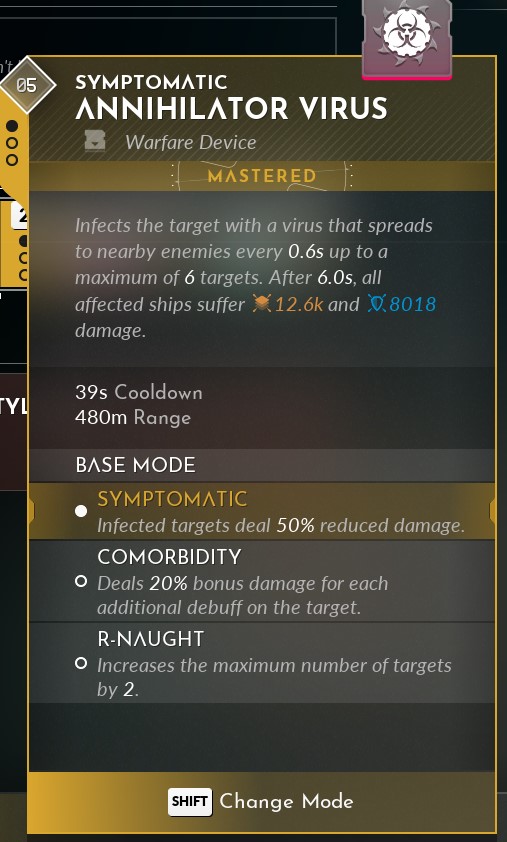
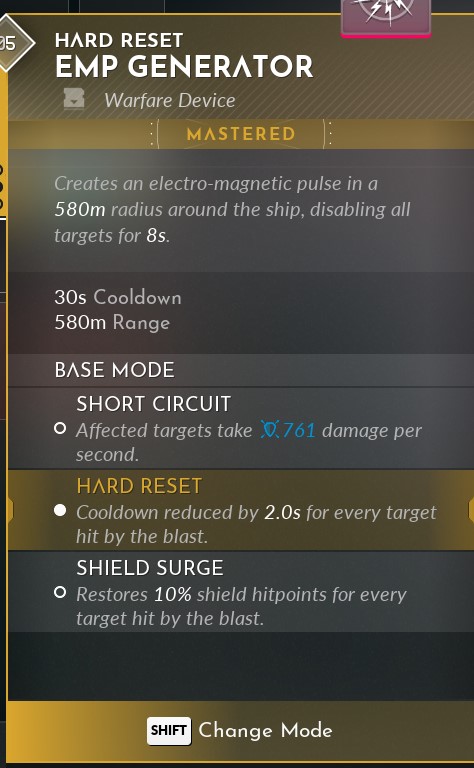
Devices


Equipment

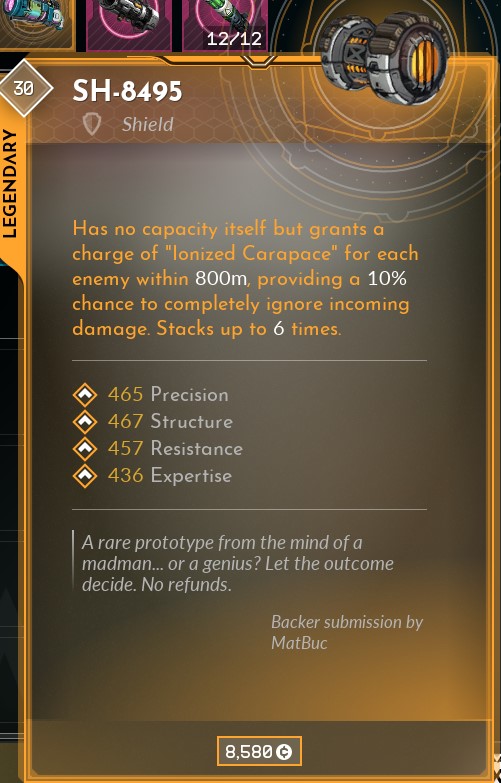
There is one item you'll need to tie this build together and that is SH-9495 shield.


More on that below.

The rest is up to you but try to prioritize equipment with bonuses to Firepower, Precision and Expertise. If an item has 2 out of 3 of those it's fine and I bet you already have a lot of parts with Firepower and Precision ;) In my video I'm useing a Power Core with only one promary stat only becouse it has a really high output to weapons. So in case of this part that would be ouer priority.

Weapons

In my video I use LBLaser witch is ok but onlu becouse I didn't had anything better. I would prefer Crimson Sun over it but I only had level 16 version. Instead of Laser used whatever wepon you like with high rate of fire - Beam Lasers, Disintegrators, Jaggers or Pulse Lasers are great. Higher rate of fire means you will score critical hjits more often and that will trigges few mechanics.

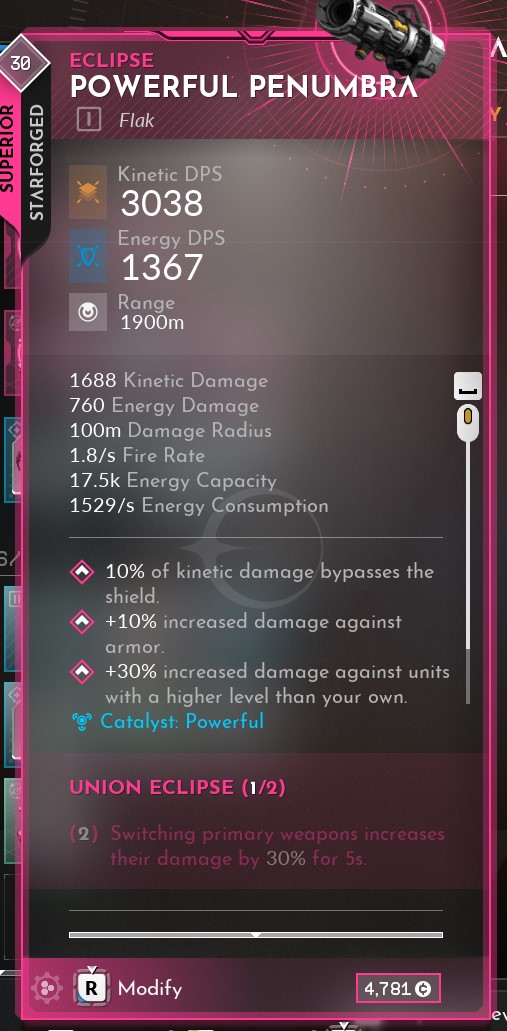
As second weapon I highly recommend a good Penumbra or at least Flak Cannon. Those weapons have high damage and AOE explosion that will clear enemy drones fast and those will turn in wreck you can use to make your own drones. Ihey will also protect you from incoming missiles or mines.

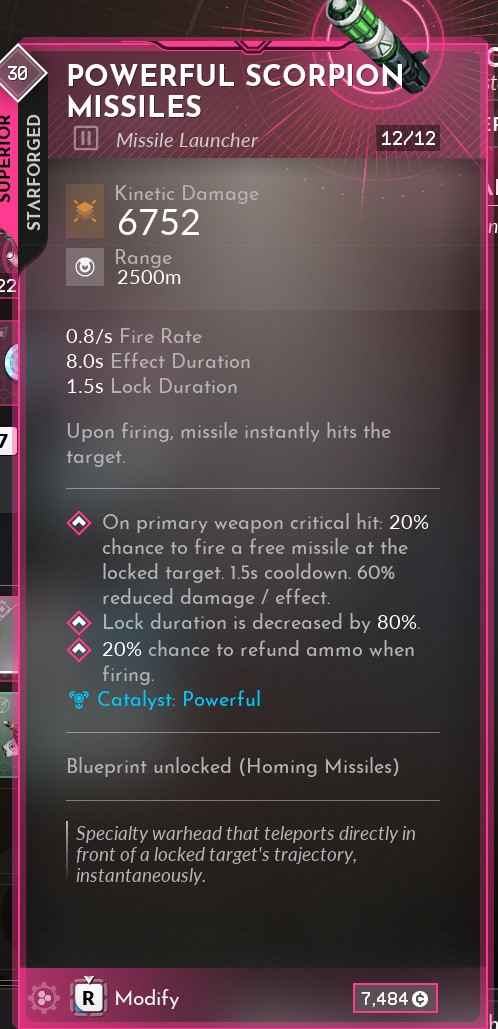
As secondary wepon I have Scorpion Missiles with aweosome ability: on primary wepon crit there is 20% chance to fire a free missile that deals 60% damage. That one reason a high rate of fire weapon that can score a lot of credits is recommended.

All weapons should have Powerful Catalyst installed.


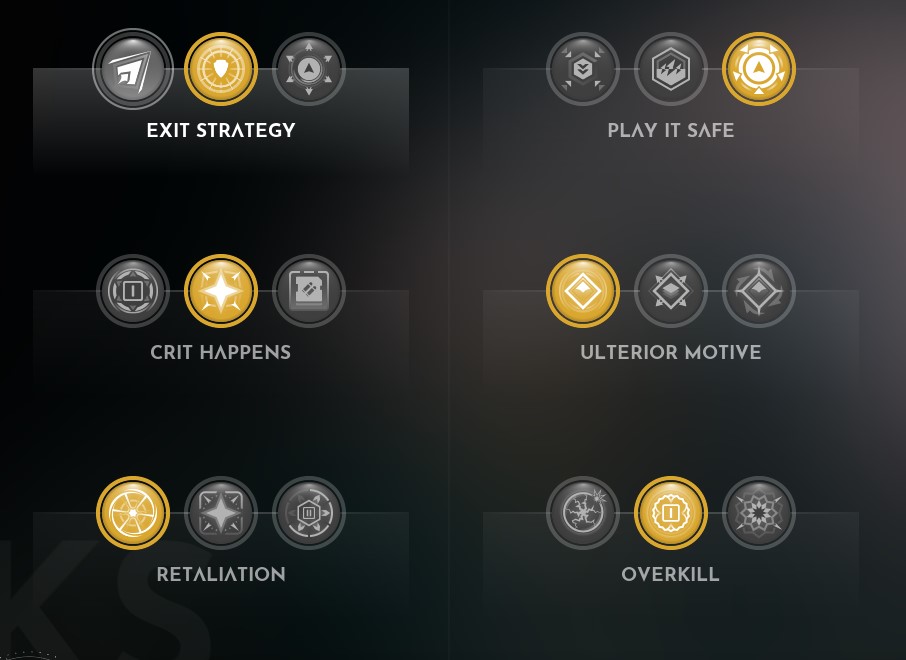
Perks

By the time you finish the game you should have maxed out all companion perks. Especially Energy Orbs and Nanotechnology.

As for personal perks I reccomend those


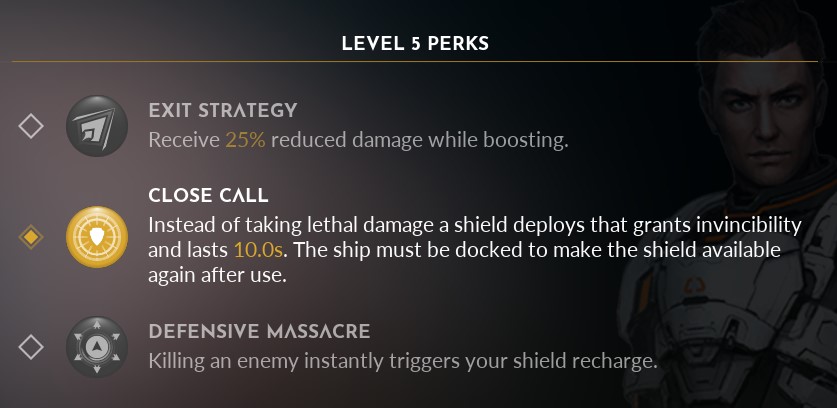
Close Call - Safty net if something goes wrong
Play it Safe - damage negation
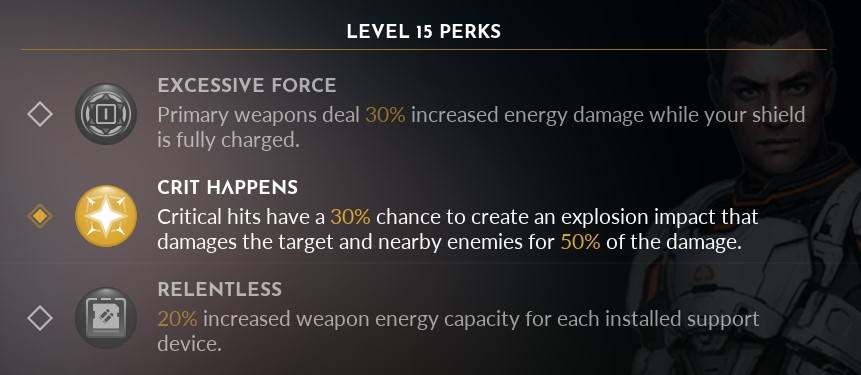
Crit Happens - more AOE damage
Ulterior Motive - doubles ULT generation
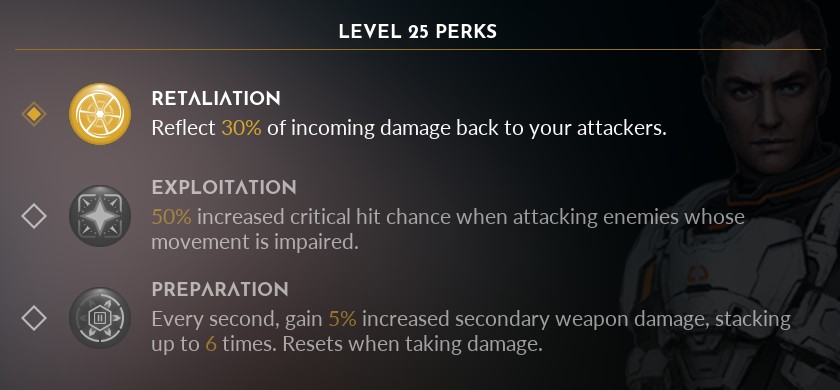
Retaliation - damage reflection
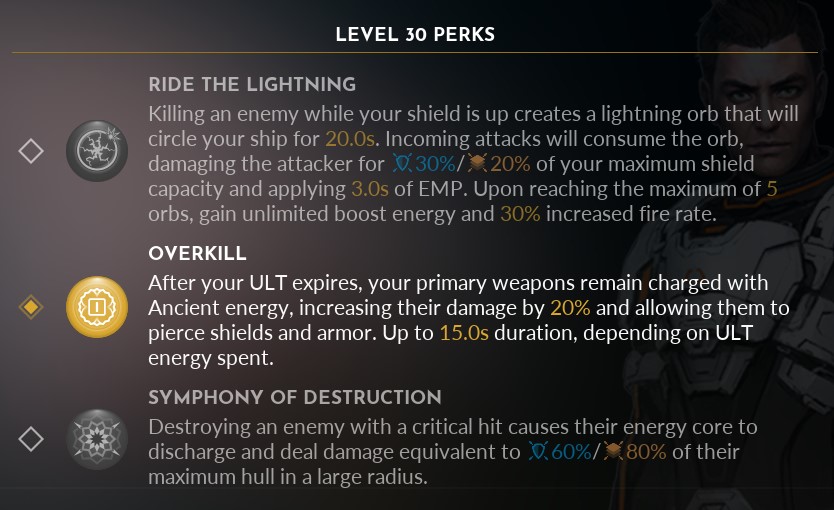
Overkill - good for takeing out enemies with high armor or shield


The Build

No shields, I know :)
While working on this achievement I foud myself often withoiuth shield anyway. One or two shots from sniper drones and they'r gone.


SH-8495 gives you 10% chance to ignore damage per enemy within 800m and stacks 6 times. That's 60% chance, on top of that you ignore damage from Play it Safe perk while you cycle through your offensive devices. Anmd some of that incoming damage will be soaked up by your drones. It worked better than expected but you have to be in the middle of the fight so there are at least 6 enemies in range for this shield to work.
Always cycle through your offensive devices, something I often forgot. Even if you were forced to take EMP Resistance Rift use EMP Generator as it will give you charges from Play it Safe.
When in trouble and enemies are eating you up boost out and repair.
Always keep your drones at max and repair them by picking up enemy wrecks. Those drones do a lot of damage and they will fight on their own until you use ULT to focus fire. And you should do that as often as possible but remember to taget enemies that are close and in range of the drones.
After your ult ends Overkill perk will activate giving you increase damage that ignores armor and shield. Use it to take down heavily armored targets.
Ult generates really quickly in this build so don't save it for later.


As far as modifiers go those are my priorities

Tier 1
Jarred Sensors - Enemy type names are hidden - does nothing
Hidden Health - Enemy hitpoint bars are hidden - does nothing altough you may not know who is armored and who isin't. I know my enemies so it doesen't bother me to much.

Tier 2
Evasive - Enemies have 50% increased movement speed - enemies will be upon you faster if you boos out
No EMP - Enemies are resistant to EMP - EMP Generator will do them no harm but still give you protection
Overheated Systems - A random item is overheated for 10s - I never really noticed it

Tier 3
Corrosive Death - Enemies leave behind corrosion fields when killed - very annoying especialy when your in the middle
Enemy Regen - Enemies slowly repair their hull - try to avoid this

Tier 4 - avoid at all cost
MInes on Death - Enemies drop mines when destroyed
Explosive Death - Enemies deal area damage upon death

Run killer
Strength in Death - Every time an enemy is destroyed, all other enemies gain +5% speed, shields, armor, and hull


Video will be here soon :)

Union - Zharkov Supply Route - Garrikun's Rest
Zharkov - Eye of the Storm - Orlov Asteroid
Zharkov - Dust Rim - Ulynaova Rift
Zharkov - Dust Rim - Navia Polar Orbit
I Got You Fam

I Got You Fam - Protect your wingman from getting immobilized while fending off the Dreadnought.


This can be done during the storyline or after, during Dreadnought events. Just cover NPC aiming at the Dreadnoughts weak point.
It's A Sabotage

It's A Sabotage - Destroy the Dreadnought's first of two interstellar drives.


Story related
Stop! Hammer Time!

Stop! Hammer Time! - Disrupt the Dreadnought auction.


Story related
Inner Space

Inner Space - Get swallowed up by a Leviathan.


Story related
Catch of the Day

Catch Of The Day - Break open your first Leviathan pearl.


Story Related
Didn't Hurt A Bit

Didn't Hurt A Bit - Obtain a Leviathan Pearl while agitation is below 20%.


Internal Combustion

Internal Combustion - Explode one of XR’s panzer bombs inside a Leviathan.


Stop Hitting Yourself

Stop Hitting Yourself - Use one decoy to guide at least 10 missiles into the Dreadnought's launcher system.


A Taste Of Their Own Medicine

A Taste Of Their Own Medicine - Kill a Cloudgrazer with a weapon similar to the creature’s fiery breath.


At the time I'm making this video there are 2 ways of getting this achievement.
Both require legendary equipment. On Steam forum Devs sayid they will think about making this achievement easier to unlock in the future.
First method requires Inferno legendary gun as this is the only gun that will unlock this achievement.
Second method requires Wrath of the Fallen legendary cargo unit that allow you to take control over enemy.
The World is Your Oyster

The World Is Your Oyster - Break 20 Leviathan Pearls.


Simply farm Leviathan pearl 20 times
60 Comments
Mesjaf  [author] 31 Oct, 2024 @ 9:31pm 
Happy to help :)
Kujar3 31 Oct, 2024 @ 4:06pm 
I've been using your videos for locations secrets for a while now, just here to say thank you, this is an insane amout of work.
Mesjaf  [author] 26 Oct, 2024 @ 12:54pm 
No. Finish the Dreadnought storyline. This will unlock the Dreadnought even and you can get it there, ALthough metod of defeating Drednough will be random so it may take few tries.
Exvelsior 26 Oct, 2024 @ 4:49am 
Hi! If I miss the "Stop Hitting Yourself" achievement, do I have to start all over again?
YuuriDM 12 Oct, 2024 @ 7:41am 
👍👍👍
Mesjaf  [author] 29 Sep, 2024 @ 6:58am 
Guide has been updated for Titans DLC
Mesjaf  [author] 28 Sep, 2024 @ 4:15am 
I'm working on it right now actually :) Check out my youtube channel.
DLC came out few days ago.
fasnoon 28 Sep, 2024 @ 2:32am 
Hello Mesjaf
Hope you are doing well. Just wanted to ask when you will be updating this page with the latest information for all the secrets, walk throughs, loot locations etc. as the last update is from 2023 ?
Evexis | 夜炎 11 Oct, 2023 @ 7:41am 
Maybe it will help someone. If you find a weapon with "Powerful" prefix in name, you may install Energy/Kinetic damage catalyst in this weapon WITHOUT breaking "Powerful" prefix and both catalysts will work. That means you probably have a +20% to Energy and Kinetic damage from Powerful catalyst and +25% to damage type of your preference, from energy or kinetic damage catalyst installed.
Generalisator 25 Jun, 2023 @ 8:13am 
OK attacking/killing it drops even more.