X3: Farnham's Legacy

X3: Farnham's Legacy

Not enough ratings
Large-scale logistics
By changtau2005
Moving the universe with Trade Distribution and manual selling
   
Award
Favorite
Favorited
Unfavorite
Preface
This guide is meant to push the 'build' and 'think' aspects of the game to its limits. Our main tool would be the [Trade Distribution] feature new to Farnham's Legacy, unlocked via buying Trade Software Mk 2. If you're an X3 series veteran, this is similar in function, but very different in use, when compared to the popular CLS (Community Logistics Software) pack.

If you like optimization games like Factorio or Satisfactory, this guide is for you. In the spirit of applied engineering, I wrote it as a short list of powerful patterns that solve a wide range of logistical problems in X3.

I shall assume familiarity with the game, e.g. you should know how to deploy and run stations, how to buy software for ships, how to use the command console for your ships. X3 has had a 10-year old history, and there are already plenty of really good guides out there, so I'm not going to reinvent the wheel.

You'd want to make a start by playing the game normally, exploring the universe, finding and relocating your HQ, and making sure your bank account has at least ~100 million. We need TS and TL transports to work with. These methods only come to the fore when we are truly building and producing on a massive scale. Otherwise they're just outright impractical. It's like chartering a jet to get to the local grocery store.

Keep in mind, at time of writing, the game version is 1.1, and you will run into bugs. I have included workarounds where possible, but partake with the understanding that warranty is not included.

I wrote most of this while waiting for things to finish in SETA. * The thumbnail for the guide is the front of a Terran Atmospheric Lifter.

Game version updates:
- v1.2 changed null order behavior. Updated storage rack section where the order is first introduced.
Basics: Homebasing
Any ship that does not require a capital-sized dock can have a homebase. Intuitively, this can be a station or larger craft (e.g. carrier) where this ship is based in. By itself, the home base just makes things more convenient; you could just order the ship to return home or sort them by homebase in the Properties view. However, it is very important to get homebasing right, if we want to use the Station Manager, or certain features of Trade Distribution.

So for example, to use a TS to deliver wares between two or more larger ships, the only way is to use Trade Distribution with the TS homebased on one of them. As of ver 1.1, without the homebase, the command would not work.

Note: A ship homebased to a station will withdraw funds from the station's account, so if you order it to be repaired at a shipyard, if the station doesn't have money, it will not be repaired! Thanks to Akurei for pointing this out.

To set a home base to a ship, bring up its command console and you'll see the options in there. If you need it step-by-step:
1. Bring up Properties (r)
2. Click any of your ship M6 or smaller. Select order, then command console.
Basics: Minimum storage
For any station, we can set the minimum storage for any good. These goods will never be touched by the computer, no matter what we configure it to do. Only we as the player can withdraw from this reserve.

To do this, select the factory or dock, and hit [d] for station parameters. If it's a factory and it's an intermediate good that we want to configure, make sure that good is set to [Tradeable] and you can set the minimum reserve there. Minimums of end products of factories are listed under 'Minimum Storage'.
Basics: Station Manager
This is a new feature introduced to Farnham's Legacy. If you haven't already, you'll want to see its entry in the Survival Guide[www.egosoft.com]. Intuitively, a station with a station manager will make use of ships homebased there, to attend to the needs of the station automatically, e.g. sell goods, restock, repair ships etc.

We won't be using much of this but I need to briefly touch on it so we have context to work with. The station manager has its uses, but I stay away from it because we have limited control over what the station manager does. It's supposed to be helpful, and in certain cases, it is. However, when it misbehaves, it drives me up the wall.

A station manager assigned to a normal station consumes a rolling 10k credits per period of time. I'm not sure how long exactly this period is. The game doesn't tell you this, but the service isn't exactly free. Fine print and all that. Setting a station manager for your HQ consumes rolling 100k credits per period of time.

To set a station manager, open its command console. Under station commands, assign a Station Manager. If this is set, that station is considered to have a station manager, along with all of its running costs.

You'll see that there's another entry called Station Manager Restrictions. This lets us set which of the station's goods are managed by the Station Manager. For example, if we want to keep a factory's missiles for our own use, we can prevent the manager from touching our stocks.

If we already have ships homebased at the station, we can additionally restrict which goods can be carried by which ship. For example, we could restrict our M3's to carry only weapons to set up a high-tech trader, so they don't naively carry 300 energy cells for nothing.

Note that if a ship is homebased at a station with a station manager, we will no longer be able to directly control the ship. To unassign a ship from the station manager, go to the ship's command console and clear its home base.
Basics: Autojump
When you're at the 100 million credit mark, every single one of your ships should be auto-jumping and auto-refueling. If a ship can get somewhere faster using its jumpdrive, with enough e-cells and autojump enabled, it will do so. To make things completely automated, we also want to set up a fuel distribution network. That's one of the applications of this guide.

If a ship has auto-jump configured (needs a jumpdrive, of course), to order it to dock to a station in another sector, all we need to do is order it to dock normally. So command [c] -> 3 -> station, rather than having to click the jump and dock option. When you are jumping 12 TL ships to-and-fro constructing 300-station complexes, it will save you hours in menu time and frustration.

To set up auto-jump, make sure the ship has a jumpdrive, and open the command console. Under 'Advanced Jumpdrive Configuration', set the following:

- Autojump: Yes
- Autojump minimum range: 0 (always jump)
- Emergency jump: Yes
- Emergency jump shield threshold: 50% (or whatever you want)
- Fuel resupply Quantity (jumps): 100 for freighters, 160 for TLs. Adjust as you need.

Every single one of your non-disposable ships that can carry a jumpdrive should have this setting. I make it a habit of setting it when I buy a new ship.

New in Farnham's Legacy: There is a Jumpdrive Installation Kit now, available at Terracorp HQ in Home of Light alpha. Gone are the days of jumping in a carrier with M4s carrying jumpdrives to transfer to new (or captured) ships. Now all we need to do is have a freighter carrying a stack of these kits to jump to the shipyard and transfer them to the new ships via freight transfer. Then simply open the freight menu of the new ship, and activate the installation kit.
Basics: Trade Distribution
On any ship with at least Trade Command Software Mk1, open its command console, then trade. You'll see a list of available trade commands. If some of them are greyed out, it means the ship does not meet all of its requirements. To see the requirements, and a description of what the command does, mouse over the entry and hit (i).

Buy / Sell Wares (for best price): We only use these when we are not yet self-sufficient and we're still tied to the NPC economy.

Fetch/Deliver wares to/from station: This is a highly-specific order: We order the target ship to move a single good, as much as it can carry, between its homebase and one other station which we own. So we need one ship for each kind of good, and we cannot deliver to multiple stations. It's pretty limiting, but if it's exactly what we want, we don't have to use Trade Distribution.

Trade Distribution
Requires Trade Command Software Mk 2. This is the star of this guide, and it's easily the most powerful trade command of them all. The interface should be intuitive, so take your time and poke around. This lets us configure any ship, where to load goods from and where to deliver them, and how much.

Trade Distribution bugs and workarounds [v1.1]
As of version 1.1 of the game, these are plenty of bugs when using Trade Distribution. Despite this, it is still a very powerful tool.

1. [Transporters supposedly fixed in 1.2] Ships equipped with Transporters or Freight Drones will not use them to transfer goods to a target ship. So for example, if we ask a TL to transfer stuff to another TL, or station, it will fail. I know no workaround for this. All we can do as of version 1.1 is make sure the ship we're programming can dock at whatever target we're interested in. We can stay OOS (out of sector) so the docking takes less time and there's no chance for collisions.

2. [Fixed in 1.2] When asking a transport to load goods from a complex, the Trade Distribution interface will not allow us to select goods being used as intermediate resources by that complex.

To work around this, we use the 'replace' feature. You need to have found either your HQ or the Hub, or own at least one Trading Station or Equipment Dock. Select any one of these buildings and open its command console. Under 'Configuration', select Add Wares. Add the intermediate good at we want the freighter to move. Make sure it's set to [Tradeable].

Now start setting up the trade distribution. First, select our HQ or equipment dock etc. Ask the freighter to load the good. Since none of the wares at an equipment dock or HQ are intermediates, this will always work. Now, click on the station's entry and click [Replace]. Change it to the actual station where we want to load the goods from. You'll notice that the entry for the intermediate good stays around, even if the station doesn't produce that good at all. In that case, it does nothing. However, if the station actually produces that good, intermediate or not, the order will work. This is just an interface bug. The logic works. Now, simply add the rest of the goods and complete the distribution settings and hit [Start].

Alternatively, instead of an equipment dock, you can also use a dummy factory that produces that intermediate good as an output.

3. There is no way to simply offload a ship's cargo using Trade Distribution Run without first loading stuff. It might not seem like this is something that makes sense, but if we have a fully-filled freighter and we want to use it as an auto-dispenser, this is exactly what we want to do.

It's easier to explain the workaround using an example. Let's say I want a freighter that we pre-loaded with Typhoon missiles to dispense them to an equipment dock. When setting up the trade distribution run, I need to first ask it to load Typhoons, before the interface would let me [Unload] or [Stock] them, even if the ship already had the good to begin with. So first, we configure the freighter to load up at some Typhoon-producing factory. Now that the game lets us [Unload] or [Stock], we can configure it to stock the equipment dock like we originally intended. Once we're done, before we start the script, just delete the order that asks the freighter to load from the factory, and it'll work just fine.

4. [Fixed in 1.2] There is no way to delete saved distribution routes. So come up with a naming and versioning scheme that makes sense to you.

5. There's an error with how the game references saved distribution routes (the actual data) and the name of the route. It's best explained with an example: Let's say we have two sets of four equipment docks (total of 8). Now, let's say we want to create two supply ships, each supplying four of those docks. Now, we start by creating a distribution route for the first ship from scratch. Let's save that as 'Route A'. Now, the obvious thing to do for the second ship is to just load up Route A and then simply replace the first four docks with the other four. This is when stuff goes wrong.

When we load up 'Route A' for the second ship and edit it, we are at the same time modifying the route the first ship is already running, even if we saved it as 'Route B' afterwards. What's worse, when we load up 'Route B', edit it, and then save it as 'Route C', now we're editing all three routes at the same time! This is a reference error, and I hope it gets fixed soon, because it is a major pain in the butt having to create every single route from scratch.
Basics: Notables
Ships form the backbone of any logistics network. For our purposes, a few of them stand out above the others.

Goner Ozias [TL]
Ships that can dock TS-sized ships work as storage 'racks'. The Ozias is the only TL-class ship that can do this. It can dock a whopping 12 ships. In Albion Prelude, it's a very special ship that we need to go through great pains to get, but here, we could just buy it from the Goner Wharf in Elysium of Light. When fully expanded, its cargo hold holds 52,500 units. With 12 Owls docked, it holds 400k storage.

Terran Atmospheric Lifter [TL]
This is the TL with the largest cargo hold, at 80,000 units. For large-scale station construction, this ship is peerless, but for logistics, it cannot dock anything larger than an M3, so it's far less useful. Must be captured in Terran space.

Goner Aran [M1]
This is the Goner Ozias's big daddy. It's an M1 ship that moves at 5m/s (basically a station that can jump) that holds 120,000 units of cargo and can dock 30 (!) ships including TS / TP / M6, or alternatively one M7 or larger ship. With 30 Owls docked, a single Aran holds a million units of storage. However, if your 'rack' needs to move around other than jumping, the Ozias is probably a better choice.

Terran Kyoto [M2+]
If you want a ship that can dock TS/TPs that can also defend itself (and more), this is it. It can only dock 6 ships, or half of Ozias' rack capacity. When you're a trillionaire, you can afford to use an M2+ battleship as a glorified storage rack.

NMMC Owl [TS]
There are two versions of the Owl heavy transporter. The miner variant available at NMMC Shipyards has 31,250 cargo. The normal Teladi version has a few thousand less. These are TS ships with the largest cargo holds in the game. They hold almost as much as a Split Elephant TL! However, they're also about as slow as you might expect. They work best as storage 'pods' that spend most of their time docked inside a larger ship or station.

Split Ocelot [TP]
At 260.6 m/s, this is the fastest available TS / TP ship. Useful as signal runners in certain situations, as ships like the Ozias cannot dock M5s.

---

Goods

There are two forms of manual selling (see Appendix). When selling at a shipyard, we look for highest price / storage volume. When selling at an equipment dock, we look for highest price / transfer.

The ware that meets both criteria: Teladi Energy Bolt Chaingun (EBCs). 150k / 1 storage. 50 transfer limit, so 7.5m per two clicks. A single Owl stores up to 4.7 billion credits in this form. However, note that if your objective is to directly sell the Owl with the EBCs at a shipyard, if a ship is worth over 2 billion credits, you will not be able to sell it this way.

Missiles have nowhere near the density of EBCs, but the advantage is that you can use them, and you use up lots of them. So one idea is to create two sets of output factories. Make missiles when you need them. When you have enough, switch those factories off and re-route production towards Energy Bolt Chainguns.
[Pattern] Storage Rack
Verified: Game version 1.1

Let's start simple: We simply want to route our factories' outputs into storage ships, and swap in new ships when they're full.

Example: We could keep delivering missiles to TS's, and when they're full, we dock them to our equipment dock as expanded munitions storage, or we could sell surplus at a shipyard for instant credits.

Requirements: We will need one ship (the rack) that can dock the TS ships which we'll use as storage pods. I will work a specific example for Typhoon missiles.

Ships:
- 1x Goner Ozias TL (rack)
- 1x Argon Consus Armored Transporter TS (link)
- 11x NMMC Owl TS (pod)

Storage capacity: 350k units per 11 Owls.

The Consus serves to deliver goods from our factory to the Goner Ozias by docking to it, and the Owl TS's will pull from the Ozias until their bays are full. We then manually swap them out for empty Owls fresh off the shipyard. The Ozias is just a passive ship sitting in a strategic location with no specific orders. For best results, put one jump beacon next to the factory, and another next to the Ozias.

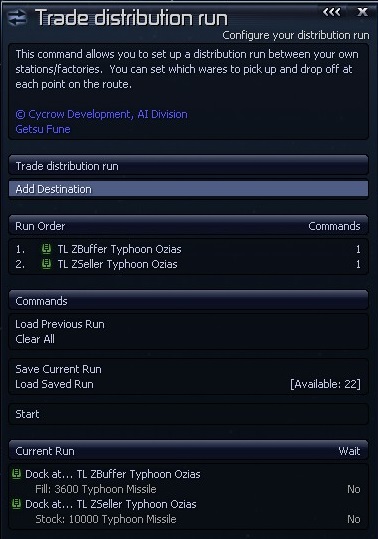
Trade distribution of Consus:
1. Source factory or ship - [Fill] with Typhoons. 2. Ozias - [Stock] with Typhoons. {1}

{1} If we are delivering energy cells, unfortunately unlike CLS, for Trade Distribution, there is no distinction between e-cells as goods to be delivered, and e-cells as jump fuel. To ensure the ship always has e-cells for auto-jump, we need to make modifications:

For the first [Fill] order from the source factory, set wait == true. This will make sure the ship always leaves with a full load. The drawback is that the ship will take up one docking slot until it's full, which may potentially cause deadlock[en.wikipedia.org] under extreme circumstances, e.g. blocking crystal delivery. Then, make sure to only ever stock the destination with the Consus' max capacity minus jump fuel.


---


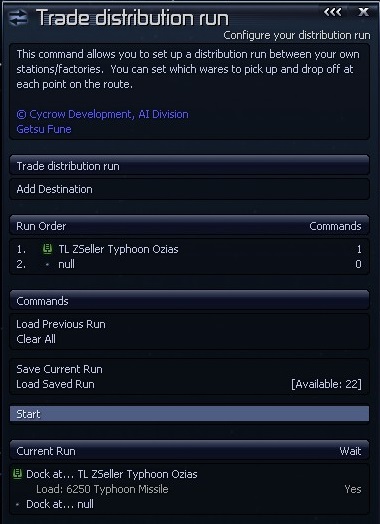
Trade distribution of Owls (no homebase necessary):
1. Ozias: - [Load] {1} with Typhoons up to Owl's maximum. Wait == true 2. null*

* We can get null by setting any location, clicking [Replace], and then hitting [Esc]. This just sets a dummy second location so we can start the script. In versions 1.0 to 1.1, the ship will not know what to do with the null order and it'll just remain stuck and docked to the Ozias, which is what we want.

* [version 1.2+] Instead of getting stuck with a null order, the ship will move onto the next one, which is not what we want. To fix this, make sure the first [Load] order is not filling up the Owl to the max. Leave some room for additional cargo. Then, for our second order, ask the Owl to load + wait with something which we know the Ozias doesn't have, e.g. slaves. If you don't know how to do this, see the workarounds section for how to use the replace trick with a station that does have slaves. For the purposes of this guide, I will stick with v1.1 terminology by just using 'null' if we want a ship to wait permanently, rather than having to encode this order with a specific good such as slaves.

{1} If we use [Fill] here, the ship will wait until it can pull goods from the Ozias once, and then stop, so it wouldn't work.

To do things quickly when the ships are full, we select the Ozias, hit (l) for landed ships, select one pod, hit (c) for commands, and broadcast to all docked ships to dock with the shipyard and sell all 11 of them. Likewise, broadcast to all the new empty 'pods' docked at the shipyard to dock with the Ozias, and then set the Trade Distribution order for each of them (you did save the order, right?)
[Pattern] Synchronized Storage Rack
Verified: Game version 1.1

The previous pattern is great for manual selling. We don't particularly care if some of the 'pods' are less than full. It's easy to set up, and as a side-effect of the randomness of timing, it does stochastic load-balancing, if that's what we're looking for.

What the simple storage rack is not so good for is if we want to use it as expanded storage. We can do better than moving less-than-full 'pods' into munitions storage. Let's up our game. I'll introduce the concept of a 'lock'. In this particular example, our locking good acts as a semaphore[en.wikipedia.org]. Since we only have one lock, you can think of it as a mutex (mutually-exclusive lock).

Again, let's work a specific example.

Goods: Typhoon missiles

Requirements:
- 1x Goner Ozias TL (rack)
- 1x Argon Consus Armored Transporter TL (link)
- 11x NMMC Owl TS (pods)

First, we want to choose a locking good. It doesn't really matter what it is, so long as it doesn't take much space, and we don't use it very often. If you're familiar with Minecraft redstone, this would be the equivalent of crafted sticks or iron nuggets as filler. I'll use ice in this example, but I generally use Nvidium.

We need to first prepare the Ozias by putting exactly 1x ice inside its cargo hold. Again, the Ozias is just a passive ship sitting in a strategic location with no orders.

Trade distribution order for Consus (same as before). Remember the caveats with autojump.
1. Factory station - [Fill] with Typhoons. 2. Ozias - [Stock] with Typhoons.

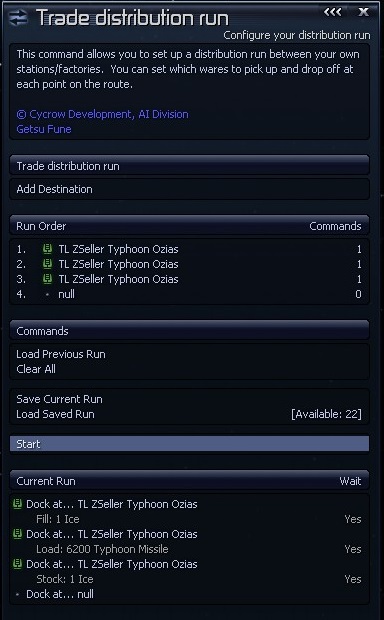
Trade distribution for Owls:
1. Ozias - [Fill] with ice, up to x1. Wait == true 2. Ozias - [Load] {2} with Typhoons, up to maximum {1}. Wait == true. 3. Ozias - [Stock] 1x ice. Wait == true 4. null

{1} I generally don't fill the pod to the very maximum. Leaving room for 100 cargo or so can be very useful if we want to use the pod in other ways down the line, e.g. as a synchronized dispenser. Otherwise we may need to manually eject stuff for cargo space and it's a major pain in the butt. So the Owl holds 6,250 Typhoons, but I only load 6,200.

{2} v1.1: Like in the previous example, [Fill] doesn't work with wait. [Load] will auto-terminate if the freighter becomes full or the desired load limit is reached, whichever comes first.

Did you get what we just did? I'll walk us through.

Every pod starts out by waiting on lock release, i.e. one ice in the Ozias. They'll just keep waiting forever if this never happens. When one ice appears, each pod fights for it, and depending on their timing, only one will get it. This is how we implement the semaphore or thread lock. Now this one pod then gets to do its thing. It loads up Typhoon missiles, and when it's done loading, it'll release the ice (the lock) back into the pool (the TL). Now the same pod has moved to the null state, so it will no longer fight for the ice. And the cycle repeats.

What's the improvement? Only one pod (randomly selected) will ever fill at a time, and we only ever get completely filled pods.

Now, if you do multi-threaded programming, you'd probably say, okay, what about the Consus? That one's not synchronized. Indeed, there's one case where this breaks. When the active Owl has just finished step 2, and it is just about to dump the ice, if the Consus comes in and fills up the TL entirely, the Owl would never be able to release the ice. An unreleased lock is called deadlock. Thus our system would break.

How do we fix that? Maybe take a minute to try and figure out a solution for yourself.


---

The most straightforward solution I can think of is to simply make sure the TL is never filled to the brim. So for the Consus, we tune the amount to stock the TL with such that there's always enough room for the ice to pop back out, taking into account jump fuel and other goods. It's that simple!
[Pattern] Auto-Dispenser Pod
Verified: Game version 1.1

Alright, we've covered storing stuff. Now let's actually use that stuff. For example:

Use cases
- Equipment docks can only hold limited quantities of goods. This is really problematic when we're trying to resupply our M7Ms. Let's make it better. I'll work this example.
- The Terran Kyoto M2+ has 6x M6/TS-sized docks. Filling those with auto-dispenser pods filled with drones makes it the best drone carrier in the game (the Aran is too slow and cannot be bought in bulk).

Before we start, I should make this clear: Compared to storage racks, auto-dispensers were difficult to get right, because of unwritten limitations of the Trade Distribution system. There are also details that we have to know, depending on what exactly we want to do.

The distinction between a dock and a ship becomes important. A trading station or equipment dock has separate storage limits for each good. It means we could never fill up the whole dock with one good and the others would have no room. Ships don't have this property.

Why is this important? If we want to stock a ship with different goods, [Dump] would indiscriminately fill it up, leaving no room for other kinds of goods. This leads into the following point:

We have to choose between [Stock] and [Dump] depending on what we want to do.

- It is possible to repeat the same [Stock] command twice to get a loop effect. The good thing is that by doing this, the ship won't dump its jump fuel. It also won't indiscriminately fill up the whole ship. The bad thing is that the loop is all the ship can do, meaning we can't augment it with synchronization or resupply orders. Because of internal cooldowns, the time period between each restock interval is also longer, because the ship is switching between two orders.

- We've shown the problems with [Dump] already. However, with [Dump] + wait, and then instead of just null, we could make the pod reload itself at some depot, and then return to the dock, for fully-automatic resupply. Not possible with the [Stock]-styled loop.

Note:
- (v1.1) It is not possible to configure an auto-dispenser 'rack'. If an Ozias is docked to an equipment dock, TS's docked to it cannot run trade distribution. On the flipside, if a TS is already docked to the Ozias and it is running Trade Distribution, the Ozias will not be able to dock until the TS is undocked, which is never.
- [Unload] doesn't work with wait. Ship will wait to unload one time, and then move onto the next order, even if it just unloaded one good (what's the point of this?).

---

Let's set up the station case first, because it's easy.

Requirements
- 1x Equipment Dock (station)
- up 5x Owl TS (pods)

Our goal is to set up Trade Distribution in such a way that the pods will keep dumping into the equipment dock. As mentioned above, it is not possible to have the pods dump through an Ozias. For stations, it's possible to use either [Dump] + wait or a [Stock] loop. We'll use [Dump].

Trade distribution for Pod:
1. Dock - [Dump]. Wait == true 2. Dock - null

Exercise
- Can you make it a synchronized dispenser? Hint: Use different locks for different goods.

The way to automatically restock your M7Ms is to put Trade Command Software Mk 2 on them, so they actually have access to Trade Distribution order as well. Then simply ask them to [Fill] with the desired missiles with wait == true, and then null. Make sure to save the order. The ship will pull the entire stock of missiles from the equipment dock, and the pod will replenish, and the cycle repeats until the M7M is fully stocked.

I use this all the time, because the built-in resupply settings for drones, missiles, etc. have arbitrary limits. (Why are there such limits in the first place?) I shouldn't need to stress how useful this is, for stocking other wares such as drones.

---

Now for the ship.

This is what I wanted to do. For a Kyoto M2+, we want pods to automatically resupply it with e-cells, missiles, and drones. Frustratingly enough, this is not possible in v1.1.

We have to use [Stock] in order to not flood the Kyoto with just e-cells, for example, which precludes the automatic resupply bit. If we don't care about missiles and drones, only e-cells, then sure, we can use dump with wait, and then exit into the resupply order.

Using [Stock], the pods would automatically reload our drones and missiles as we use them, but we have to manually refill the pods ourselves. It's not the fully-autonomous command center I want it to be. The consolation is that first bit is cool enough as it is: our Kyoto effectively has as much storage as an Aran. It just deletes things with drones. Also, if your Kyoto is fighting all the time, then having control over when you resupply is a good thing. But you know what's better? Having both options.

As a compromise, we could use [Unload] + wait, and then set that order a hundred times, before transitioning into a resupply order. Well, in this case, technically we get automatic resupply, but the pod could be unloading when it's empty, and it's likely to resupply when it's not empty. It's fugly.

- Depending on how you use your Kyoto and how much risk you expose the pods to, I recommend either the Terran Mercator (1.2GJ, 90m/s, 20k cargo), or the Paranid Hyperion Vanguard (1GJ, 169m/s, 3.3k cargo), which doubles as M6 escort.
[Pattern] Simple Ship Buffer
Verified: Game version 1.1

If you're looking for an idealized buffer ship or monster freighter, sorry to disappoint you, but this is not possible due to the asymmetry between the orders [Stock] and [Fill].

Specifically, [Stock] reads the cargo level of the destination. [Fill] reads the cargo level of the current ship. To make a buffer, we need the ship to be able to pull from and push into the destination depending on how much cargo the destination has, in order to maintain stock at a fixed level, whenever other sources interact with the buffer. [Stock] lets us push, but there is no equivalent to pull with. And thus it is not possible to design an ideal buffer.

However, there's still a way to expand the storage of a ship in the manner that we've been describing, but we have to trade-off between buffer capacity, and latency + liveness[en.wikipedia.org]. Consider the following example. I'll use Typhoons again:

We have 11x Owls docked to one Ozias. Each Owl repeats two orders:

1. Ozias - [Fill] with Typhoons, up to maximum. No waiting. 2. Ozias - [Stock] with Typhoons {1}. No waiting.

What happens to the Ozias' cargo? The level of Typhoon missiles will rapidly fluctuate between zero, and the amount we choose to stock it with.

{1} Note that we could leave sufficient space for jump fuel. Now how much should we stock the Ozias with? Well, the Ozias has 50k cargo capacity. The Owl has 31k. An idea might be to stock the Ozias with 19k. This makes sure the linker ship (if we're using an Owl) always has space to dump an entire load into the buffer. However, if we're looking to take stuff out of the buffer, the linker ship would be competing with the pod Owls to [Fill], so it may have to wait a while. Now that we know this, since we have more trouble getting stuff out of this buffer design than getting stuff in, we should be stocking the Ozias with 31k (or whatever the maximum cargo is for our puller ship).

In fact this is the same reason why an Aran works better than an Ozias as a buffer, because of its 120k cargo capacity. We could set the pods to [Stock] it with 90k cargo, improving the availability of goods, thus shortening the mean pull latency for our buffer.

The buffer's performance (time-wise) is a complicated function of the Ozias' current / maximum cargo, the Owls' current / maximum cargo, how many buffer Owls we're using, and how many linker ships we are using, and what they're doing (pushing, pulling). If you really need to know, I suggest setting up a Monte-Carlo simulation.

Also, because this one single linker ship would be blocking the only available dock especially when loading, no other linker ship would be able to use the buffer in that time. Hence liveness would suffer. The obvious idea would be to reduce the number of pod Owls so we get more docking spots for linkers, and there's our trade-off for liveness.

This solution works, in theory. However, I don't find it very practical. It's very unfriendly if we're manually controlling the Ozias, because we'd have to wait for the Owls to randomly push or pull goods into it. I also find that my buffers don't need to move much at all, so I use station buffers instead. If we're looking to link different stations, see the pattern for high-speed OOS pipes.
[Pattern] Adv Ship Buffer (part 1)
When debugging this protocol, I realized that we're limited to only broadcasting messages, so the algorithm as written below will not work correctly as of version 1.1 I overlooked this fact during the initial draft.

Specifically, when the pods release the locks, we cannot make sure they go back to the mediators rather than being immediately snapped up by the other pods. We need unicast messaging for this but that's not gonna happen with how we're implementing our messages.

So if you didn't read the above, THIS ALGORITHM WILL NOT WORK CORRECTLY. Below was the initial draft. You're welcome to follow the logic if you want to grab some pretty interesting ideas, otherwise skip to Station Buffers.

---

After giving this problem some more thought when I'm not being distracted by happenings in SETA, this is the best ship buffer solution I can come up with. For practical purposes, I suggest just using the station buffer, but if you want to see how far we can push Trade Distribution, keep reading.

The key observation to make with regards to the simple ship buffer is that we do not know the intent of the linker ship that's interacting with the buffer. We were not given enough information for us to be able to act more intelligently. Let's fix that with a better algorithm.

I'm pulling out all the stops for this one, so I'll be introducing handshaking[en.wikipedia.org] in order to solve this problem using a full-blown communications protocol.

In order for this buffer to work correctly, linker ships interacting with it all need to obey protocol, or they can potentially break the entire system. This is not a weakness of this particular arrangement, but it is a property of concurrent programming. And bear in mind, we have severe limitations in terms of what we can do because we have to work within the confines of Trade Distribution. In particular, there's no way for us to eject a ship that chooses to block a dock permanently by breaking protocol. We don't even have a branch instruction i.e. IF-ELSE (!)

Single-port buffer
For this case, we have a single docking port dedicated to pulling, and another dedicated to pushing. We need one of each to prevent deadlock. These ports could be used by other ships such as fueler ships that don't care about protocol, as long as they have no potential of blocking it permanently, e.g. with a waiting order. Otherwise leave more docking ports open for them by using fewer pods.

The main difficulty is in setting up a protocol such that our storage pods are either empty or completely filled, except one. This is non-trivial without branch instructions. Recall the asymmetry between [Stock] and [Fill]. This is our way to get around the fact that we don't have control over how much [Dump] releases. If we always release a full pod, we know how much the pool contains, and then we could just re-store whatever that was left over. This is far from easy to set up and synchronize.

Limitations
- The I/O latency of the buffer is pretty high, due to the overhead of all the synchronization and locking.
- Ordering more than 1 push or pull linker to run the protocol is likely to deadlock the system. This is the user's fault, not the system's.

Requirements:
- 1x Goner Aran M1 (rack)
- 1x Argon Consus Armored Transporter TS (puller)
- 1x Argon Consus Armored Transporter TS (pusher)
- 1x NMMC Owl (push mediator)
- 1x NMMC Owl (pull mediator)
- 26x NMMC Owl (pods)

First, we encode our messages. Choose your goods accordingly so they don't conflict with your payload. For this example, we maintain Typhoon missiles as our payload:
- PUSH: Argnu Beef
- PUSH-ACK: Meatsteak Cahoonas
- PULL: BoGas
- PULL-ACK: BoFu

For our locks, we stick with Ice and Nvidium:
- PULL-LOCK: Nvidium
- PUSH-LOCK: Ice

The Aran has no orders. It's just a passive rack that can jump. It starts off empty.

Trade Distribution of pusher Consus. It starts off with 1x PUSH message (Argnu Beef) in cargo:
1. Aran - [Stock] 1x Argnu. Wait == true -- {signal: I want to PUSH} 2. Aran - [Fill] with 1x Cahoonas. Wait == true -- {wait for PUSH-ACK} 3. Aran - [Fill] with 1x Argnu. Wait == true -- {wait for PUSH-RDY} x. Aran - [Stock] with Typhoons. Any amount. No wait. {1} x. Aran - [Stock] with 1x Cahoonas. Wait == true -- {return ACK} -- I'm done here. Carry on. 6. (do whatever)

Because our messaging medium consists of physical goods in a common pool, we need PUSH-ACK to block PUSH-RDY.

Similarly, our Trade Distribution of puller Consus starts off with 1x PULL message (BoGas) in cargo:
1. Aran - [Stock] 1x BoGas. Wait == true -- {signal: I want to PULL} 2. Aran - [Fill] with 1x BoFu. Wait == true -- {wait for PULL-ACK} 3. Aran - [Fill] with 1x BoGas. Wait == true -- {wait for PULL-RDY} x. Aran - [Fill] with Typhoons. Up to Pod's cargo maximum. Wait == true {1} x. Aran - [Stock] with 1x BoFu. Wait == true -- {return ACK} -- I'm done here. Carry on. x. (do whatever)

{1} Notice the difference between the pushers and the pullers here. We want the puller to wait because there may or may not be a single pod that's trying to pull from the Aran's buffer.
[Pattern] Adv Ship Buffer (part 2)
I had to split this section into two parts because there's a word limit, apparently.

Anyway, that's the easy bit. Now, for our pods, we want them to alternate between a [Fill] state, and a [Dump] state, depending on whether they're full or empty. That part's easy enough to do. However, they cannot simply be filling or dumping all the time, because the solution would degenerate into the simple ship buffer.

This is where the mediators come in. These are two ships whose only purpose is to run additional logic to serve as gatekeepers. We need them in order to make sure the links are not competing with our pods for goods, or at least minimize it. The linkers talk to the mediators, and the mediators' jobs is to maintain proper lock state in order to get proper behavior our of our pool of pods. We need both mediators to run independently of each other, otherwise we could just run the logic inside the Aran.

If we were designing a normal communications protocol, I'd simply introduce a total ordering[en.wikipedia.org] to our pods to assign priority, but we have no access to such mechanisms here, so we have to innovate and make some compromises.

Trade distribution of Push Mediator. Starts with 1x Cahoonas (PUSH-ACK) and 1x Nvidium (PULL-LOCK).
1. Aran - [Fill] 1x Argnu. Wait == true -- {listen for PUSH} 2. Aran - [Stock] 1x Cahoonas. Wait == true -- {PUSH-ACK} 5. Aran - [Stock] 1x Nvidium. No wait -- {release PULL-LOCK} 3. Aran - [Stock] 1x Argnu. Wait == true -- {PUSH-RDY} 4. Aran - [Fill] 1x Cahoonas. Wait == true -- {reload ACK} -- Wait for push linker to finish. 6. Aran - [Fill] 1x Nvidium. No wait -- {retrieve PULL-LOCK}

Trade Distribution of pod Owl. Starts empty.
x. Aran - [Fill] 1x Nvidium. Empty state. Wait for {PULL-LOCK} release. x. Aran - [Fill] Typhoons up to max. Wait == true x. Aran - [Stock] 1x Nvidium. Release {PULL-LOCK}. x. Aran - [Fill] 1x Ice. Full state. Wait for {PUSH-LOCK} release. x. Aran - [Dump] Typhoons. Wait == true x. Aran - [Stock] 1x Ice. Release {PUSH-LOCK}

Notice that for the push mediator, we don't wait to retrieve our lock. This means if the pusher didn't give us a full load, now we've just set one pod to keep pulling until it's full. This pod is the only one that's going to compete with our pull linker. Actually this pod is the one that's going to get priority, because its location is more advantageous. It's pathological when our buffer has doesn't have much in it, but once we have a good number of pods to rotate around, it ceases to be an issue.

So, here's another quirk of our buffer: If our inputs are irregularly-sized, it still works. However, we get degraded pull performance. This is easy enough to mitigate. For the push linker, we could use an Owl and wherever it's filling up with Typhoons, use a [Fill] + wait for full shipments.

Trade distribution of Pull Mediator. Starts with 1x BoFu (PULL-ACK) and 1x Ice (PUSH-LOCK).
1. Aran - [Fill] 1x BoGas. Wait == true -- {listen for PULL} 2. Aran - [Stock] 1x BoFu. Wait == true -- {PULL-ACK} 3. Aran - [Stock] 1x Ice. No wait. -- {release PUSH-LOCK} 5. Aran - [Stock] 1x BoGas. Wait == true -- {PULL-RDY} 6. Aran - [Fill] 1x BoFu. Wait == true -- {reload ACK} 7. Aran - [Fill] 1x Ice. No wait -- {retrieve PUSH-LOCK}

Now let's check edge cases. What happens when we push into the buffer when all pods are full? Well, the push mediator would release PULL-LOCK, but no pod would take it because they're all waiting to unload. However, we designed our algorithm such that it won't block in this case. Hence the push linker just dumps directly into the Aran's cargo hold. If this persists, the Aran would fill up completely. It's how a buffer should work. It's also not difficult to see that we can still pull from the buffer without problems.

What happens when we pull from the buffer when all pods are empty? Well, the pull mediator would release PUSH-LOCK. However, none of the pods are ready for it. Since the mediator doesn't wait on the lock (so the algorithm doesn't block), it'll tell the pull linker to go ahead and pull. If there are any Typhoons left in the Aran's cargo hold, they'll get pulled. If there are none left, the pull linker will wait until the push linker comes with more Typhoons, at which point it will compete with one pod to fill up its cargo.

Whew!

Again, if you didn't read the first part, THIS ALGORITHM WILL NOT WORK CORRECTLY. I preserved the explanation, because it introduces concepts not used in other sections.

Multiple-port buffer
This is not possible because we have no construct to implement a logical OR with. Again, I'll point you towards the station buffer.
[Pattern] Station Buffer
If all we're looking for is a giant container for goods, here's how we can brute-force a buffer: Let's talk in terms of e-cells. One of my mid-sized factories has a capacity of 100 million e-cells. That's the equivalent of one thousand Arans' worth. The reason for that is because there are lots of factories in the complex. Many of them only run situationally, however all factories use or produce e-cells.

So here's the idea: We could complex together a ton of factories that either use or produce whatever it is that we want to store. Even if they're permanently shut off and they don't produce anything, we could certainly push and pull from them. It'll cost a ton of credits (we have practically infinite credits) and it'll cause fps issues when IS, but it'll work. However, it will not be able to move.

If we already have giant factories, it's probably easier and more efficient to just boostrap these new storage factories onto one of them, because we could then share the same jump beacon or other infrastructure. Another huge advantage is that we could just turn off our existing production to let the new ones take over until they could get upgraded to XXL themselves, for more compact storage.
[Pattern] High-speed OOS Pipe
The last remaining big problem to solve in logistics is that we simply want to move the biggest volume of goods between complexes in different sectors, as fast as possible.

The method is independent of your trade configuration. The most important observation to make here is that it is not possible to bypass the docking limit of 20 ships, because AI ships will not use freight drones. This also means it's meaningless to design schemes such as a super-transport Ozias or Aran fully docked with TS's that can move gargantuan volumes of goods, which happens to not be possible because this is the very definition of a high-capacity buffer.

The best thoroughput we can ever have, is by placing a jump beacon as close as humanly possible to the docking hubs we want to transfer freight between, and then make this a strictly OOS sector. OOS because ships skip the docking sequence, and also because otherwise we'd lose freighters in an instant due to collision. Afterwards, it's a matter of assigning freighters to the pipeline. Using Owls, 30k x 20 freighters is 600k freight volume in about a minute.

It works so well, in fact using 20 freighters is overkill for just about every practical application I could think of. This is assuming that we do other forms of optimization, such as localizing as much production in the native sector as possible, and we only ship output + excess energy. Also think about your topology, so for example, avoid having many factories dumping into a single one.

It's simple in concept, but getting a pair of jump beacons is the most difficult bit. Let me know if you find a way to bypass the docking limit.

---

I thought I should mention this: For energy, we always ship it in the form of crystals. XL SPPs consume 40 crystal (160 vol) to make 5530 e-cells, so crystals are 35x more compact. A single Owl ships 31,250 cargo, or 7,812 crystals, which makes 1.08 million e-cells. Another advantage is that we do not run the risk of shipping e-cells until we hit the minimum storage, which prevents ships from refueling.

It goes without saying that we never pipeline bulky ore or wafers, so I always base my production in ore-rich sectors, because there's just no good way to move ore. Drones are also a bit unusual in that they require wafers and not ore, unlike other equipment, so base their production in silicon-rich systems.
Specific applications
The following are example use cases for trade distribution that don't fall into the patterns for moving large volumes of goods.

Simple refueling station
A factory only has 20 docking clamps. It'd be a shame to waste some of those clamps just to let ships dock to refuel 200 energy cells. It'd be more efficient to use a single docking event to offload a freighter's full load to some other station, and have other ships refuel there, especially for a busy IS sector.

Requirements:
- 1x e-cell producing complex
- 1x Equipment dock
- 1x Station tanker TS

This one's easy. So the station tanker runs the following.
1. Equipment dock - [Dump] e-cells. Wait == true 2. Factory - [Fill] e-cells.

Notice the use of wait so we don't waste docking events. The tanker acts as a temporary storage pod. Use two tankers for even more capacity, but keep in mind the equipment dock only has 5 docking clamps.

Mass resupply / equip
- We have a dozen TLs (Atmospheric Lifters) jumping back and forth to upgrade or construct complexes. We want to quickly order all of them to grab 10k e-cells so we can resume construction.
- We have just ordered a batch of 10 capital ships from a shipyard. We want to outfit hundreds of such ships for OOS sector lockdown with minimal effort.

For the first case, I use the following:
1. Spacelab HQ - [Stock] 10k e-cells. No waiting. 2. Equipment Dock - [Stock] 1x of anything the dock doesn't have. Wait == true.

The second station + order is to simply free up the HQ's docks after the ships are done, so the others get to finish their order. I'm assuming we already have an e-cell supply line for the HQ.

For the second case, I'll use Megalodons as an example. First, dock a TS at the shipyard so we can pass the new ships jumpdrive installation kits and some e-cells via freight transfer. We then use the mass-upgrade ships option to give them basic software, which is all they need. Then simply run the following:

1. Equipment dock / HQ - [Stock] x7 2GJ. Wait == true 2. Equipment dock / HQ - [Stock] x36 PPC. Wait == true 3. Equipment dock / HQ - [Stock] x16 Flak. Wait == true 4. Equipment dock / HQ - [Load] x9999 e-cells. Wait == true 5. Equipment dock (dump) - [Stock] 1x anything the dock doesn't have. Wait == true

Again, I'll assume we already have supply lines or dispenser pods set up for the HQ / main dock(s). Note that the order is important for weapon slots for most ships. The result is that we'll have a whole bunch of M2s near the dump station, all ready to be grouped into fleets / wings, or to jump into any sector at a moment's notice.

---

None of the configurations we've seen so far look particularly complicated, and they shouldn't be. It's figuring out how we use them.
Appendix: Manual selling - the loophole
I investigated most of this in order to move high volumes of goods from my complexes, to perform manual selling (and stockpiling).

Manual selling uses a loophole in the game. Almost all actions in X3 take time and obey the universe's rules, however we as a player can do some special stuff. These have been around since X3 Reunion and every iteration since.

If you'd like to build and link together complexes formed of hundreds of factories churning out billions of credits' worth of goods every hour, this is the only way to get rid of the goods fast enough so the factories don't fill up and stop within a matter of minutes. It's not so much about the money than pushing the 'build' aspect of X3 to its limits.

There are situations where things happen instantly, without capacity limits, and we're going to make use of them all:
1. Buying ships at shipyards. Shipyards manufacture ships as fast as we could buy them.
2. Selling ships at shipyards. Shipyards instantly turn ships (and whatever it is in their cargo holds) into credits, without limit. Note: credits earned this way does not raise trading rank. But do you see the potential here?
3. Selling unstocked equipment at docks. If we sell something that the equipment dock doesn't stock, e.g. Boron weapons at a Teladi dock, we could repeatedly sell our entire stock of items until we run out. This does raise trading rank, but we will be clicking *a lot*, so unless we specifically want to raise trading rank, we use method 2. [1.2+] This method no longer raises trading rank?
Appendix: Intractability of the normal economy
Out of all the ways to make money in X3, all but manual selling is limited by the rate of consumption by the NPC-driven universe.

Station managers, Sector / Universe traders, NPC traders, they're all bound by the rules of consumption imposed by the universe.

We could keep adding to our Cahoona bakery to make it bigger, but soon, there won't be enough Argons in the entire universe to eat them all. We could diversify our goods, and we'd soon find that there aren't enough stations in the universe to eat them all. But does that stop us from building bigger? No!

You see, economically, the X3 universe is very simple. There are sources, and there are sinks. It's not so much an economy as a flow graph (which we bypass entirely).

Sources are where goods are created ad-nihilo. For our purposes, These are mines and NPC solar power plants, but if we want to be thorough, this also includes goods spawned in the cargo holds of ships. Sinks are where these goods are consumed or destroyed. Take a second to think about it: just how are goods consumed? We could certainly fire missiles and they'd be gone, but what about stuff like microchips? What about the stuff that was produced from those microchips? Does the chain end somewhere?

It's actually what the secondary resources exclusive to NPC stations are there for. NPC stations are not driven by profit. Their existence only depends on the fact that they are producing, so they're designed such that there is always some type of station that consumes some product, so there'd not be a build-up of any particular good in the universe. You'd notice that the Terran market is designed to work in isolation, so their exclusive wares (i.e. food) all loop back into their low-level products, e.g. Carbo Cake, Flavorings etc.

We can't do much about the sources; the number of asteroids in the universe determine how many mines we could build, and that number is more-or-less fixed. The sinks are the problem.

Instability: The GOD engine removes and adds stations depending on how much an NPC station is producing, so the sinks are not necessarily stable. We may be fully stocking an NPC station, but that says nothing about whether the station would actually manage to get rid of anything it's producing.

Asymmetry of scale: We only have 20 docking clamps per factory complex, but how many factories are there in the universe? We cannot simply spam freighters to service them all. If we spread out our factories to get more docking clamps, we start to need freighters in order to move goods between factories, which themselves need more docking clamps.

Cost: The stations are spread all over the universe, mostly tens of kilometers from jump gates. Our automated freighters take ages to reach them, and they have to compete with NPCs for fulfillment. Our factories wait for no one.

The Cahoonas wait for no one. Hence high-powered logistics and manual selling is the way to go.
Thanks for reading!
That's it for logistics for vanilla X3:FL.

If things change in future versions, feel free to let me know and I can update some stuff.
22 Comments
락스미스 6 Jun, 2022 @ 10:37pm 
dang, that's why my station profit goes to minus....
Thank you for the guide.
jimmy.cwl 11 Oct, 2021 @ 10:02am 
I just want to report, it all worked! Synchronized Dispensers to supply the Dock and Manual Trade Run to sell the goods.
Two things I want to draw attention to.
One, it's Fill that doesn't work with Wait. The ship take one load of goods and just leaves! Load is the one that waits until the full number of items is loaded onboard.
Two, DO NOT homebase the Manual Trade Run ship to the Dock that the MTR ship will buy from. For some unknown reason, this will result in the ship not buying certain products.
changtau2005  [author] 7 Oct, 2021 @ 11:06pm 
You will have to test that yourself. Whatever is in the guide has been validated at time of writing but I don't know if anything has changed in the intervening months.
jimmy.cwl 7 Oct, 2021 @ 7:22pm 
Thanks for the advice, I will try it out soon. Have to take care of a few ships first.
Before that, I am concerned about your remark that Unload doesn't work with Wait. Would Stock or Dump with Wait be able to put 1000 EBCs into the Dock 16 at a time until it's empty?
changtau2005  [author] 7 Oct, 2021 @ 11:26am 
Okay, I think I see what your problem is. The solution should be very simple.

Run at least two stocker ships using the synchronized dispenser pattern, but instead of transitioning to null, ask the dispenser to restock at your EBC factory to finish the loop. If you did it correctly there should always be at least one dispenser that's keeping the station stocked. That dispenser is the ship that currently has the synchronization good.
jimmy.cwl 7 Oct, 2021 @ 11:12am 
I need a way to keep the Dock stocked with EBCs for the Manual Trade Run ship to buy. The straightforward way would be to have a Stocker ship filled with EBCs docked at the Dock that puts EBCs in the Dock's EBC slot via Trade Distribution. But how do I keep the Stocker ship filled with EBCs from the complex when Trade Distribution won't transfer to docked ships?
If the Stocker has to go to the complex to get more EBCs by itself, eventually the Trade Run ship will come and find the Dock without EBCs and halt.
changtau2005  [author] 7 Oct, 2021 @ 8:40am 
I'm not sure what you mean. I haven't touched the game for a few months so my memory's a bit wooly.

If a ship that's running manual trade run is pulling from a station, all you need to do is keep the station stocked with EBCs by running trade distribution with another ship. There's no way you can do trade distribution + manual trade run on the same ship because the ship only takes one order.
jimmy.cwl 7 Oct, 2021 @ 8:13am 
Glad you liked it. But there is a matter I can't figure out yet. I can have a ship docked to the Dock that puts up EBCs to be sold via Manual Trade Run. But how do I keep this stocking ship supplied with EBCs? Trade Distribution won't transfer items to docked ships, so the stocking ship has to be supplied via the Dock in the same slot as the Manual Trade Run ship buys the item.

I can figure out how to resolve the collision problems this causes yet. Can you?
changtau2005  [author] 5 Oct, 2021 @ 10:42am 
@jimmy.cwl Thanks for the note about the manual trade run! That's certainly useful to know.

(Sorry this came late, I didn't subscribe to the thread)
jimmy.cwl 20 Jul, 2021 @ 9:50am 
One thing I forgot to add, set the selling price for the missiles at the PHQ to less than avg (which would be the price the Research Station would buy them at) or the ship won't sell.